OD Matrices
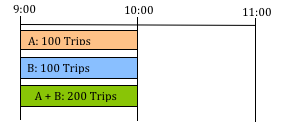
In a Scenario using an OD matrix-based Traffic Demand, the traffic to be simulated is defined by one or more OD matrices. Each OD matrix gives the number of trips between origin and destination centroids for a time slice vehicle type and trip purpose. The cell (i,j) of an OD matrix for trips contains the number of vehicles going from centroid i to centroid j.
Vehicles are generated at each origin centroid and fed into the network via the sections or nodes connected to the source centroid as ‘Generates to’ objects. Vehicles travel through the network following paths between origin and destination centroids finally exiting via the sections or nodes connected to the destination centroid as ‘Attracts from’ objects.
When a vehicle is generated, it is assigned to the sections and nodes connected to the centroid based on probability, or on the path to destination. Using the probability-based approach, proportion of vehicles taking each of the possible objects connected to the centroid is specified. Using the destination-dependent approach, Aimsun Next will allocate the vehicle to the object offering the best path to its destination.
Note that matrices with other kinds of contents (cost, travel times, distances, etc.) can be also defined in Aimsun Next, their format is the same regardless of the type of contents of the OD matrix.
An OD matrix is linked to a centroid configuration. Use the context menu of a Centroid Configuration to create a new OD matrix for it. The Centroid configurations folder is located inside the Demand data in the Project window or inside the subnetwork folder if the centroid configuration belongs to a subnetwork.
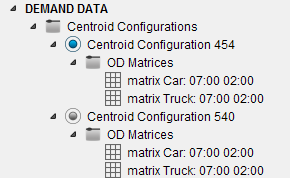
For every new OD matrix, its name will be assigned using the convention: ‘matrix vehTypeName: initialTime duration’ (for example, ‘matrix car: 07:00 02:00’). When any of these parameters changes, the name will be automatically updated, unless the OD matrix name has been edited, in which case the user allocated name will be retained. Auto naming will be re-activated if the user supplied name is deleted.
OD Matrix Editor
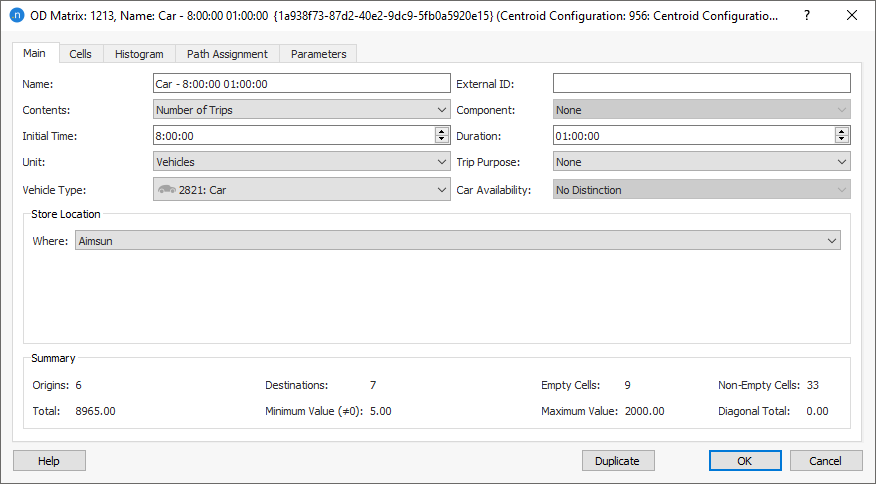
In the Main tab, contents, unit,, and time settings are specified. The Contents are the kind of data the OD matrix contains: trips, travel times, distances, etc. Contents are described below. In order to define the Traffic Demand, the contents of the matrices must be trips. Some dialogs will filter OD matrices by contents (for example, contents must be set to Maximum Deviation for the demand bounds in Static OD Adjustments). The Unit specifies whether trips are made by vehicles or individuals. Depending on the unit, a vehicle type (for vehicles) or transportation mode (for individuals) is specified. Moreover, depending on selected content other options are available, such as Trip Purpose, Component or Car Availability for four-step models.
Contents
The types of data that can be stored in an OD matrix, that is, the different options for Contents, are:
- Trips: The number of vehicle trips. Output from a Modal Split scenario, input to a static or dynamic scenario through the Traffic Demand.
- Cost: Mean trip costs. Setting the Component gives an additional description. These components are listed and specified in the following components section.
- Relative Gap (Dynamic Simulations): The RGap convergence criteria, broken down by OD trip generated by a Dynamic Scenario. Only dynamic simulations produce these matrices. For more information on the relative gap, see Relative Gap.
- Blocked Cells (Travel Demand Experiments): An OD matrix identifying cells which will be blocked from generating any trips in a Distribution Scenario.
- Maximum Deviation (OD Adjustments): Used in the OD Adjustment to constrain the change in trip numbers. See the documentation on the Static OD Adjustment, Static OD Departure Adjustment or Dynamic OD Adjustment.
Components
There are some predefined component names and also the user-defined function components will appear in the drop down list. They are described by area in the next sections.
Travel Demand Model Data
Costs matrices used in this area can refer to the descriptions explained next.
The following matrices are generated as output in the assignment scenario and are used as input in the four step model, distribution or modal split scenario:
- Travel Time: Weighted mean trip times.
- Distance: Weighted mean trip distances.
- Junction Delay: Weighted mean junction delay path costs.
Also there are matrices generated as an output of the assignment scenario, obtained from the evaluation of function components:
- User-Defined function component: such as the mean speed of a trip, output from an assignment scenario through function components. The function component outputs are those from the functions defined as Macro Function Components and called as components in Volume Delay functions and Junction Delay functions or a Turn Penalty functions. When an OD matrix contains contents corresponding to a Macro Component function, an extra field in the Component list appears in the OD Matrix editor, with the name of that function component.

Transit Data
The following skim matrices are generated by a Transit Assignment Experiment suitable for input to a Distribution or a Modal Split Experiment. These are the components of the overall cost of a transit trip.
- In-Vehicle Time: The time spent in a vehicle on a trip.
- Waiting Time: The time spent waiting for a transit vehicle.
- Walking Time: The time spent walking to and from transit stops.
- Transfer Penalty: The perceived costs which are used in a transit trip to choose between a trip with no interchanges and one with interchanges.
- Fare: The fare incurred on the trip, this is derived from the fares tables documented in the Fare Structures Section.
- Crowd Discomfort: The perceived costs due to overcrowding on transit services, documented in the Transit Assignment Section.
These skim costs are documented the Transit Assignment Section.
Dynamic Simulations Data
Dynamic simulations produce Trips, Cost, Distance, and Travel Time output matrices, containing the weighted mean values per OD pair. They also produce OD matrix outputs for function components, the usage is the same as with macro function components.
Units
Only available when the OD matrix contents are Trips or Costs. It describe what the trips are about.
-
Vehicles: The pair formed by a Vehicle Type + Trip Purpose constitutes a User Class.
-
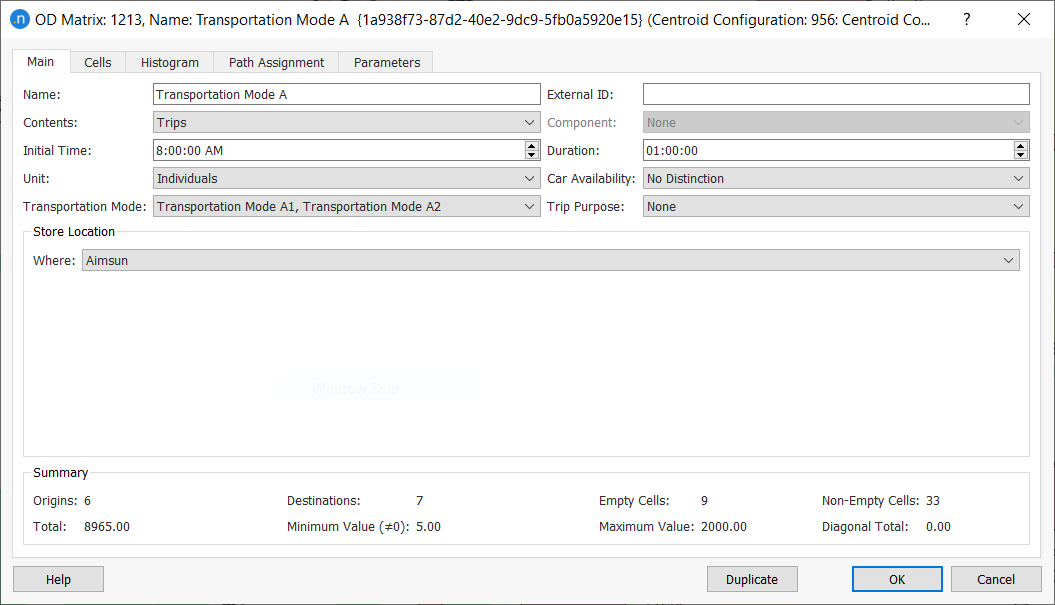
Individuals: The Individuals matrices are generated by the Distribution and refer to the trips made by individuals (not taking yet into account car occupancy rates, for example).
The Individuals matrix further specifies the travel characteristics of the individual travelers in the OD matrix, whether they have a car available and what mode of transport they might use.
OD Matrix Storage
The Main tab of the OD Matrix dialog summarizes the key parameters of the OD matrix and also contains the Store Location group window, which enables you to choose where the matrix is stored.
You can store the OD matrix in one of three places listed in the drop-down list labeled Where:
- Aimsun Document – in the project ANG file
- External File – outside the Aimsun Next project folder
- Project Outputs Database (Defined in Project Properties).

Aimsun Storage
Storing an OD matrix in Aimsun means that the matrix will be stored in the document with the rest of the model in the ANG file.
External File Storage
Storing an OD Matrix in External File means that Aimsun Next will load the matrices from an external location when required, reducing the memory requirements for large models and enabling integration with other applications.
You can select several formats when storing the OD matrix in an external file, as described below.
-
Aimsun ASCII: You must define the File path, the Field Separator (tab or comma) and the Centroid Storage ID, which is used as the ID for identifying the centroids in the ASCII file. For all centroids, the Centroid Storage ID can be the ID used by Aimsun Next, the External ID, or its Name. The format of the ASCII file is documented in the Copy and Paste Matrix Options section. Only the centroids' IDs and Trips information are stored in the ASCII file.
-
Aimsun Binary: The Aimsun binary format is more efficient than ASCII. It requires less disk space and loads faster than the ASCII format. You must define the File path.
- Visum: You must define the path to the Visum matrix file.
- SATURN: You must define the path to the Saturn matrix file.
- Emme: You must define the path to the Emme matrix file.
- OMX: You must define the path to the OMX file.
When storing the OD matrix as an external file, you still have the option to copy the matrix to the project folder (the equivalent of storing it to Aimsun as well). The box labeled Copy to Project Folder enables you to do this.

This option is ticked by default. If you keep this ticked and exit the dialog, the matrix is copied to the project folder and the path is updated.
If you do not want to copy the matrix to the Aimsun folder, untick this option. This will leave the matrix file in its external location.
Project Outputs Database Storage
Storing the OD matrix in Project Outputs Database means that the matrix will be stored in the database defined in the project's properties (to review them, select Project > Properties > Projects Outputs Database).
In the ID in Database field, select which identifier to use by clicking up or down in the adjacent spin box. By default, Aimsun Next will use the OD matrix External ID (if defined), the ID, or any number that you select here (1, 2, 3, etc.).

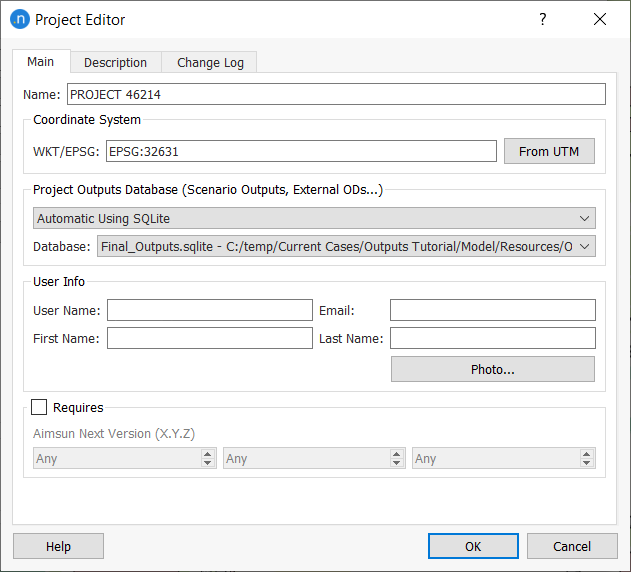
The source of the Database is listed on the Main tab of the Project Editor.
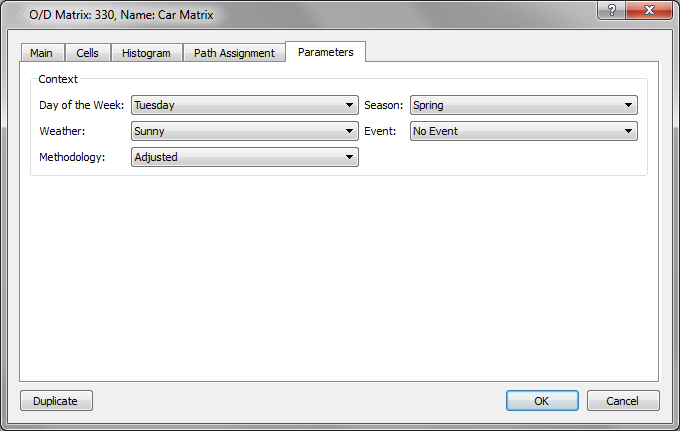
The information stored in the database is the OD matrix's initial time, duration, all trips, and any contextual parameters (Day of the Week, Season, Weather, Event, Methodology).
Information is stored in the tables: sim_odmatrix and sim_matrixtrips. Information about OD routes' assigned percentages is stored in the sim_odmatrix_route table.
When the Store Location is not Aimsun, that is, for both External File and Project Outputs Database, only the OD matrix location will be stored in the Aimsun document.
When the document is closed and opened again, Aimsun Next will automatically retrieve the OD matrix if the external file is found. Otherwise it will prompt you for the new location.
In either case, while the Aimsun document is open, you can reread the OD matrix information by clicking Retrieve.
Click Store and Store As... to save the current matrix information in the external file.
Automatically Relocate All Matrices
There are options in the Tools menu to internalize or externalize all matrices automatically with Aimsun Next selecting the filename and using the binary format.
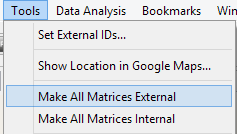
the OD matrix file name is: "matrix_%1.bin" where %1 is the UUID of the OD matrix.


Cloning External Matrices
When copying an OD matrix set as external, Aimsun Next will also copy the external file.
Removing External Matrices Files
In the Tools menu there is an action to remove orphan matrix files in binary format. This will ask for the folder where the matrices are stored and any matrix file without a corresponding OD matrix will be deleted.
OD Matrix Cells
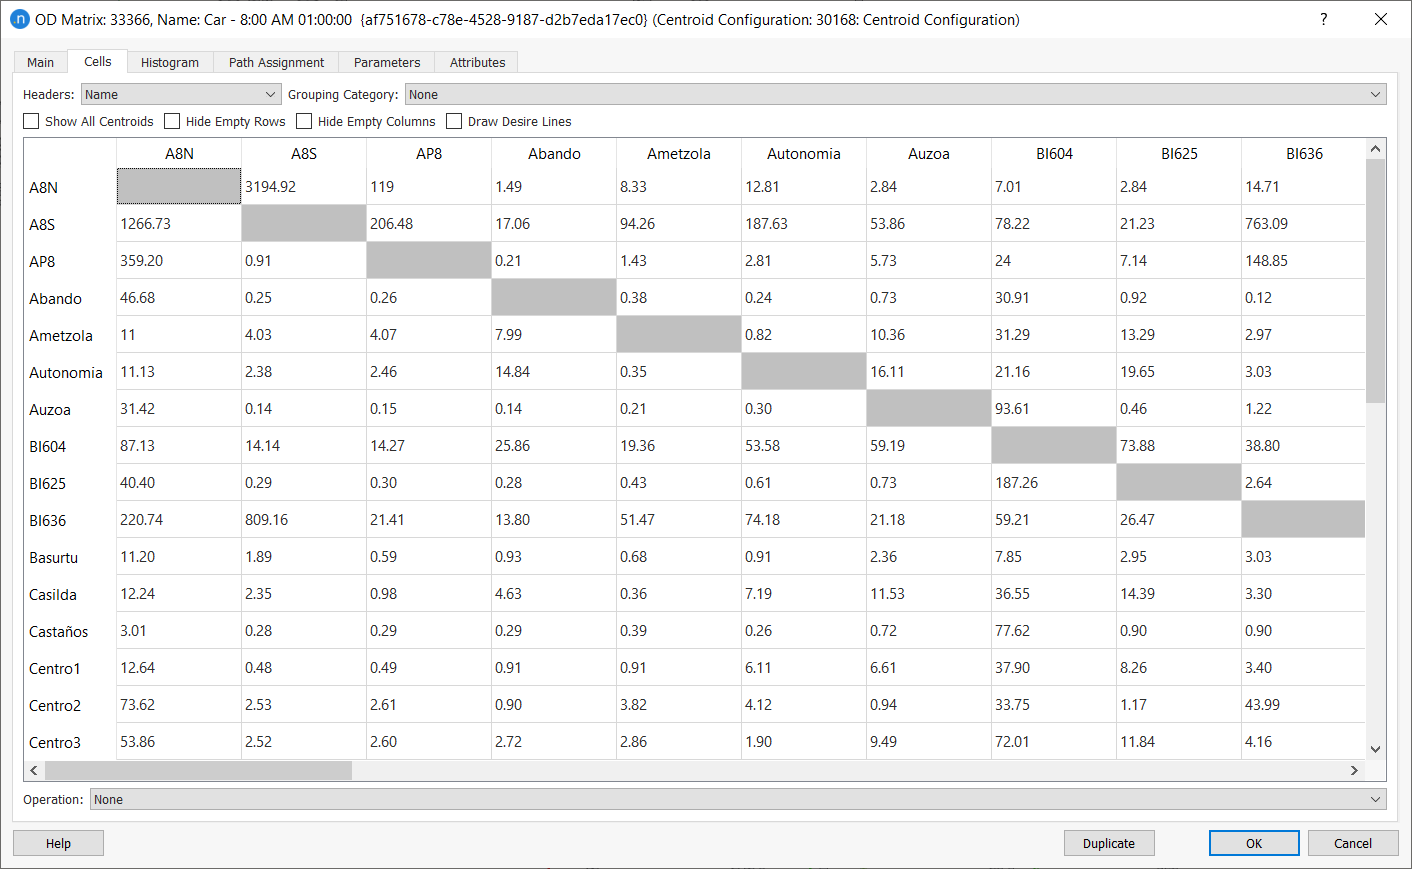
On the Cells tab, the number of trips (or any applicable data) from each origin to each destination is presented in the central part of the dialog. You can also edit a cell by double-clicking in it and entering new values directly.
While editing a cell, if the centroid configuration to which the OD matrix belongs is active, the origin (rows) and the destination (columns) centroids are highlighted in the 2D view. The primary color is used to highlight the origin centroid and the secondary color for the destination centroid.
From the Headers drop-down list, select an option for the row and column headers. You can choose from ID, External ID, Name, or various combinations of these. Columns and rows are labeled and ordered based on your choice.
From the Grouping Centroid drop-down list, select a Grouping Centroid to reduce the dimensions of the OD matrix while visualizing it. All cells in the same grouping will either be added or averaged, depending on the contents of the OD matrix, as described below.
For content types: Not Set, Trips, Parking Slots, Distribution: Through Trips, and Individuals, the sum is calculated for the aggregated cells.
For content types: Costs, Travel Times, Distances, Tolls, Speed, and Ratio, the average (not weighted) is calculated.
For Distribution: Blocked Cells, if one of the cells is blocked (has a value other than 0), the cell aggregated by Grouping Category will also appear as blocked.
By default, only centroids with entrance connections will be listed as origin centroids and only centroids with exit connections will be listed as destination centroids. To list all the centroids as origin and destination without considering their current connections, tick the Show All Centroids option.
Tick Hide Empty Rows and Hide Empty Columns to hide rows and/or columns that only contain zero values.
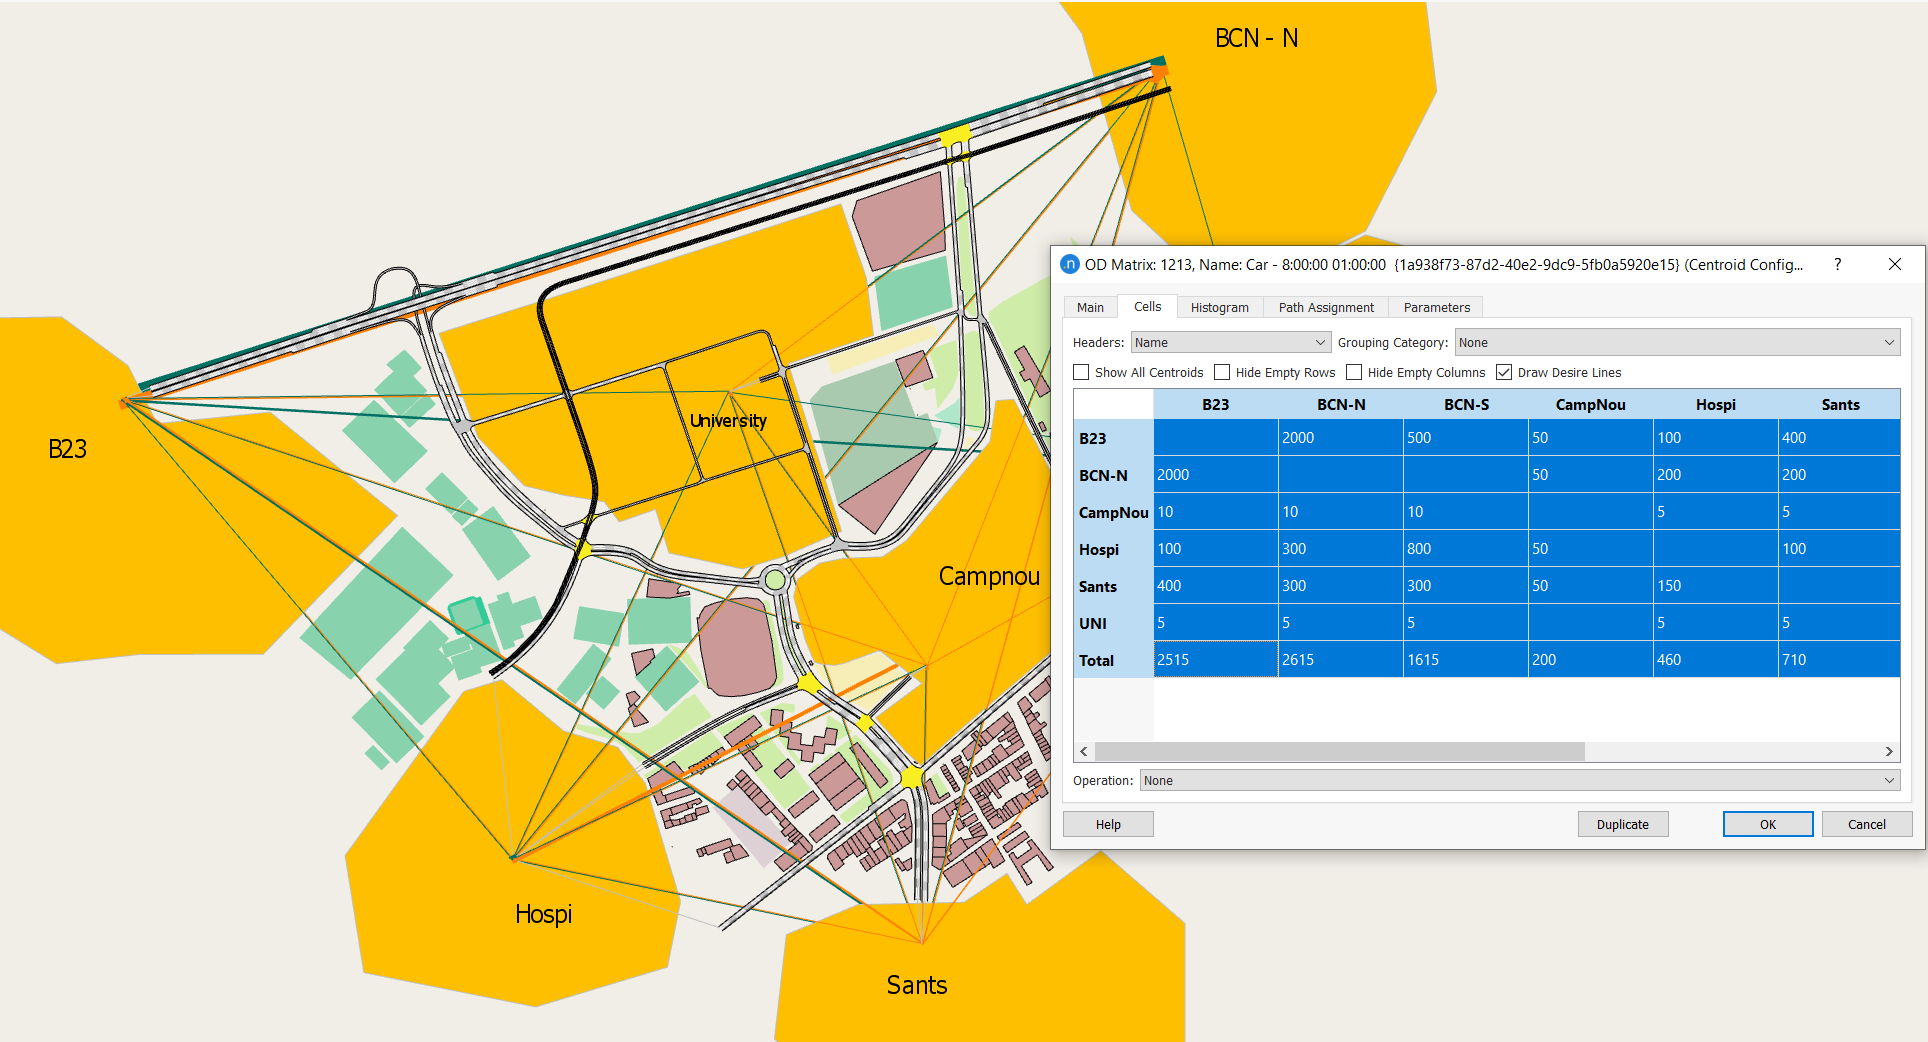
Tick Draw Desire Lines (desire lines indicate the demand flows from point to point, based on the values from a matrix) to display them in the 2D view. Desire lines will be displayed only for cells you have selected in the OD Matrix dialog. You can select between one and all cells.
This option is initially unticked because, if you have a large amount of cells in your matrix, drawing all the desire lines might slow down the performance of Aimsun Next. Make sure you select only the cells you are interested in, if they are a subset of all.
The screenshot below shows desire lines that have been drawn for a modest amount of centroids and cells.
Matrix Operations
The operations, available from the combo box in the Cells tab, are:
-
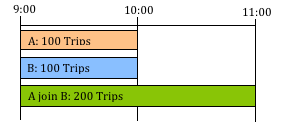
Join: to add another matrix to this one. This command modifies the original matrix. The join types are:
-
Concatenate: Adds the trip values of both matrices and adds the time durations.
- Add: Adds the trip values but the duration of the original matrix is not modified. The duration of the second matrix is not taken into account
- Split: Creates N new matrices dividing the number of trips among the new matrices. This command does not modify the original matrix.

If the option Split Duration is selected, the new matrices will have an initial time and duration automatically calculated to cover, as time intervals, the one from the original matrix. The duration will be split proportionally to the number of new matrices, not to their percentage.
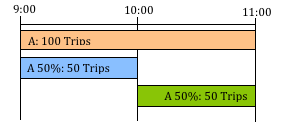
If the option Automatic Factor is activated, then the percentages will be distributed uniformly among all the new matrices specified.
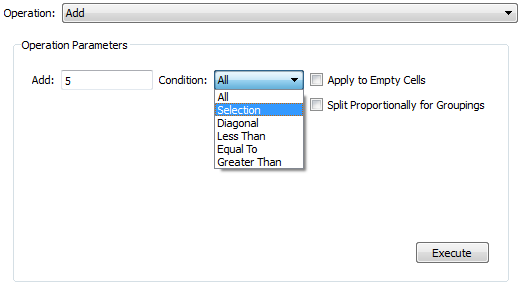
- Add: Adds trips to the cells of the OD matrix, either to all the cells of the OD matrix, to a selection of cells or by a condition. The option Apply to Empty Cells allows adding trips to the empty cells. When the option is not activated, the trips will be added to the cells with defined trips only (i.e., with a number of trips greater than 0). The option Split Proportionally for Groupings applies when executing the operation while a Centroid Grouping Category is being applied to the cells table. Then the added value is added to the grouped cells and split proportionally when back to showing all the cells in the OD matrix.
-
Multiply: Multiplies the trips in the OD matrix by a factor, either for the entire matrix, for a selection of cells or by a condition.
-
Transpose: Transposes the OD matrix or part of it.
-
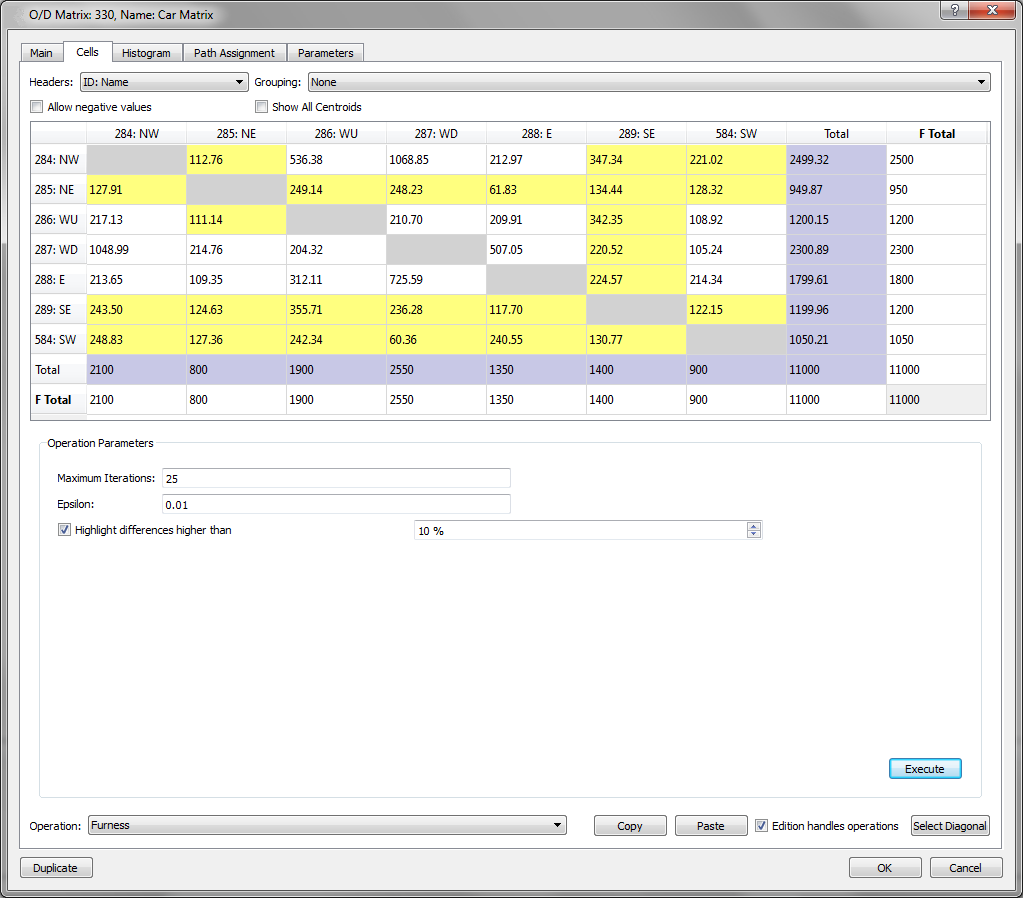
Furness: Balances the OD matrix taking into account new generation or attraction values in some centroids. After selecting Furness operation, as shown in the next figure, a new row and column will appear (F Total). These are filled with the new total generations and attractions that should match the Balanced Matrix after the balancing process. The total of produced trips by all the origins and the total of attracted trips by all the destinations must be equal.
The procedure will look for row and column multipliers that will be applied to cells in order to match the new row and column totals.
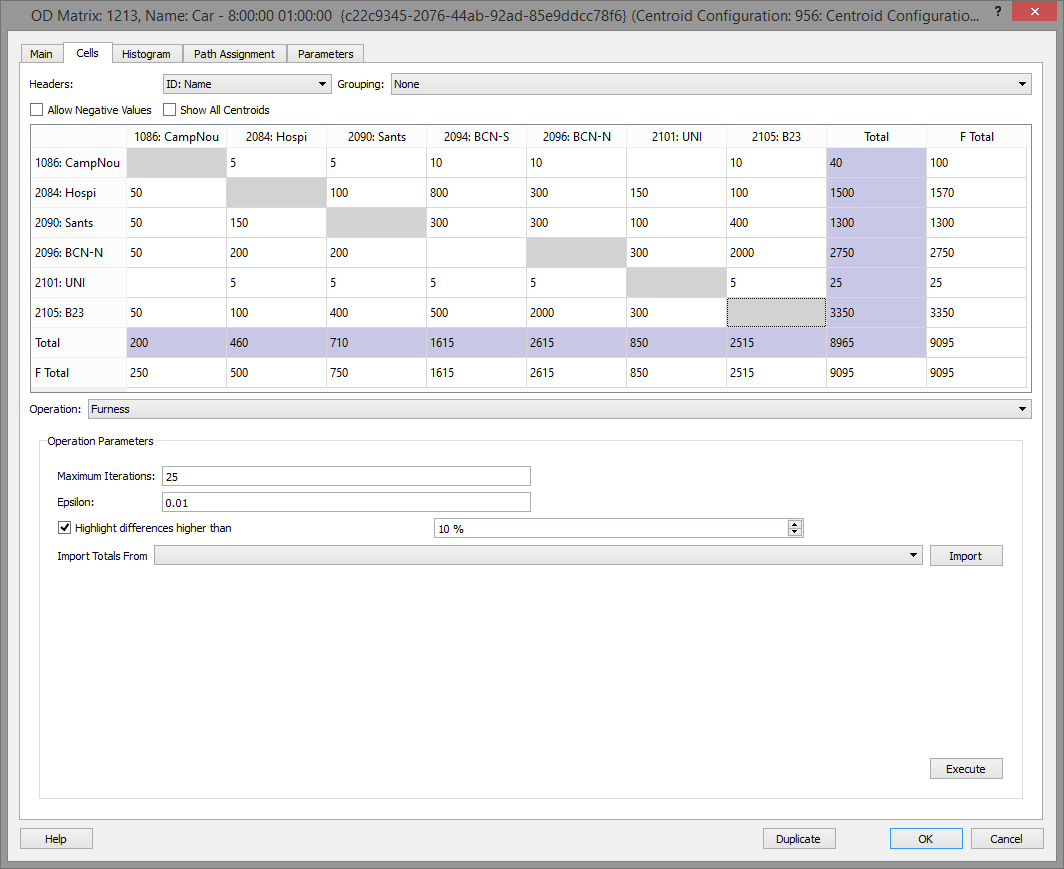
The stopping criteria for the algorithm are the Maximum Number of Iterations and Epsilon, the maximum relative difference allowed in multipliers between one iteration and the next one.
Changes in a cell value can be highlighted if they exceed a defined percentage, after the algorithm has been executed.
For more information on the Furness algorithm, refer to the Growth Factor Methods section.
As the Furness operation will overwrite the initial matrix, making a copy of the OD matrix before balancing is advisable, so both the initial matrix and the balancing matrix are kept. The resulting matrix is shown here.
-
Filter: Performs a filtering action (hide or highlight) on the cells of the OD matrix that match the comparison condition given.
-
Classify: Colors the cells of the OD matrix according to a range of values. These ranges can be calculated automatically or specified by the user.
-
Redistribute: An OD matrix has a specific cost distribution based on any of its corresponding skim matrices (for example, the OD distances matrix). After an adjustment, this distribution might have been distorted; it can be recovered by executing a Redistribute operation that will need the following as input:
- The OD matrix to be redistributed (Current) which is the currently being edited.
- Its current corresponding skim matrix.
- The original OD matrix.
- The original skim matrix.
The last two give the cost distribution to be recovered.
-
Correction: This operation will apply the same (multiplicative) changes to the current matrix that were made from an original matrix to a manipulated matrix (for example, an adjusted matrix) up to a maximum correction factor.
-
Cell-by-Cell Operations: adds, subtracts, multiplies or divides the cell values of the current matrix by the cell values in the specified matrix.
-
Apply Traffic Profiles: This operation will apply the traffic profiles selected per cell, obtaining OD matrices for each interval in the profile and with values multiplied by the percentage stated in the profile.
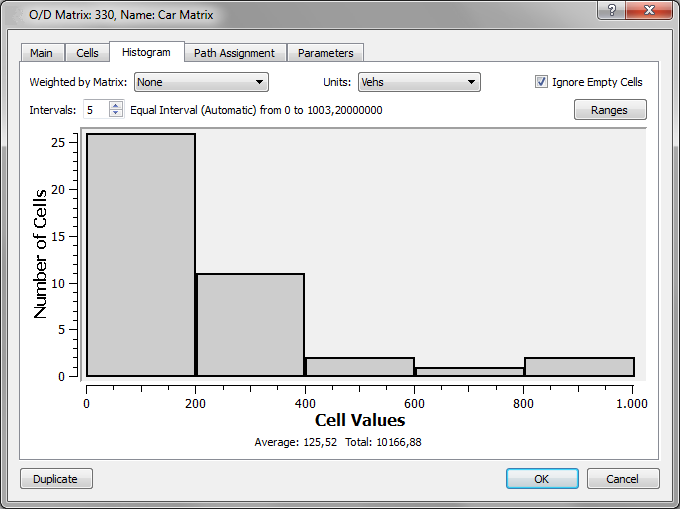
OD Matrix Histogram
In this tab, a histogram based on the cell values is available. The number of intervals and the ranges is configurable. The Units can be number of Vehicles, PCUs, or any of these two in percentages. Empty Cells (with a zero value) can be included or excluded from the plot.
By selecting a secondary matrix, the histogram will be calculated by weighting each cell by the corresponding cell in the secondary matrix (for example, a distance matrix weighted by the number of trips).
Path Assignment tab
In this tab, the percentage of use of the previously defined paths as well as the percentage for the ICSP (Initial Calculated Shortest Path) between a pair of OD centroids can be assigned. These values are used in route choice for Dynamic simulations. This information is only available for editing when the contents are Trips or they are Not Set.
To edit the path usage, select an origin and a destination centroid (or list all of them by selecting All) to list the paths defined for the OD pair. If there is no user-defined path, then only the corresponding ICSP will be shown. The percentage of use of each path in the current matrix is set here. The total sum of the percentages for each OD pair and cannot be higher than 100. The list of paths can be filtered by type (All, ICSP, OD Routes) and by percentage of use, showing the paths which have greater or equal percentage than indicated.
The next figure shows how to set 65% of cars traveling from centroid NE to centroid S to use one of the user-defined paths. The remaining 35% of cars will choose among that path or other alternative paths according to the active route choice function.
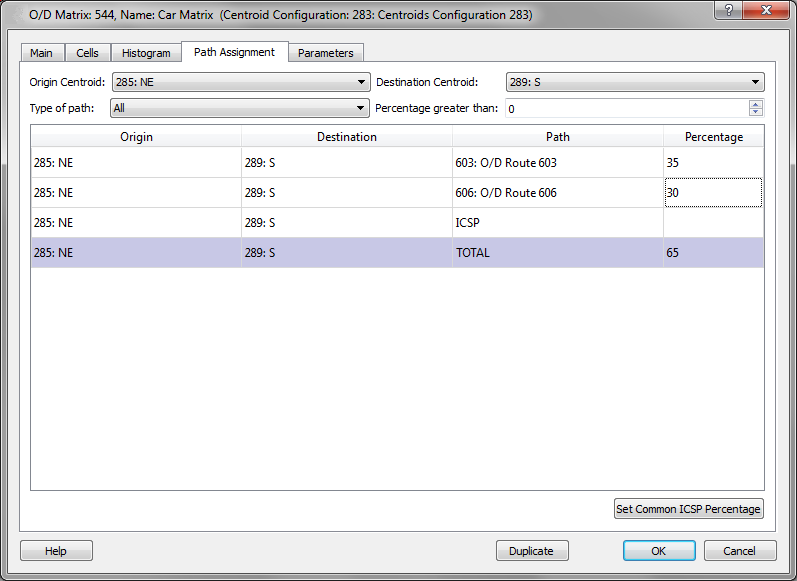
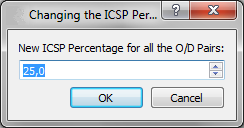
In this tab, there is also an option to set the same percentage for all the ICSP (Initial Calculated Shortest Paths) being currently shown. To do this, click on the Set Common ICSP Percentage button. A new dialog will appear in which the new ICSP percentage for the filtered OD Pairs can be defined.
Parameters
The editor has also a Parameters tab to define context data to classify the OD matrix. This context data is not used by the simulator but can be relevant for other functions.
Copy and Paste Operations
The OD matrix editor allows the interchange of data with other software using the copy and paste command.
To copy an OD matrix or a selection of the cells from Aimsun Next to any other software, select the desired cells and press Ctrl+C. The selection will be copied together with its ID context, that is, the ID heading, and the centroid ID for each row and column. When no cell is selected, the copy operation will copy the whole matrix.
There are two options to paste information into an OD matrix: with or without context.
When pasting without context, the paste data will be copied exactly starting at the currently selected cell in the OD matrix.
There are three types of context, which must be specified in the source table:
- id: The centroids ID will be used to locate a cell.
- name: The centroid name, used to locate a cell.
- eid: The centroid external ID, used to locate a cell.
When pasting with context, the context type must be specified in the heading (as in the excel example below and as bordered in blue in the OD dialog). In this case, the cells are identified by their context and the paste operation will automatically allocate data to the correct cells irrespective of the selected destination cell or the order of the cells.
Duplicate Matrix
The Duplicate button, in the bottom part of the OD matrix editor, can be used to create a new matrix in the same centroid configuration with the exact same data as the OD matrix that is being duplicated.
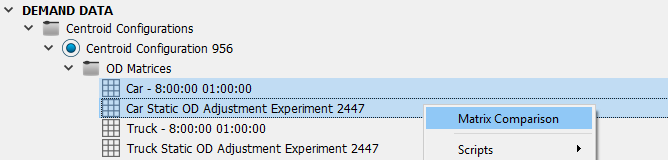
Matrix Comparison
Two matrices can be compared to reveal and analyze the differences between them. If two (and only two) matrices are selected in the project window, the context menu will contain a Matrix Comparison option. Matrices can be of any type, trips, costs, distances, etc. though only matrices of the same type should be compared. Additionally, an OD matrix can be compared to a Generation/Attraction vector.
Select two matrices, either by SHIFT and click to select adjacent matrices or CTRL and click to select two individual matrices. Right click and select Matrix Comparison in the context menu. If an OD matrix and a Generation/Attraction vector are selected, the context menu will show Matrix – GA Vector Comparison
The Matrix Comparison dialog shows the difference between the two matrices, cell by cell, as an absolute value and a relative percentage. Selecting a line in the table highlights the origin and destination centroids. The Matrix – GA Vector Comparison dialog, however, shows the difference between the OD matrix and the Generation/Attraction vector, where the selected line compares the total values generated or attracted by a centroid.
If a Centroid Grouping Category with Groupings has been created, the differences can be aggregated by Grouping pairs, that is, by comparing the two centroid vectors aggregated by Groupings in that Grouping Category.
Results can also be filtered by Grouping, to show just those centroids inside that single centroid grouping.
The results can viewed as a graph and can also be exported for further analysis as a table or as an image of the graph.

OMX Format Support
Aimsun Next can read and write matrices using the OMX file format with the following limitations:
- When making an OD matrix external, we will store the OD matrix data using its UUID, under the /data group.
- When importing matrix data, the name of any matrix table under the /data group must match either the OD matrix UUID or its External ID. Matching provides the ability to import multiple OD matrices using the same OMX file.
- When importing, attribute SHAPE defines the size of the imported matrix.
- If the optional /lookup group exists, Aimsun Next will use it to map data to centroids, either using UUIDs or External IDs. If there is no lookup data, the importer will try matching cells position (from 1 to SHAPE) with the centroids External ID.
Aimsun Next will report errors and warnings in the Log window while reading OMX data.