Four-Step Process
The Four-Step Model Scenario and Experiment dialogs are used to connect the different processes involved in a Four-Step demand modeling project.
Four-Step Model Scenario
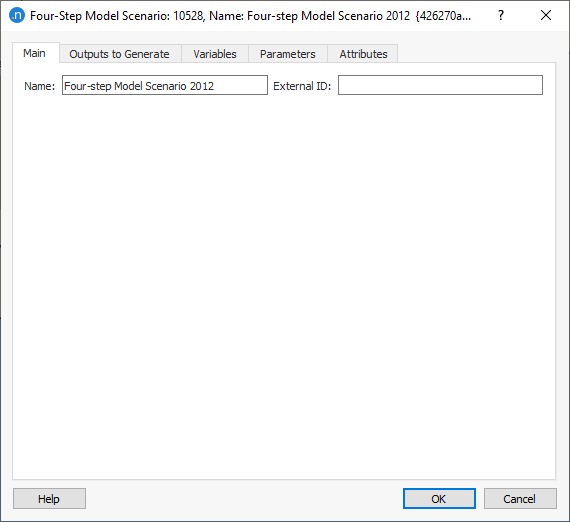
The Four-Step Model scenario contains only the basic scenario information.
To create a new Four-Step Model scenario, select New > Scenarios > Four-Step Model scenario in the Project Menu. If you are working on a subnetwork, the new scenario can be created from the subnetwork's context menu. The minimum requirement for a Four-Step Model scenario is a base transport network and a traffic demand.
The Scenario context menu has options to Activate, Delete, Rename, Duplicate or open the Scenario Properties editor.
When selecting Activate from a scenario, it is activated this scenario in the task tool bar area. Automatically it is activated the first experiment.
The scenario editor is divided into several tabs which describe what is to be simulated, the outputs to be collected, the variables used to modify the scenario, and some parameters to describe the scenario.
To use geometry configurations in a Four-Step scenario, these should be activated in the boxes (scenarios) linked to the Four-Step model in the canvas at experiment level.
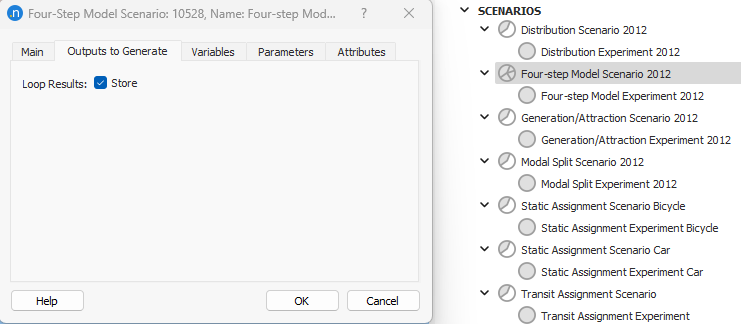
To store the Four-Step Model Loop Outputs in the database, the option Loop Results in the Tab Outputs to Generate must be activated.
The Four-Step Model experiment holds the diagram describing the inputs, links, processes and outputs of the Four-Step model.
Four-Step Model Experiment
To create a new Four-Step Model experiment, select New Experiment from the scenario context menu.
The Experiment context menu has options to Activate, Delete, Rename, Duplicate or open the Experiment Properties editor.When selecting Activate from a Experiment, it is activated this Experiment in the task tool bar area with the parent Scenario.
A new four-step model experiment contains an empty canvas. The canvas is filled with boxes which are linked to the steps in the four-step model and represent either data or experiments with inputs and outputs. The outputs of one box are connected as inputs to another box to represent the data flow in the four-step model experiment.
New boxes are created by right clicking on the canvas and choosing the box type from the drop down list. The outputs of each box are connected as inputs of the next box by drag and drop from the output slot of one box to the corresponding input slot of the next.
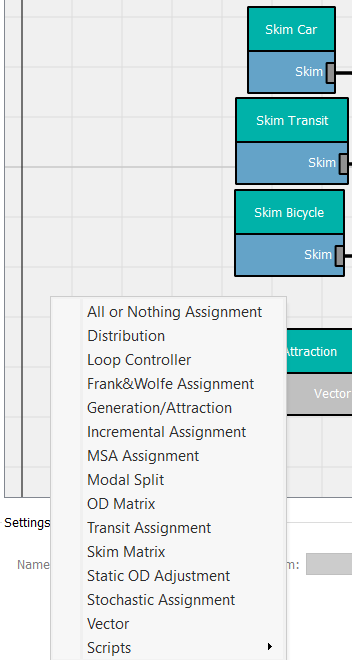
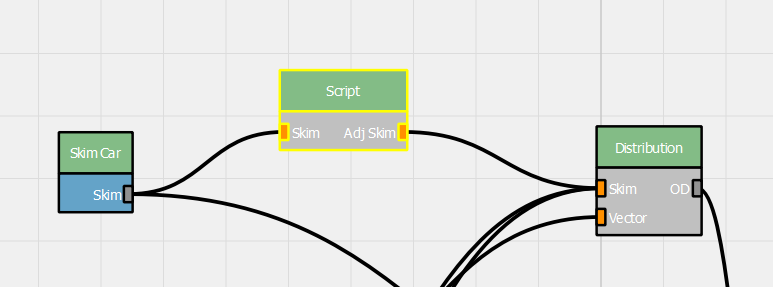
Each box (except for the loop controller) must be associated with an item from the Aimsun document. This can be either an input (skim matrices, G/A vectors, trip matrices), experiments (G/A experiment, Distribution experiment, Assignment experiment...) or a script. The data or experiment associated to a box is done in the Settings part of the experiment, with the box selected. The figure below demonstrates linking to either a data source created in the project (left, the initial car matrix is shown) or an experiment (right, the distribution experiment is shown).
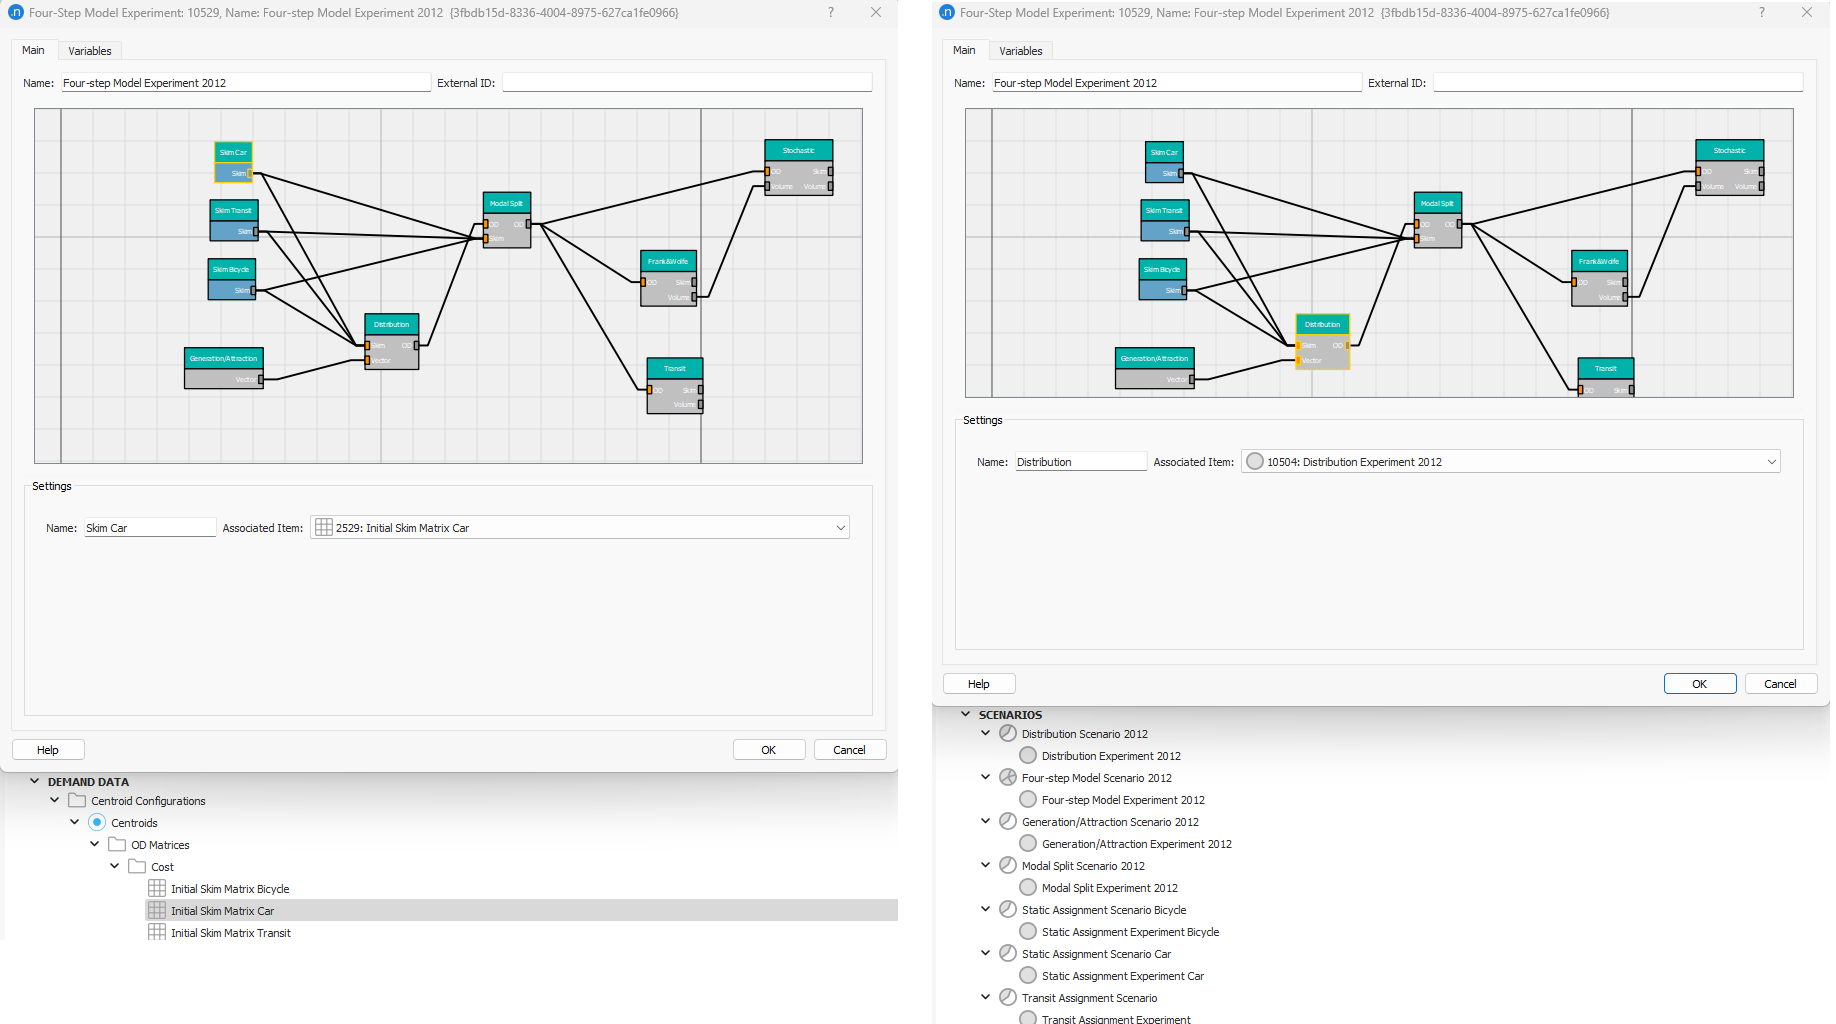
An experiment should only be used in one Four-Step Model experiment. For each of the selected experiments, the storage of results in databases or files must be active, otherwise the Four-Step Model experiment will throw an error when it is run.
A box can be displayed in three different colours related to the state of the associated results: - Gray: no results are available. In other words, it has not been executed successfully yet or results have been deleted. - Black: the results are available but not retrieved. For instance, the .dis file (Distribution Expperiment) has been generated but results are pending to be retrieved. - Blue: the results are available and have been retrieved.
Double clicking on the top part of the box will open the Scenario to which the associated experiment belongs; double clicking on the lower part of the box will open the associated Experiment.
Right clicking on a box, brings up a menu which includes the following actions (which actions are available is dependent on the type of box and its status):
- Execute this Box: Discards only results of the selected box and executes only the selected box. In case there any upstream boxes of the selected box that have not been executed, it will execute the pending for execution boxes.
- Execute from this Box Onwards: Discards results of the selected box and the boxes downstream to it. It executes the selected box and the downstream boxes. In case there any upstream boxes of the selected box that have not been executed, it will execute the pending for execution boxes.
- Retrieve Results: Retrieves the results in the database. The experiment is opened by double clicking on the lower part of the box to see the retrieved results. Outputs for an experiment in any of the boxes are not generated unless results are retrieved and the user generates them from that experiment editor.
- Delete Results: Deletes the results of this box and all downstream box from the database and resets the status of the experiments to pending status.
- Delete Box: Deletes the box from the four-step model experiment.
Clicking on a connection shows in Settings which outputs will be passed to the connected box downstream when executing and allows the user to configure them.
- For the connections coming from an OD matrix slot: specify which of the OD matrices, based on their User Class, time intervals,... are to be passed on to the next box.
- For the connections coming from a vector slot: specify which of the vectors are to be passed on to the next box.
- For the connections coming from a skim matrix slot: specify which skim components, user classes... are to be passed on to the next box. Skim matrices for all the Function Components will be calculated and made available in the OD Matrices folder if the Generate checkbox is ticked in the scenario.
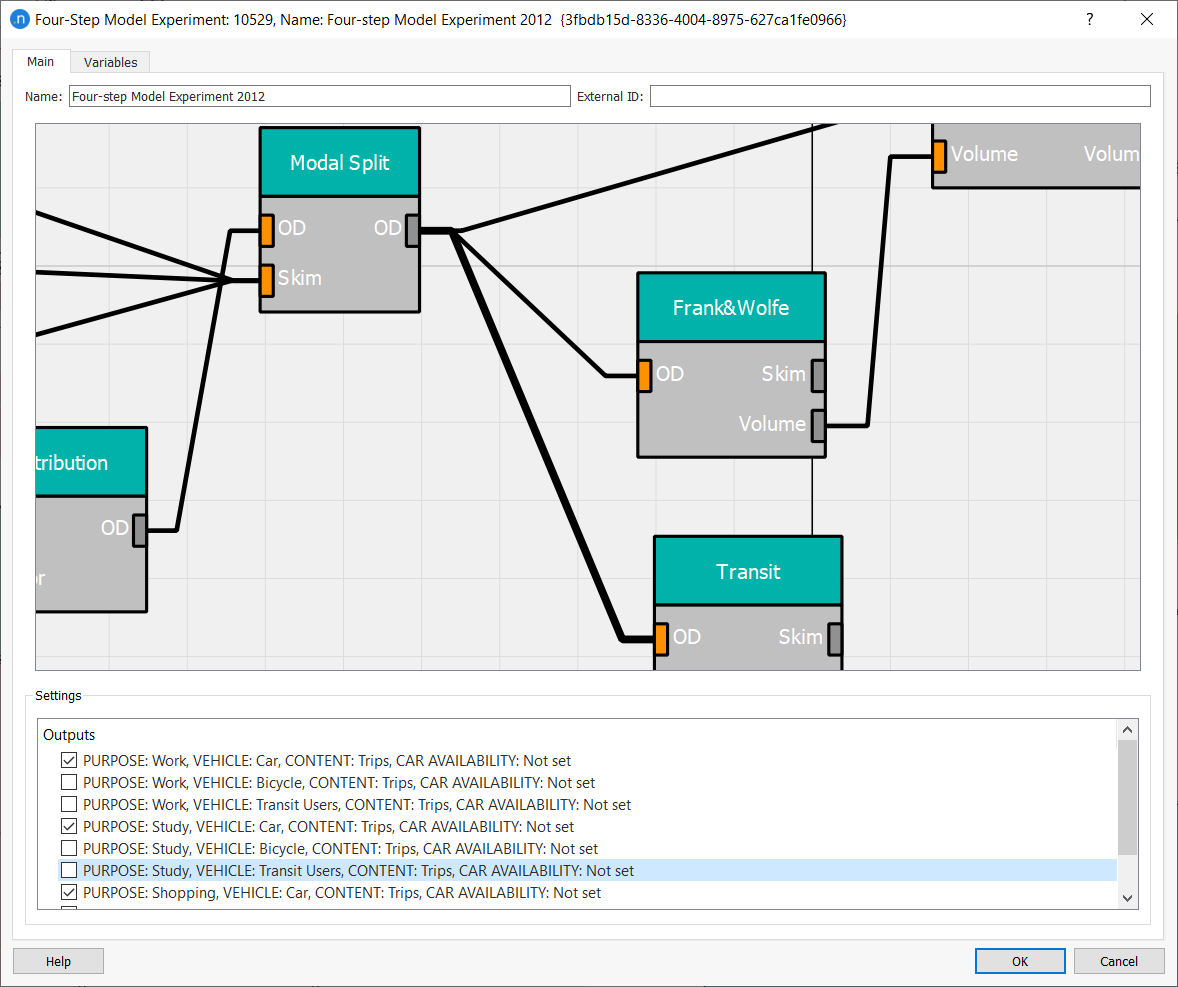
To run the complete diagram, right click on the Four-Step Model experiment in the Project window and choose Run Four-Step Model. This will delete all previous results and will re-run the complete diagram.
To delete a box or a connection, select it and use the Delete key to remove it or select the Delete Box / Delete Connection option from its context menu.
Script Box
A script box can be used to incorporate custom or external processes into the work-flow. To include a script box in the diagram, first create the four-step model script. Then add a new script box by right clicking on the canvas and select the desired script.
The input and output slots of the script box are defined in the script. This is done in the input and output functions which return a list of input or output definitions with:
- internal name
- external name
- required or optional
- slot contents: vector, matrix...
The input and output functions are run once as the box is created to configure it in the four-step model canvas.
A script can modify data between two processes, or can be used to report on the four-step process at points within that process.
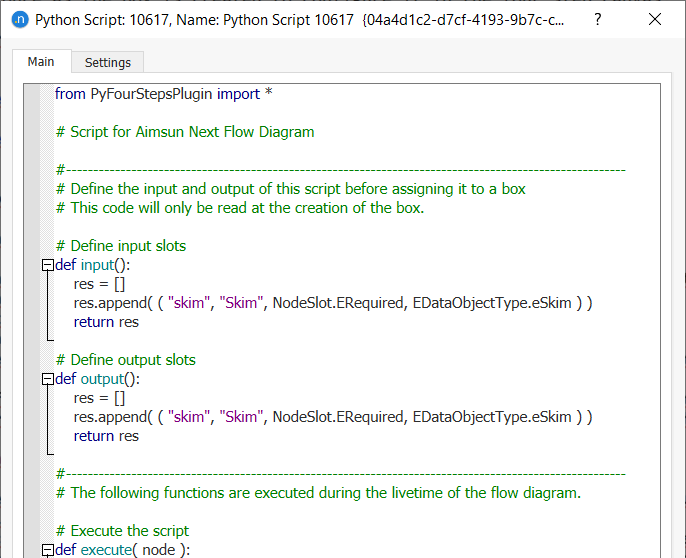
During the execution-cycle of the script box the following functions are called:
- setSlotOutputElements: which sets the output elements for the slot in the. These output elements describe the objects that will be produced as output after the box execution and will be listed in each of the output connections when connecting the output slot of the box with the next input slot.
- execute: which executes the actual process, this is only performed once in the work-flow
- loadData: which puts the data of the process into the output slots, this is performed every time the output of the box is being accessed. If the output elements (GKObject) are temporary objects, these objects are deleted after each access.
- deleteData: removes the process output if the delete results of the box is called.
- isReady: indicates if the process has outputs available.
- compatibleConnections: is called before the execution of the work-flow to check if all inputs are properly defined
When a new four-step model experiment script is created, these functions will be defined in the script skeleton. Double clicking on the script will start the Python Script editor to edit and debug the script.
Loop Controller Box
A Loop Controller box is used to create and execute iteratively a set of boxes forming a cycle. Their main usage is refining the OD and Skim matrices obtained from the Distribution and Modal Split steps and the Assignment step respectively. In particular, the Loop Controller checks whether the stopping criteria have been satisfied or not. If satisfied, the loop finishes and all the downstream boxes are run once more. If the stopping criteria are not satisfied, the Skims are passed to the connected boxes and a new iteration begins.
This Box is defined by selecting the Loop Controller option when creating a new box in the four-step model experiment canvas, and only one Loop Controller can be created for one Four-Step Model experiment.
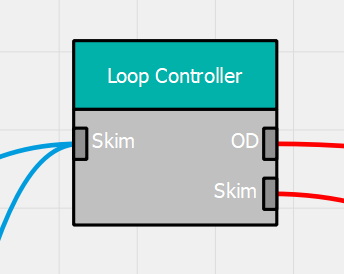
The red connections are the inputs for the Loop Controller box and they can be connected from Assignment or Adjustment for skim matrices, and Modal Split boxes for OD matrices only. Any other option is inconsistent and, therefore, not allowed.
The blue connections represent the outputs for the Loop Controller box and they can be connected to any Box that requires Skim Matrices, mainly Distribution and Modal Split boxes.
However, the connections of the Loop Controller box are not always active. They are only active inside and after the loop. To exemplify this, let us assume we have the following scheme:
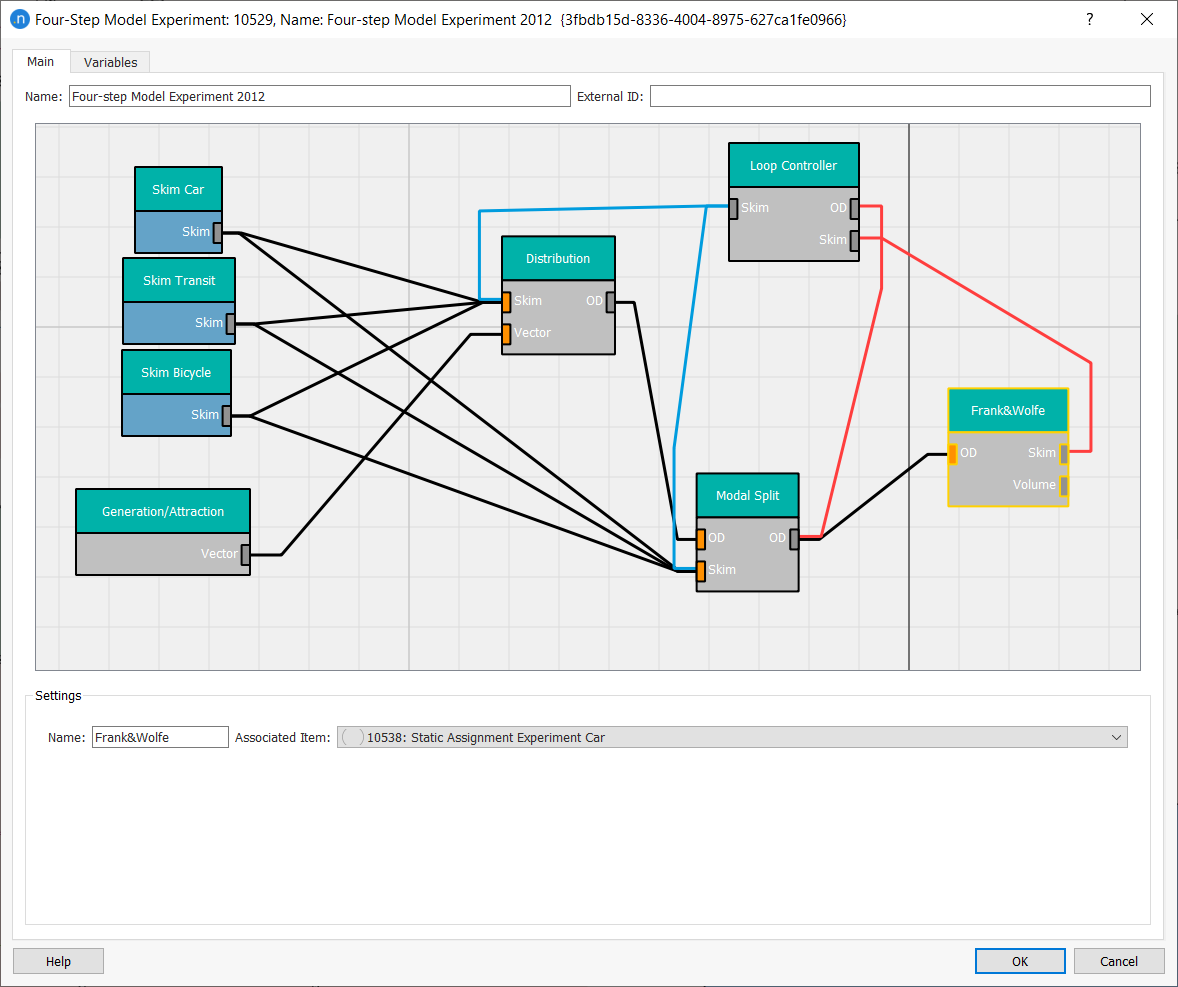
In the previous scheme the skims used for the first time in the Distribution are those from the boxes "Skim Car", "Skim PT", and "Skim Bicycle". After activating the loop, the skims used for cars will be those from the "Frank & Wolfe Box".
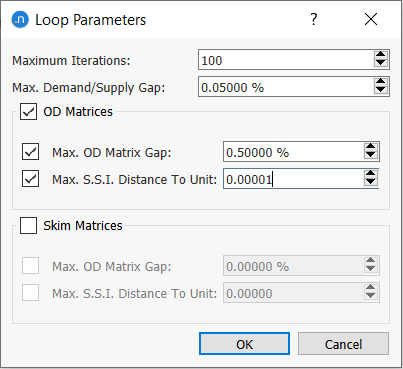
Modify the stopping criteria of the loop by double-clicking on the Loop Controller and set the values and checkboxes as you desire. There are at least two compulsory conditions and four optional ones.
-Maximum iterations: maximum number of iterations done by the loop. If this number is reached, the loop will stop.
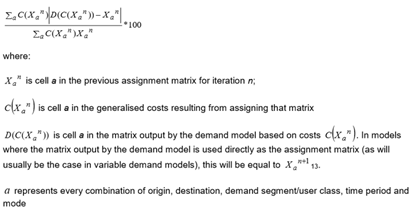
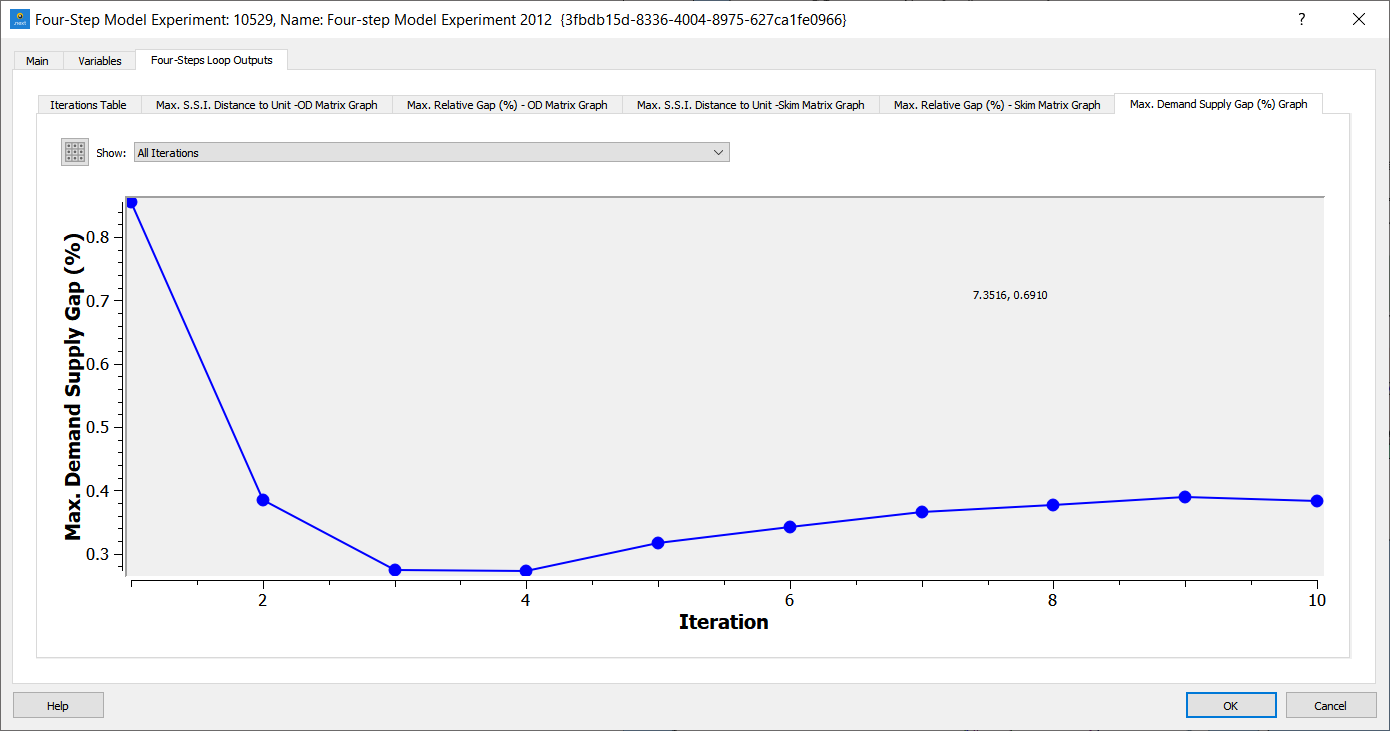
-Max. Demand/Supply Gap: an aggregated measurement of how refined are the skims and ODs. It is calculated as:
-Maximum OD Matrix Gap: the maximum Relative Gap (purpose, modes, contents, …) of the current iteration compared to those of the previous iteration (optional for OD matrices and for Skim Matrices)
-Maximum S.S.I Distance to Unit: comparison of structure similarity between matrices of the same type (purpose, modes, contents, ...) of the current iteration compared to the ones of the previous one. The ideal value of the Structure Similarity Index is 1, so the deviation from this values measures how different is the structure of the matrices. (optional for OD matrices and for Skim Matrices)
The loop will stop when either the maximum number of iterations is reached or when the rest of stopping criteria are all fulfilled.
Finally, after executing the loop, you can check the stopping criteria and the evolution of the loop execution in the tab Four-Step Model Loop Outputs in the four-step model experiment editor.
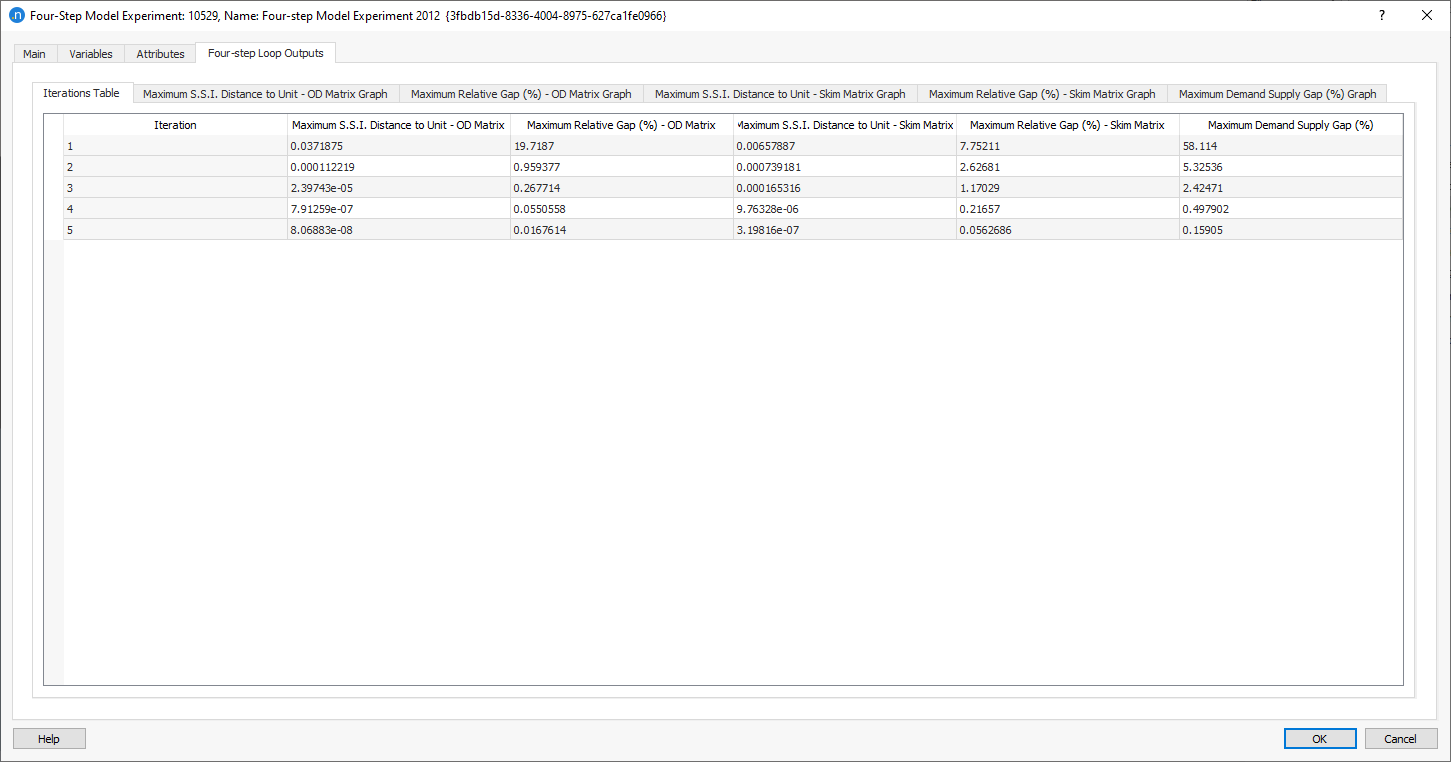
Note that to store Loop Controller output in the database, the option Loop Results must be activated in the Scenario. This option allows the user to restore the Four-Step Model Loop results from the database anytime. The corresponding table with results can be found in the Output Database description.