Yunex Yutraffic Office Interface
Yutraffic Office is a modular software suite from Yunex Traffic which provides tools for traffic management based on a shared database of network assets and traffic data. Yutraffic Office provides workflow tools for integrated junction design, route planning, and network management.
Yutraffic Office also integrates tools for dynamic signal actuation and co-ordinated signal control across junctions.
Yutraffic Office can export its data to Aimsun Next to create an Aimsun document describing the traffic network, the control systems, signals and detectors within it, the transit lines and the traffic demand, and also set up a scenario and experiment to run the model. When the simulation models in that document are run, dynamic signal control from a Yunex PDM controller is included as a "Hardware in the Loop" (Hil) simulation and the effect of that control, and the effect of changes in demand or junction layout can be studied.
More information on Yutraffic Office is available from Yunex Traffic. Sometimes the owners of websites change the location of their files, so in the unlikely event that this link doesn't work, please visit www.yunextraffic.com and search for 'Yutraffic Office'.
Adapter Installation
The Yutraffic Office uses an adapter software to link Aimsun Next to a control program configured for the junction being simulated. The communications sequence is:
Aimsun Next <--> Adapter <--> Junction Specific Control
Hence a pre-requisite to using Aimsun Next with Yutraffic is to first install the Yutraffic Tools Aimsun Adapter (SimAdapter). This provides the generic link, for all projects, between Aimsun Next and the controller specific executable generated in the Yutraffic Office export process. It is available for downloading from here.
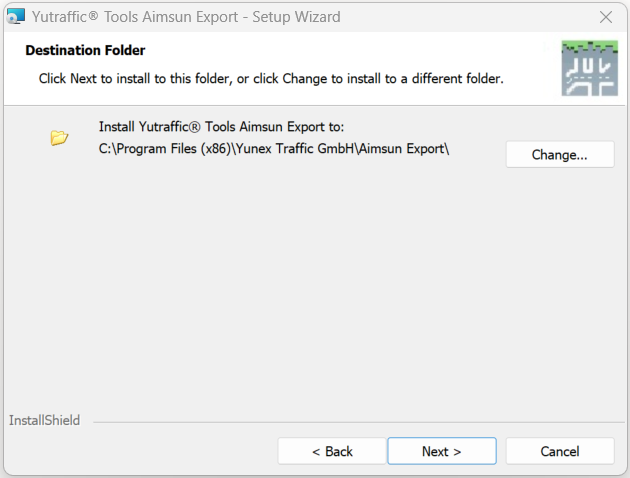
This installation is only required once, when the Yutraffic capability is installed on the workstation, and includes both the adapter program and the export wizard.
The default location used in the adapter installer and in the imported model is C:/Program Files (x86)/Yunex Traffic GmbH/Aimsun Export/Bin. In order to set a different path, open Aimsun Next without loading any document, go to the System Preferences and set the correct path to the adapter program which passes data between the simulation and the Yutraffic controller emulator.
Project Workflow
The workflow required to run a simulation with Aimsun Next from a Yutraffic on a junction held in Yutraffic Office with a Yunex PDM controller is:
- Export the junction from Yutraffic Office to Aimsun Next. This creates: a. An exported file describing the junction and the traffic demand. b. A Windows EXE file with an emulator of the PDM controller as specified in Yutraffic and the required configuration files.
- Create a new Aimsun Next project and import the Yutraffic network description (SAC file).
- Configure the graphical and protocol view for the controller at that junction.
- Add the OCIT information to the transit lines.
- Run the simulation and examine the results.
- Repeat the simulation runs with different demand (car or transit) to evaluate the effect of changes.
Exporting a Network from Yutraffic Office
Yutraffic holds the junction layout, the signals and controller information and the traffic demand for each junction. Use the Yutraffic Office Export for Aimsun Next Wizard, selecting the options to export (Controller executable name, base and TA configuration and AP values files), to create a SAC file which references a set of subsidiary files that describe the junction, the signals, and the demand.
During the export, a further option exists, for sections with reserved lanes, to convert it to one road section with a reserved lane or two parallel road sections, one of them reserved. This choice depends on the road layout in practice and the ability of traffic to move between lanes.
After the data has been exported, there will be a new directory with:
- A SAC file referencing: geometry, simobjects, apvalues, ODmatrices, and a layout bitmap.
- A set of files that contain all the information the SAC file refers to.
- A xxx.exe file to run the controller.
Importing a Network into Aimsun Next
Create a new project in Aimsun Next using the Yutraffic template. Open the Yutraffic importer from the main menu File > Import > Yutraffic Office Files and locate the SAC file. This will import:
- The traffic network geometry of road sections, nodes, and turns.
- A Centroid Configuration with centroids, a set of OD Matrices for each of the vehicle types and a Traffic Demand for each one of the scenarios in the Yutraffic Office data. Together, these describe the traffic demand in the network.
- The Transit Lines described in the Yutraffic Office data.
- The traffic signals at the junction and the Control Plans specified in the Yutraffic Office data.
- The Detectors placed in the road sections and pedestrian areas as described in the Yutraffic Office data.
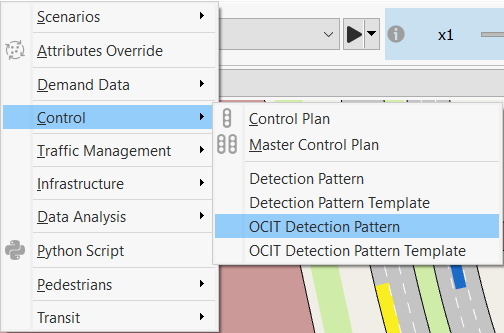
- An OCIT Detection Pattern holding a list of manual signal calls which can be included in the simulation by selecting the pattern in the Scenario Editor.
- A Scenario, Experiment and Replication to run the simulation.
- A Controller linked to the Yutraffic external control executable.
A Note on OCIT Detection Patterns
From Aimsun Next 22, Yutraffic detection patterns comply with OCIT (Open Communication Interfaces for Road Traffic Control Systems) standards, which means that they now handle all the data that are relevant to Yutraffic models. As a result, the relevant Control menu options are now labeled OCIT Detection Pattern and OCIT Detection Pattern Template. .
Controller
Configure the signal controller to link to the PDM control software configured by Yutraffic Office by specifying:
- The intersection ID which in turn specifies the name of the EXE file to be used to control the signals through the Yutraffic Aimsun adapter.
- The IP address and port number of the Yutraffic Aimsun adapter.
- The configuration folder holding the control data and executable exported by Yutraffic Office. The importer sets by default the folder of the SAC file.
- Full Communication on or off: When setting this parameter on, all AP values will be communicated, it's the full testing mode. When off, the minimum information required is communicated, in order to speed up the simulation.

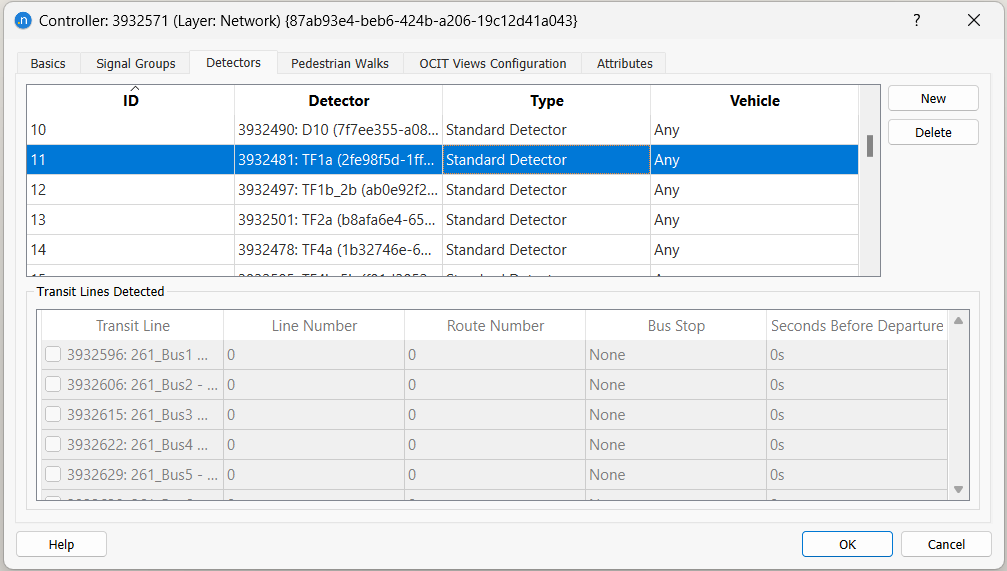
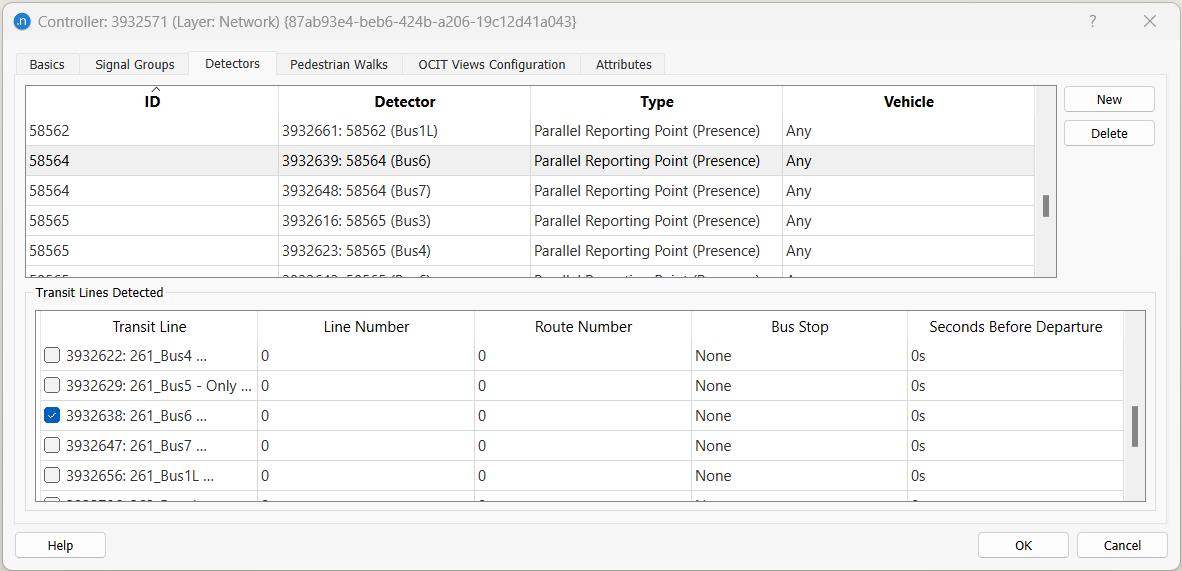
Yutraffic Controller Detectors
There are several types of Yutraffic detectors:
-
Standard: This detector works like standard detectors; it sends presence while a vehicle of any type is on top.
-
Serial Reporting Point: This detector sends a transit telegram when a transit vehicle of the transit lines selected in the "Transit Lines Detected" table is detected.

-
Parallel Reporting Point (presence): This detector sends a presence signal (like detectors) when an equipped vehicle is on top. The detector sends presence while a vehicle of any of the selected transit lines in the "Transit Lines Detected" table is on top of the detector. If no transit line is selected, it should send presence while an equipped vehicle of any type is on top of the detector.
-
Parallel Reporting Point (impulse): This detector sends a one second presence signal (like detectors) when an equipped vehicle gets on top. The detector sends presence as a vehicle of any of the selected transit lines in the "Transit Lines Detected" table gets on top of the detector. If no transit line is selected, it should send a one second presence signal every time an equipped vehicle of any type gets on top of the detector.
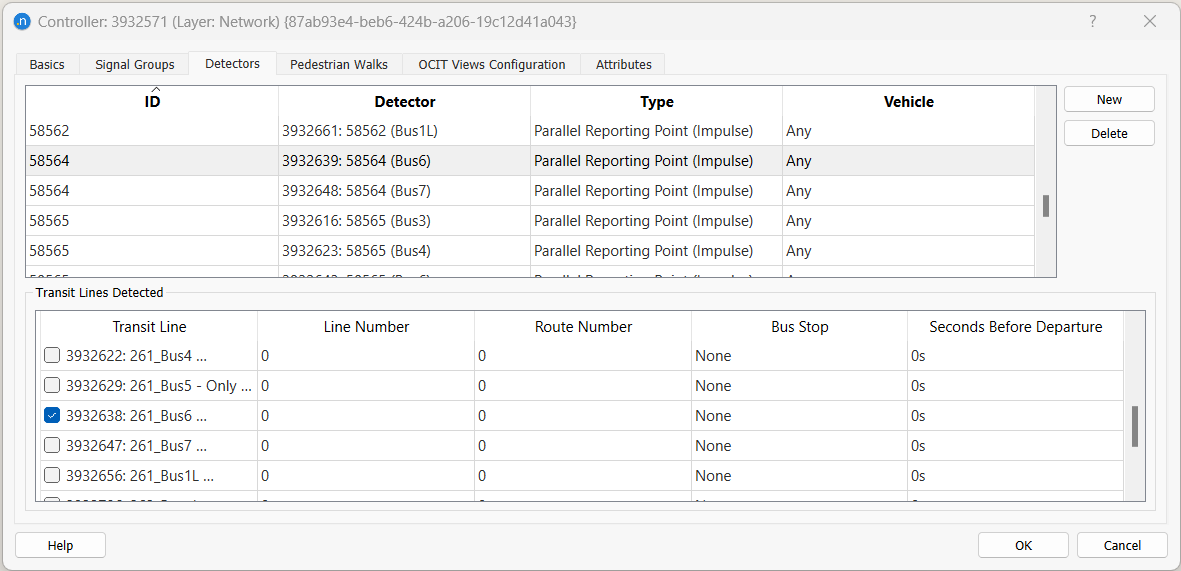
If Standard detector type is chosen, the window "Transit Lines Detected" is freezed as there is no option for transit vehicles to send messages via this detector type. If Parallel Reporting Point or Serial Reporting Point is chosen, a table called "Transit Lines Detected" is enabled at the bottom of the dialog and transit lines can be selected. In the case of a Serial Reporting Point, minimum one transit line must be selected. In the case of a Parallel Reporting Point, if none of the transit lines is selected, it should send presence for any equipped vehicle.

For example, in the case of an emergency vehicle, a detector should be defined as Parallel Reporting Point (presence) with no transit lines associated, and an emergency vehicle should be created as a vehicle type (% equipped).
- Line Number: The line number must be inserted in the transit line tab named OCIT.
- Route Number: The route number must be inserted in the transit line tab named OCIT.
- Bus Stop: If selected, then the message will be sent when the vehicle departs from this transit stop.
- Seconds Before Departure: If the Bus Stop is selected, an option to send the message seconds before the bus departs from that transit stop.
For Serial and Parallel Reporting Point detector types, the detector's measuring capabilities "Occupancy" and "Equipped Vehicle" must be checked.
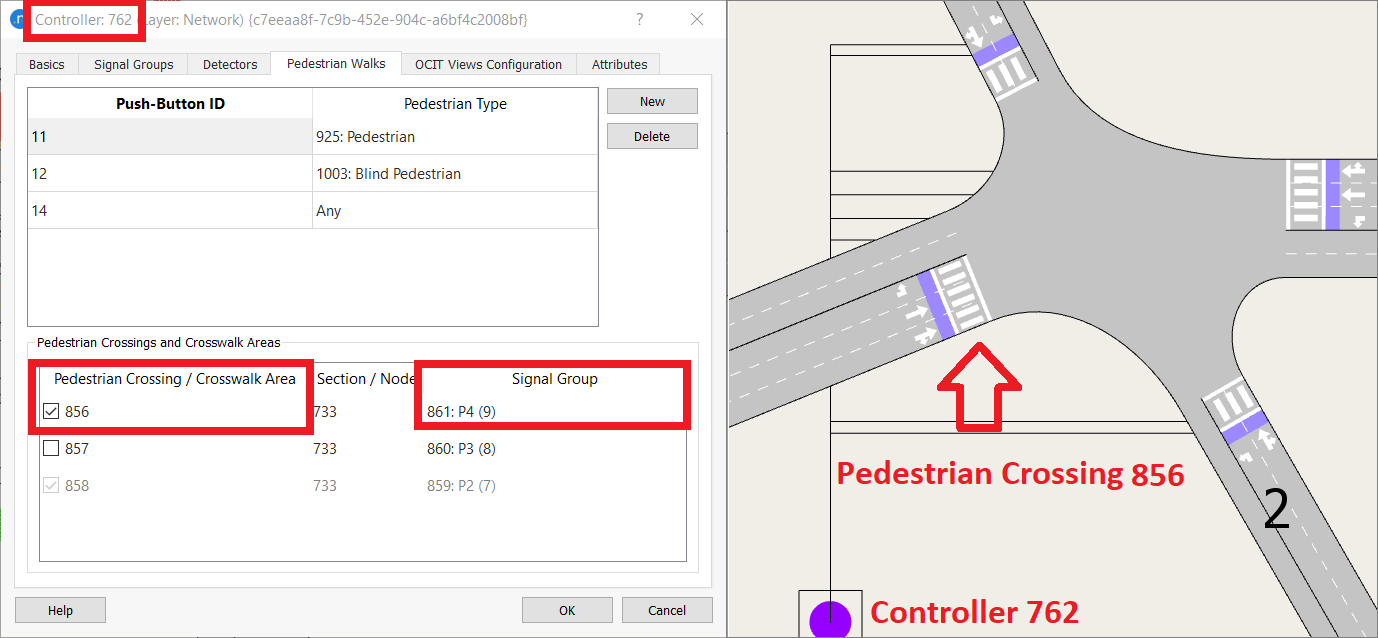
Pedestrian Walks
To allow the Push-Buttons functionality for pedestrians, the Pedestrian Crossings/Crosswalk Areas at the controlled junction should be assigned to a signal group in the Nodes Editor.
These Pedestrian Crossings/Crosswalk Areas will then appear in the Controller Editor > Pedestrian Walks tab > Pedestrian Crossings and Crosswalk Areas and the user can assign each or multiple Pedestrian Crossings/Crosswalk Areas to a Push-Button ID in the Yutraffic Controller configuration.
It is also available the option to assign the Push-Button ID to a specific Pedestrian Type. This setting tells whether presence should be sent only when a pedestrian of a specific type is waiting, or any pedestrian of any type.
The screenshots below show how a Pedestrian Crossing/Crosswalk Area with a signal group and two different Push-Button IDs, one for pedestrians with visual impairment (Blind) and one for pedestrian with no visual impairment, would be configured.
Running a Simulation with a Yutraffic Controller
The simulation can be run from the replication as normal and the log window will show any relevant messages to confirm the operation of the Yutraffic link.
Controller Output 
During a simulation run, the Controller dialog shows two views of the control actions: a graphical view showing the state of phases, stages, and detectors and a protocol view giving details of signal actuation. The items to display (signals, phases, detectors, and protocol variables) are selected in the OCIT Views Configuration tab in the controller.
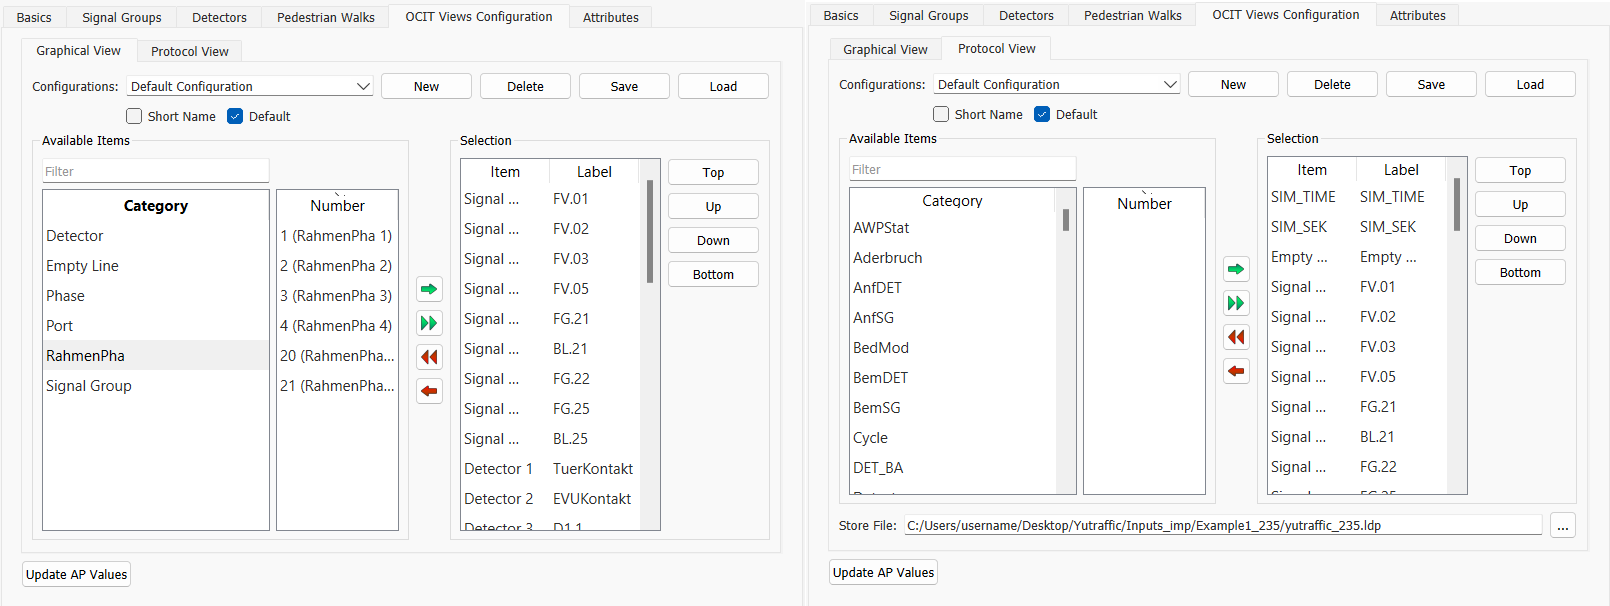
Different groupings of variables can be made and labeled as a configuration, each configuration with a different set of variables and hence a different focus on the activity of the controller. For display purposes, an empty line can be inserted to separate groups of variables.
Press the Update AP Values button and select the ApValues.json file to regenerate the list of available items based on the file contents, both in graphical and protocol view. Note that this does not apply to signal groups and detectors, which are automatically updated based on the configuration of the controller.
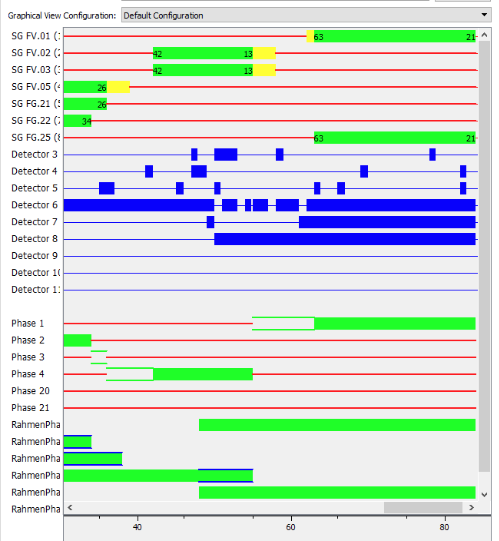
As the simulation runs, the Simulation Control tab then gives a timeline view of the signal phase and group activity, and the detector occupancy based on the configuration of variables chosen.
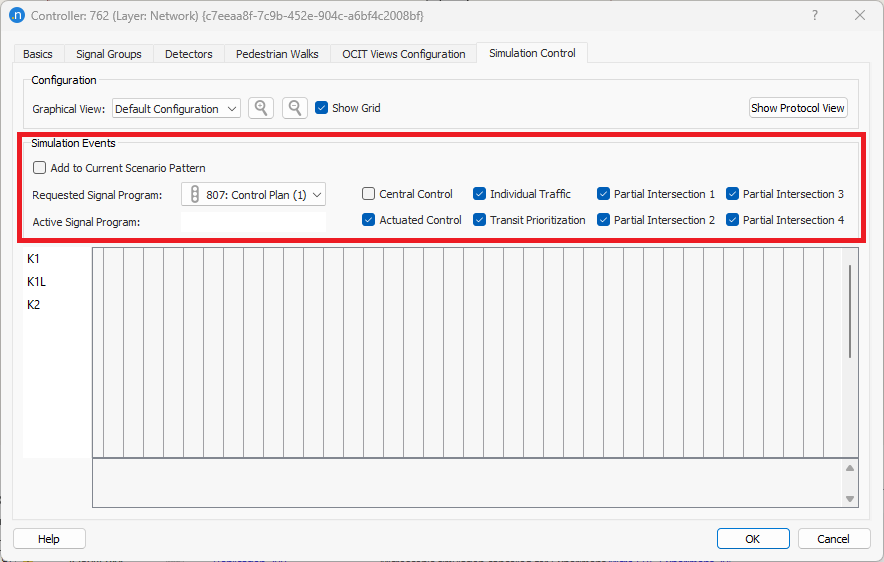
To perform testing the user can apply modifications with the option "Simulation Events" manually (on the fly) during the simulation as many times as the user wants via the controller object. Simulation events enable the user to modify the control plan and other flags during the simulation (visible only during simulations and playbacks). The simulation events in question are the following:
- switch to another signal program
- turn on/off central control
- turn on/off traffic actuations
- turn on/off transit prioritization
- turn on/off partial intersections
Once the simulation is launched, open the Controller object > Simulation Control Tab. Modify the Requested Signal Program to set a control plan and activate/deactivate the corresponding OCIT flags manually (only during the simulation). The user has also the option to save those changes in an OCIT Detection Pattern by selecting the Add to Current Scenario Pattern option to reproduce exact the same simulation with the modifications performed manually and stored.
For more options on how to use simulation events, see OCIT Detection Patterns.