Managing Traffic
Note about licenses: These exercises require a license for Aimsun Next Pro Micro, Advanced, or Expert Editions. If you have the Pro Meso Edition, you can generate experiments for the mesoscopic simulator instead of the microscopic simulator.
- Exercise 1. Reviewing Post-event Traffic Demand
- Exercise 2. Post-event Strategy (I) – The Police
- Exercise 3. Post-event Strategy (II) – VMS
- Exercise 4. Post-event Strategy (III) – Traffic Control
- Exercise 5. Setting Automatic Triggers
- Exercise 6. Creating Periodic Incidents
Introduction.
In these exercises, we will create policies for changing the destination of vehicles in response to network conditions and events. We will define strategies and policies to divert traffic, close turns, and mitigate congestion. This will involve police actions, VMS signs, traffic control plans, and conditional triggers. Finally, we will create periodic incidents in a road section.
We will focus on a scenario involving the end of a football match in Barcelona, affecting traffic between 20:00 and 21:00 hours. When the match is over, vehicles leave the stadium car park as quickly as they can from 20:10. Our task is to see if all vehicles can leave in a timely manner and how we can mitigate their impact on other traffic in the network.
The backup copies of the files related to this exercise are in [Aimsun_Next_Installation_Folder]/docs/tutorials/3_Traffic Management.
Note that there is a path assignment file (known as an APA file) containing default route paths derived from normal conditions. This is referenced by Path Assignment Plan 2373 in the Project folder. If the model (ANG) files are copied from the Program Files directory, you might be asked to locate the file before running a simulation. If necessary, the APA file can be regenerated using the static assignment scenario included in the Aimsun Next documents for this exercise.
Exercise 1. Reviewing Post-event Traffic Demand
First we will open the traffic management model and review the initial traffic demand created by vehicles leaving the stadium after the football match.
1.1 Reviewing the initial demand
- Select File > Open > Initial_Traffic_Management.ang.
To generate the traffic demand that includes the post-match-related traffic, the initial model contains a user class named Car Soccer. This user class models the extra load created by spectators as they leave.
An OD matrix for Car Soccer is part of the traffic demand named Traffic Demand Match, which we will use with the dynamic scenario.
- Optional: Open both traffic demands to compare them.
The difference between the normal and match demands are shown below, with the post-match demand on the right.
Vehicles from the CampNou centroid will queue in the stadium car park and exit as soon as there is an opportunity. To simulate this, in the experiment named Micro Exp Match – No Strategy we use the Arrival Type: ASAP on the Arrivals tab.
To view the inputs:
-
Open Micro Exp Match – No Strategy and click on the Arrivals tab to see the inputs for Centroid and Arrival Type.

-
Click OK to close.
1.2 Viewing the initial simulation
To view the initial post-match situation, we need to run the simulation to generate the initial outputs.
To run the simulation:
-
In the Project folder, right-click Rep No Strategy > Run Animated Simulation (Autorun).
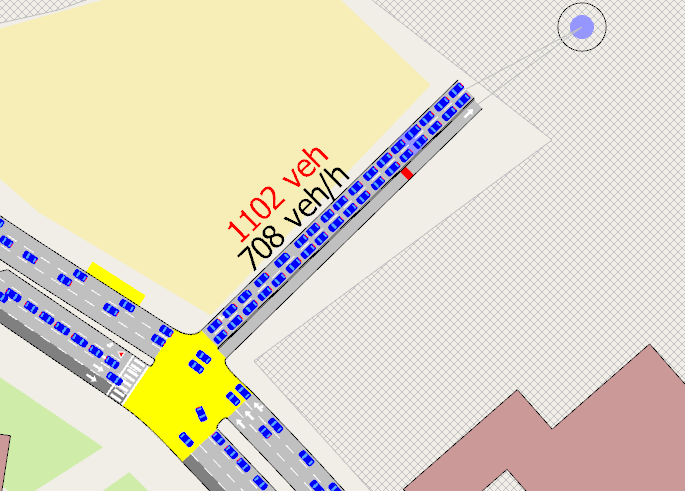
From 20:10 in the simulation we can see the formation of a virtual queue of vehicles waiting to exit from CampNou. A dynamic label attached to the section shows the count or flow of exiting vehicles and the virtual queue of remaining vehicles.
-
Double-click the affected section to open its dialog.
-
Click the Time Series tab to see a dynamic graph.
-
Click Variables and, for the Y axis, select Max. Virtual Queue.
-
Click Graph to view the times series.
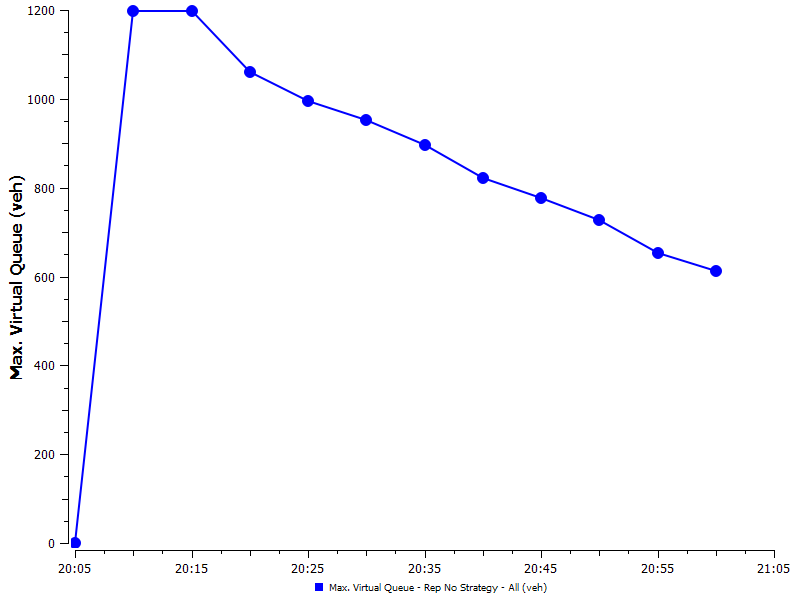
The virtual queue in the CampNou centroid drops from 1,200 vehicles to around 600, indicating that approximately 600 vehicles exit within 50 minutes. At this rate it would take at least 2 hours for vehicles to exit CampNou, which is unacceptable.
Check the time series for Waiting Time in Virtual Queue for a further illustration of the problem.
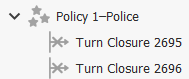
Exercise 2. Post-event Strategy (I) – The Police
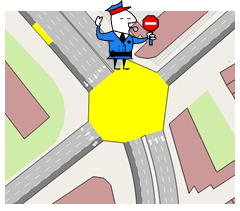
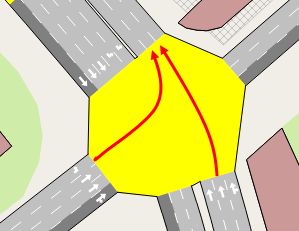
This exercise covers our first mitigation strategy, which involves simulating police actions at node 2062, from 20:10 to 21:00. The aim is to prevent vehicles approaching the stadium from the south during this time. To do so, we will create a traffic strategy comprising specific policies.
This strategy can use one of two different traffic policies to simulate police actions:
-
Force Turn requires vehicles to take an alternate turn
-
Turn Closure prevents vehicles from taking a turn.
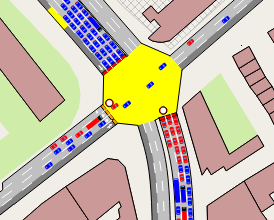
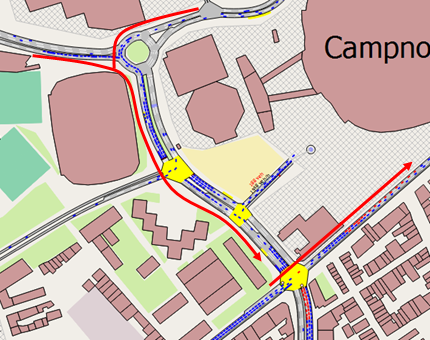
In this exercise we will apply Turn Closure to the two turns indicated in red below.
2.1 Creating the traffic management strategy
To create the traffic management strategy:
-
Select Project > New > Traffic Management > Strategy. A new Strategy object is added to the Project folder under Traffic Management.
-
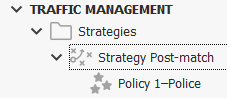
Rename the strategy Strategy Post-match.
-
Right-click Strategy Post-match > New Policy.
-
Rename the policy Policy 1–Police.
-
Open Policy 1–Police.
-
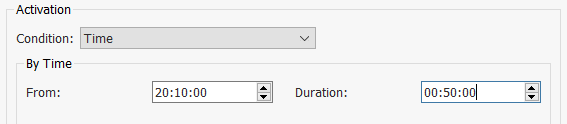
For Condition, select Time.
-
Set From to 20:10:00 and Duration to 00:50:00.
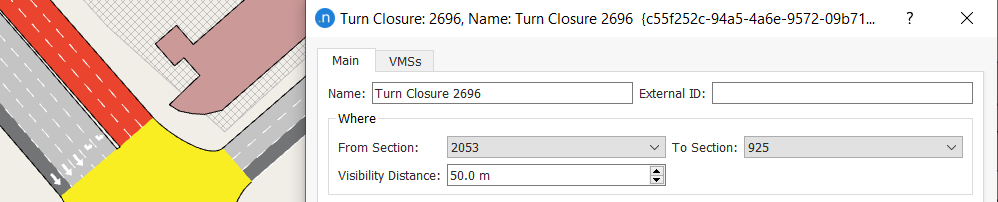
2.2 Adding the turn closures
Next we need to add the two Turn Closure actions to this policy.
To add turn closures to the policy:
-
Right-click Policy 1–Police > New > Turn Closure. Repeat to add the second turn closure.
-
Double-click the first Turn Closure to open its dialog.
-
In the 2D view, click the section containing the first turn you want to close.
-
From to To Section drop-down list, select the turn's destination section.
-
For Visibility Distance, enter 50.00 m. This distance means that drivers can see the police directing traffic before taking action. In this case, direct visibility is the only means of warning drivers.
-
Click OK.
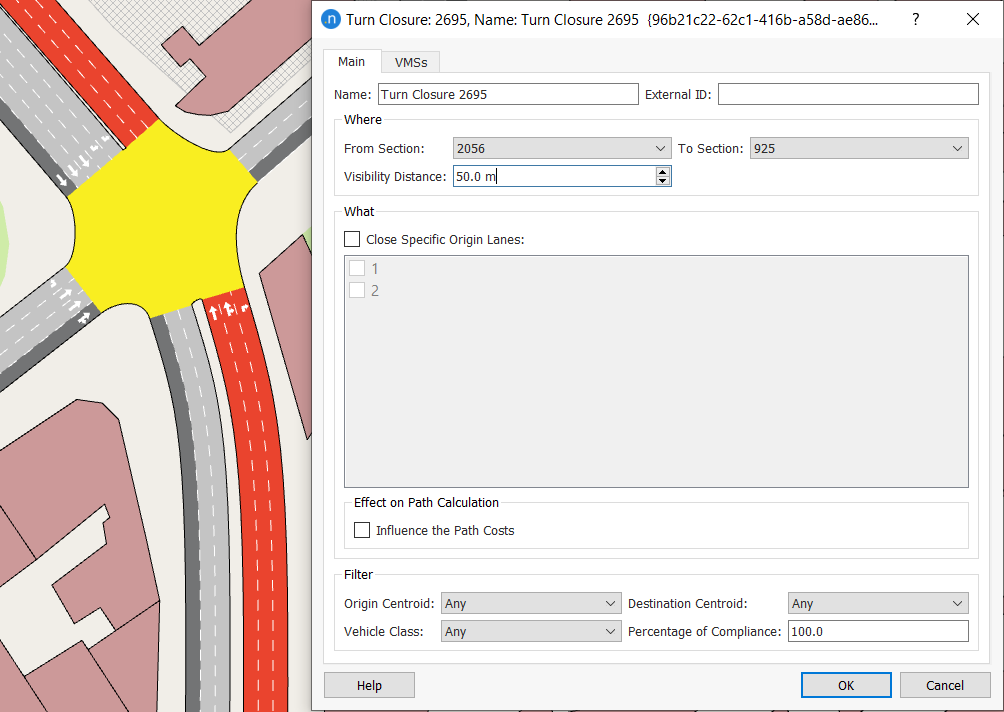
-
Repeat steps 2–6 for the second Turn Closure object.
2.3 Activate the strategy
Now we need to activate this strategy in the dynamic scenario and its associated experiment.
To activate the strategy:
-
Open Dynamic Scenario Base.
-
Click the Strategies and Conditions tab.
-
Tick Strategy–Post-match.
-
Click OK.
-
Right-click Dynamic Scenario Base > New Experiment.
-
Click OK.
-
Rename the experiment Micro Exp Match–Policies.
-
Open Micro Exp Match–Policies and click the Policies tab.
-
Tick Policy 1–Police.
-
Add a new replication to the experiment (name it Rep Policies) and run the simulation to view the effect of the turn-closure policies.
-
Select the view mode Traffic Management Affected to see, marked in red, the vehicles affected by the policies. We can see that, as desired, none are turning onto the section leading to the stadium entrance.
However, as the remaining congestion in the simulation indicates, this strategy alone is not sufficient.
Exercise 3. Post-event Strategy (II) – VMS
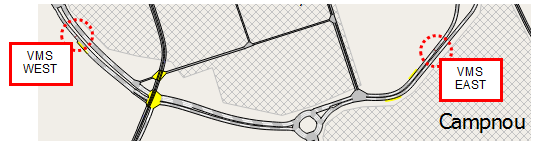
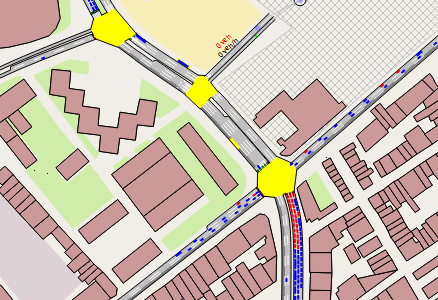
In the network there are two variable message signs (VMS), East and West, shown below.
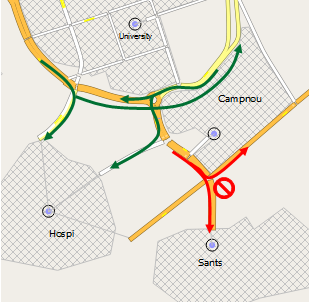
These signs warn drivers about congestion in the network and enable them to avoid it. In this strategy, we will use VMS to enact two policies:
-
To tell all drivers heading toward the Sants centroid to divert to the Hospi centroid
-
To redirect vehicles near the westward VMS, and which are heading to the BCN-S centroid, toward the BCN-N centroid.
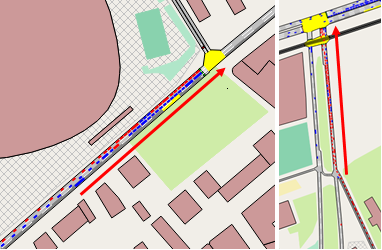
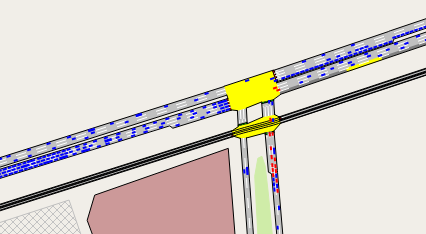
These routes and diversions are illustrated below, with the proscribed trips marked in red.
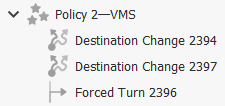
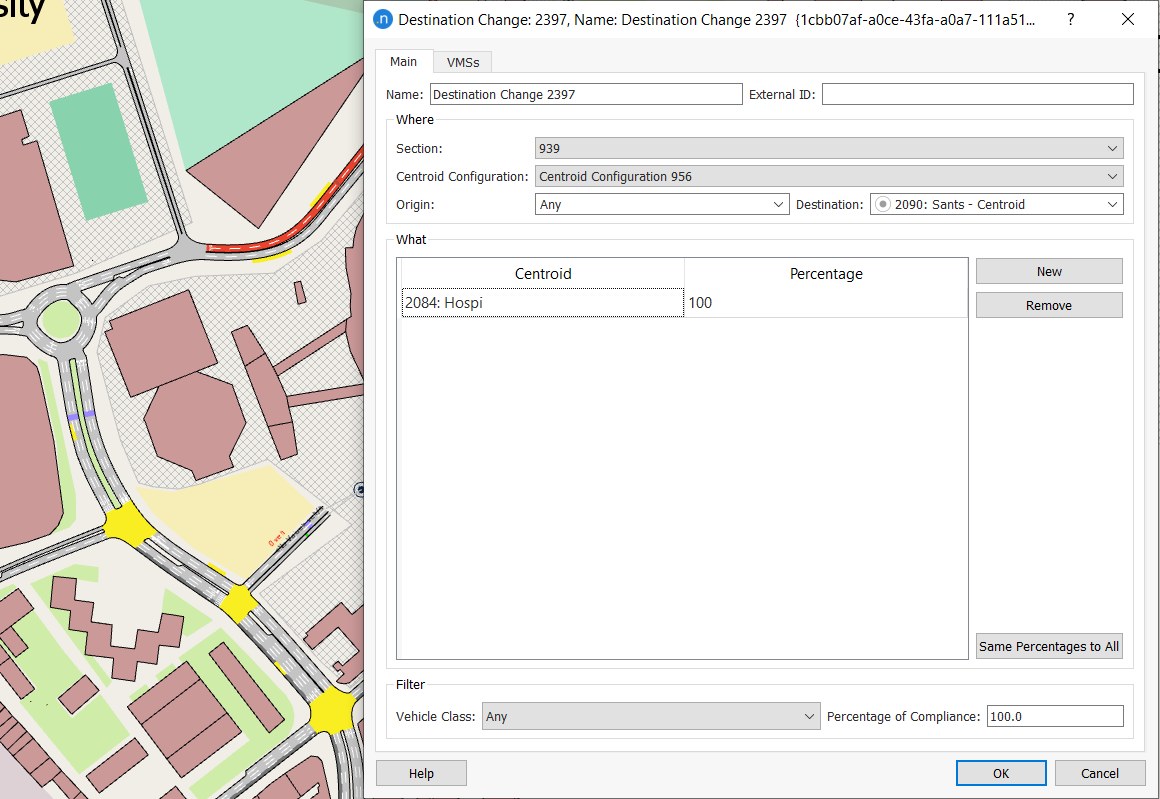
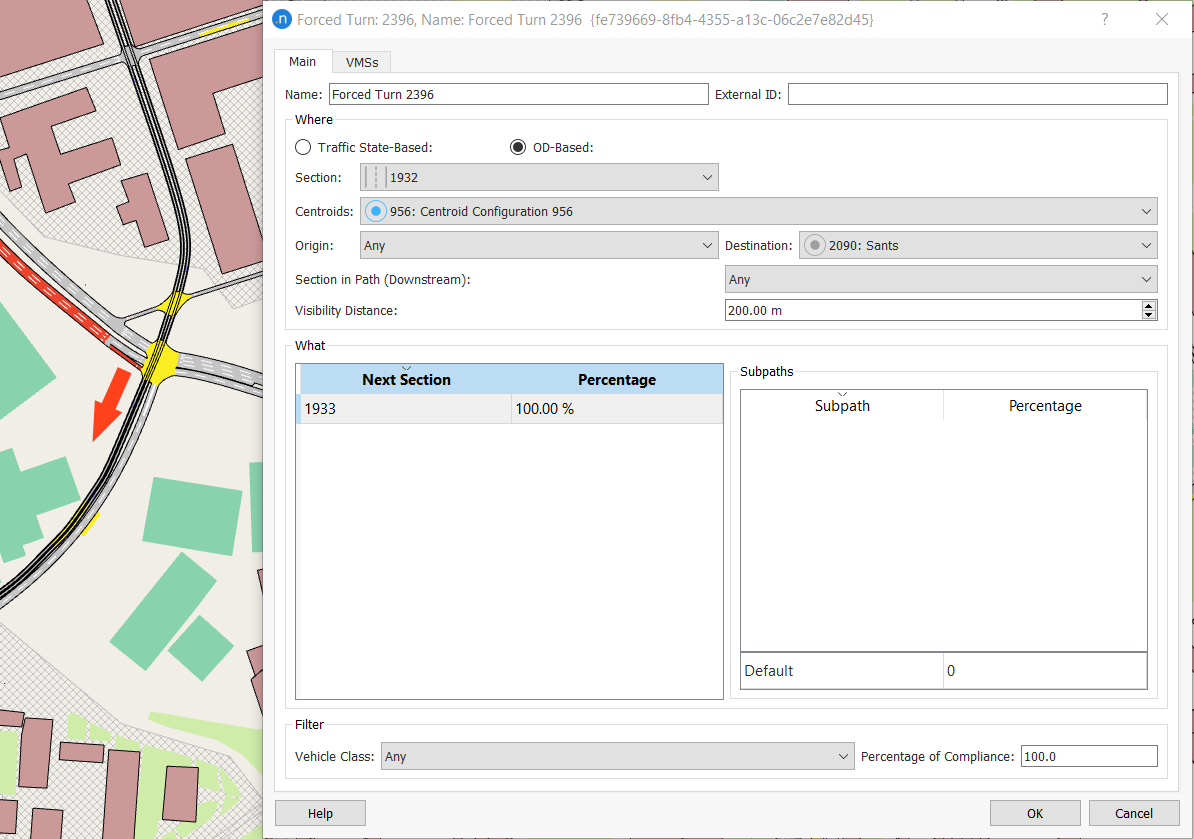
To do this we need to create a new policy, which will be added to the list under Strategy Post-match. The policy will enact two destination changes and one forced turn.
3.1 Create the new policy
To create the new policy:
-
Right-click Strategy Post-match > New Policy.
-
Rename the policy Policy 2–VMS.
-
Right-click Policy 2–VMS and:
i. Select New > Destination Change twice
ii. Select New > Forced Turn.
3.2 Defining destination changes
We will now define the two changes of destination that are part of Policy 2–VMS.
To define the destination changes:
-
Open the first Destination Change item. We will change the destination of vehicles heading to BCN-S to the new destination of BCN-N. The section with the relevant VMS is Section 1932.
-
For Section, select 1932.
-
Click New to add a new Centroid–Percentage pair to the dialog.
-
Double-click in the Centroid field and select BCN-N.
-
Click in the Percentage field and enter 100.
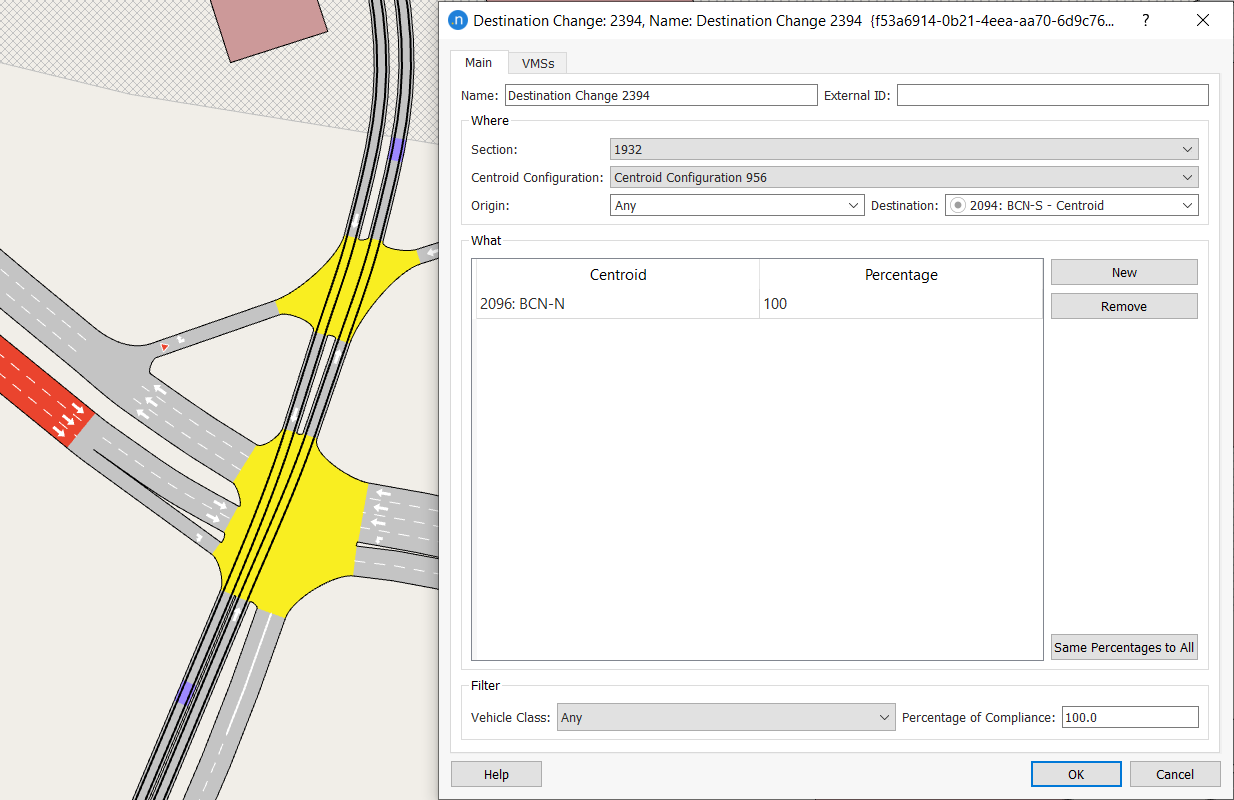
-
Click OK to save.
-
Open the second Destination Change policy and repeat steps 2–6 with the following inputs:
- Section: 939
- Centroid: Hospi
- Percentage: 100.
3.3 Defining forced turns
We will now define the forced turn that is signaled by the second VMS on Section 1932. We will force vehicles heading to Sants to take the first right turn to Hospi instead.
To define the forced turn:
-
Open the Forced Turn item.
Note: If we tried to do this using a Destination Change action, not all of the vehicles would turn here because there is another way to get to Hospi further along the section. This action is not quite as simple as selecting the obvious right turn section (2070) to Hospi because the turn at this node has a filter lane. Therefore, the correct next turn is into section 1933 which leads to the right turn.
-
For Section, select 1932.
-
For Destination, select Sants.
-
For Visibility Distance, enter 200.00 m.
-
For Percentage, enter 100.
3.4 Re-running the simulation
To re-run the simulation with the new policies:
-
Open Micro Exp Match – Policies and click on the Policies tab.
-
Tick Policy 2–VMS to add it to the list of active policies.

-
Re-run the replication Rep Policies.
Now all of the vehicles are able to leave the stadium, but there are congestion problems remaining at two nodes as shown below.
Exercise 4. Post-event Strategy (III) – Traffic Control
The current traffic control in the network is optimized for normal traffic rather than an exceptional situation like a large number of vehicles exiting a football stadium. For this reason we need to create a new traffic control plan and a policy to cope with the extra demand.
To create the new strategy:
-
In the Control Plans folder, right-click Control AM > Duplicate.
-
Open the duplicated control plan and rename it Control AM Strategy.
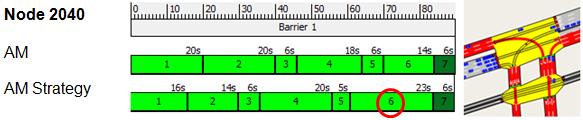
In the Control Plan dialog, we will change signal phases for four nodes: 2062, 2058, 2040, and 959.
-
In the Nodes group box, scroll to 2062 and double-click it to open the Node dialog.
-
Change the phases so that they match AM Strategy in the screenshot below. You can do this by clicking, resizing, and dragging the signal boxes (1–6 in this example). The aim in this case is to add time to signal 3, increasing it from 15 seconds to 19 seconds.
-
Click OK to save and return to the Control Plan dialog.

-
Repeat steps 3–5 for the next three nodes, using the screenshots below as a guide.


To create the new policy:
-
Right-click on Strategy Post-match > New Policy**.
-
Rename it Policy 3 – Control.
-
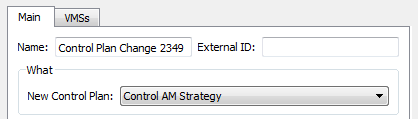
Right-click Policy 3 – Control > New > Control Plan Change.
-
Open the new control plan change and, for New Control Plan, select Control AM Strategy.
-
Open the experiment Micro Exp Match – Policies.
-
Click the Policies tab and tick Policy 3 – Control to add the policy to the experiment.
-
Re-run the replication Rep Policies.
The new policy has helped ease the congestion.
All vehicles have left the stadium and have exited the model.
Exercise 5. Setting Automatic Triggers
The policies in the previous exercises have a fixed start time of 20:10:00 and a duration of 00:50:00. This is adequate if the timetable of an event is known in advance, but this is not always possible.
The policies will also continue until 21:00 hours regardless of the rate at which the problem is resolved. Automatic activation and deactivation of the policies, in response to traffic conditions, would make traffic management more efficient. To do this we can set automatic triggers.
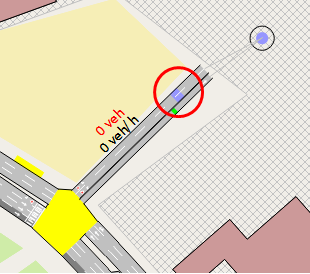
Triggers are used to automatically activate policies in response to conditions. In this exercise we will use a detector near the stadium exit, just in front of the conflict zone where congestion is building up. The detector is named Det_Campnou and is located in the section leading from the CampNou centroid, as shown below.
We will aim to activate a policy as soon as detected occupancy is greater than 80% and keep the policy running until occupancy decreases to less than 20%. To do so, we need to create activation and deactivation triggers and add them to a new policy.
5.1 Setting automatic triggers
To set the activation and deactivation triggers:
-
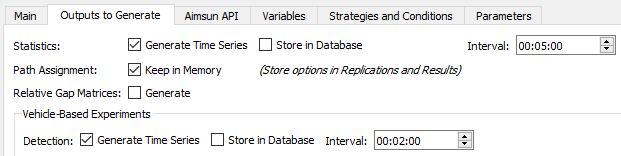
Open Dynamic Scenario Base and click on the Outputs to Generate tab.
-
To set the detector to gather data every 2 minutes, for Detection, tick Generate Time Series and for Interval enter 00:02:00.
-
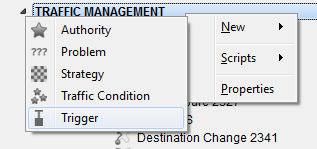
To create the activation trigger, right-click Traffic Management > New > Trigger.
-
Open the trigger and rename it Trigger Act.
-
Click New Condition to add a new line to the Condition section of the dialog.
-
In the 2D view, click on the detector Det_Campnou to add this object to the dialog.
-
For Attribute, select Occupancy, Last Generated, and All.
-
From the adjacent drop-down list, select greater-than (>).
-
For Value, enter 80:00 (this represents the 80% threshold mentioned earlier).
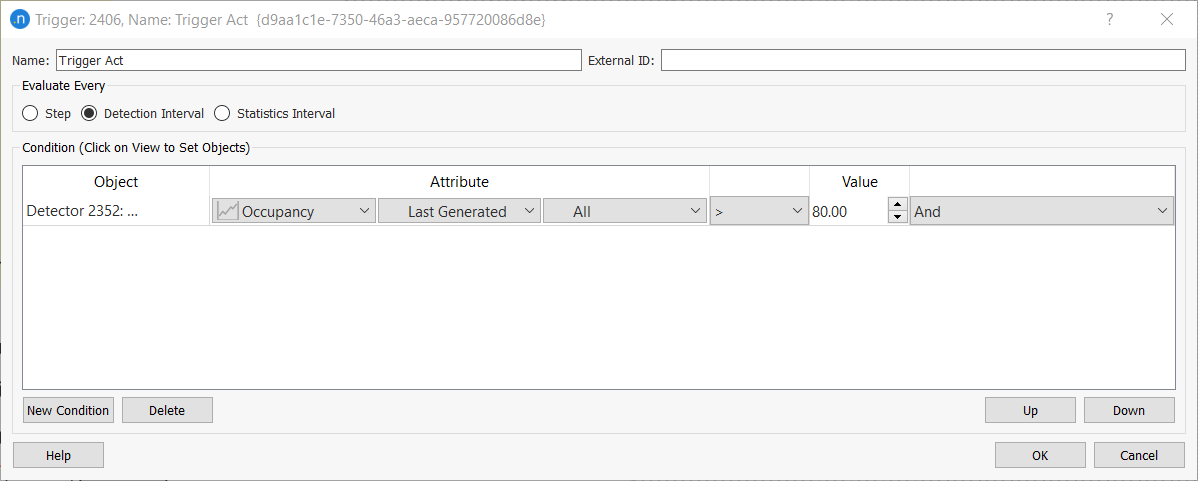
-
Click OK.
-
To create the deactivation trigger, repeat steps 3–10 but rename the trigger Trigger Deact and use the values in the screenshot below. Note that the less-than sign (<) is used this time for the Value of 20.00.

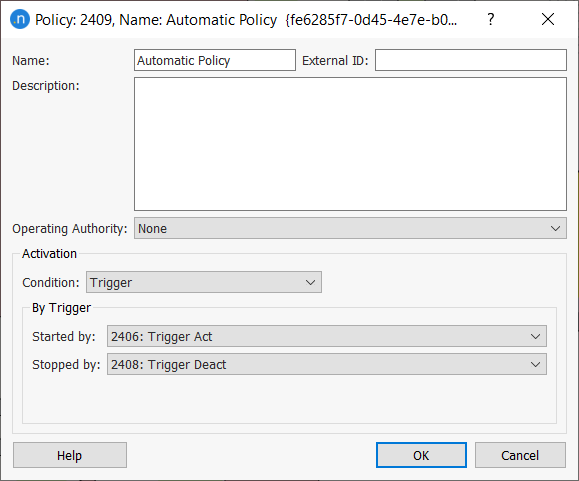
Now we have created the triggers, we need to create a new policy named Automatic Policy and assign the triggers to it.
To create a new policy for the triggers:
-
Right-click Strategy Post-match > New Policy.
-
Open the new policy and rename it Automatic Policy.
-
For Condition, select Trigger.
-
For Started by, select Trigger Act; for Stopped by, select Trigger Deact.
-
Click OK.
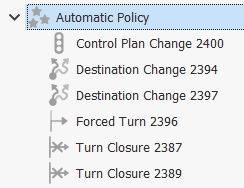
Over the course of these exercises we have learned which actions are required to tackle the congestion, so we can copy all the policies into the new Automatic Policy.
To copy all policies into one policy:
-
Select all the individual policies and drag them onto Automatic Policy. The result should resemble the screenshot below.
5.2 Running a new experiment with triggers
Now we can run a new experiment using automatically triggered policies.
To run a new experiment with triggers:
-
Duplicate the experiment Micro Exp Match – Policies.
-
Open the duplicated experiment and rename it Micro Exp Match – Automatic Policy.
-
Click the Policies tab and tick only Automatic Policy.

-
Click OK.
-
Rename the replication Rep Automatic.
-
Run the replication.
5.3 Viewing outputs
While the simulation is running (and afterwards) check the following outputs to review the results of the triggered policies. Use methods covered in the Viewing Microsimulation Outputs tutorials.
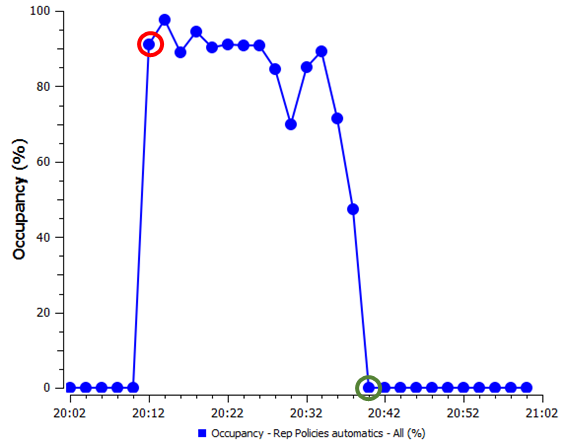
View time series in the detector. Select the variable Occupancy to see the generated map below. The red circle indicates the time when the policy is activated and the green circle indicates the time the policy is deactivated.
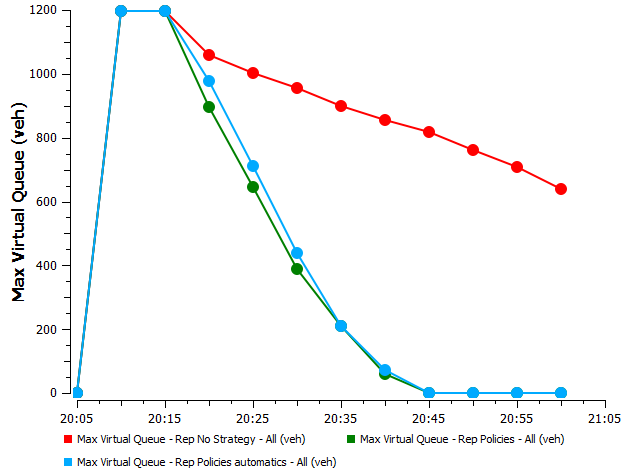
View time series in the CampNou centroid to see the outputs of the different experiments. The Max Virtual Queue variable displays the effectiveness of each: no strategy, policies, and automatic policies.
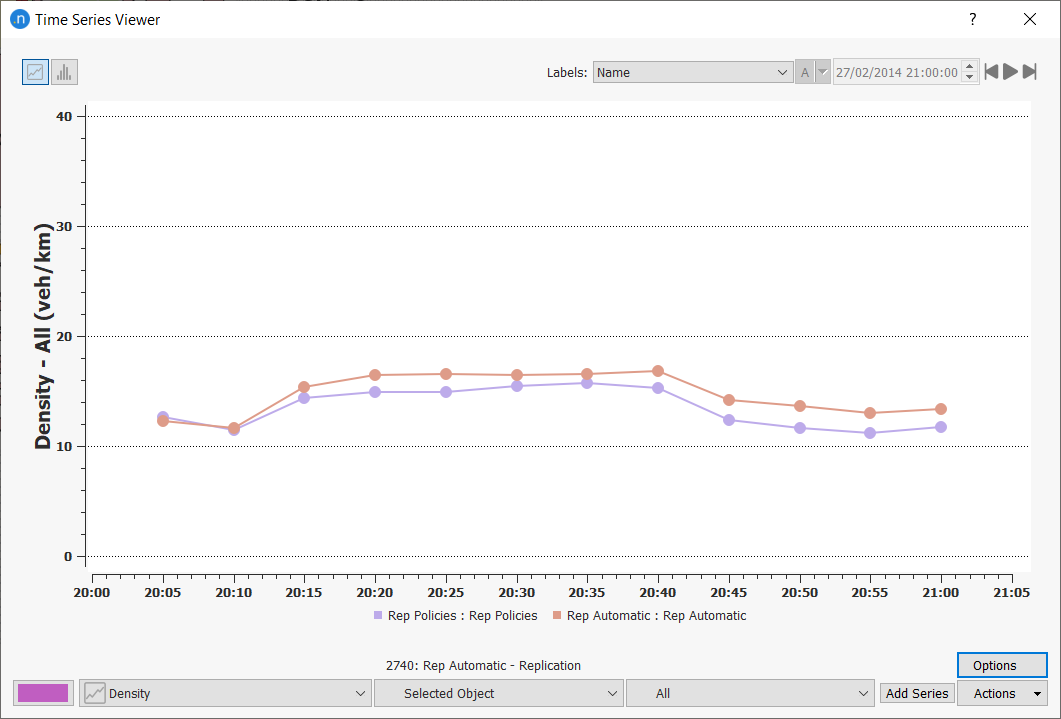
To view the overall vehicle density of the network for the two replications that use strategies, open the Time Series Viewer. Select Rep Policies from the Project folder, select the variable Density, and click Add Series. Repeat for Rep Automatic to display both sets of results.
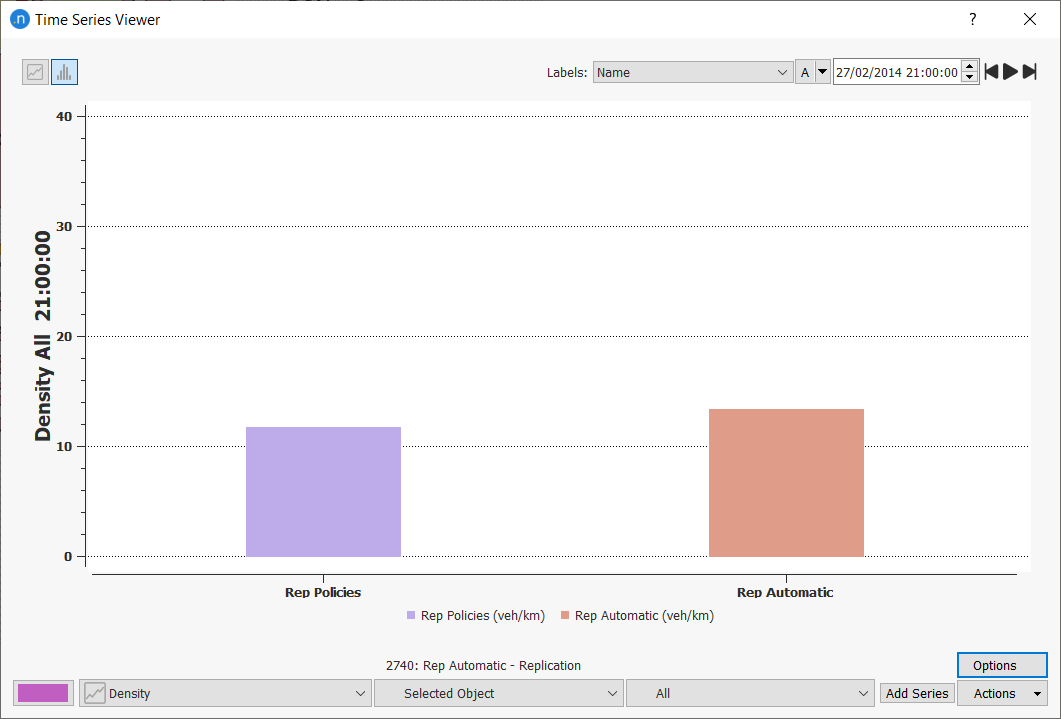
To display the outputs as a bar chart, click ![]() .
.
It is clear that the automated, triggered, policies achieve lower density by the end of the simulation, with conditions returning to normal more quickly. This is because the deactivation trigger detects when the queue has dispersed and ceases the action at the optimal time.
Exercise 6. Creating Periodic Incidents
Up to this point we have covered a predictable or planned traffic event. In this exercise we will look at how to simulate unplanned traffic events. To do so we will create a traffic condition that simulates different instances of parking within a particular road section.
Because this is not a planned traffic-management action, it is best to use a traffic condition to include it in a simulation. In this way we can create multiple incidents that are randomly located within a specific area of the network.
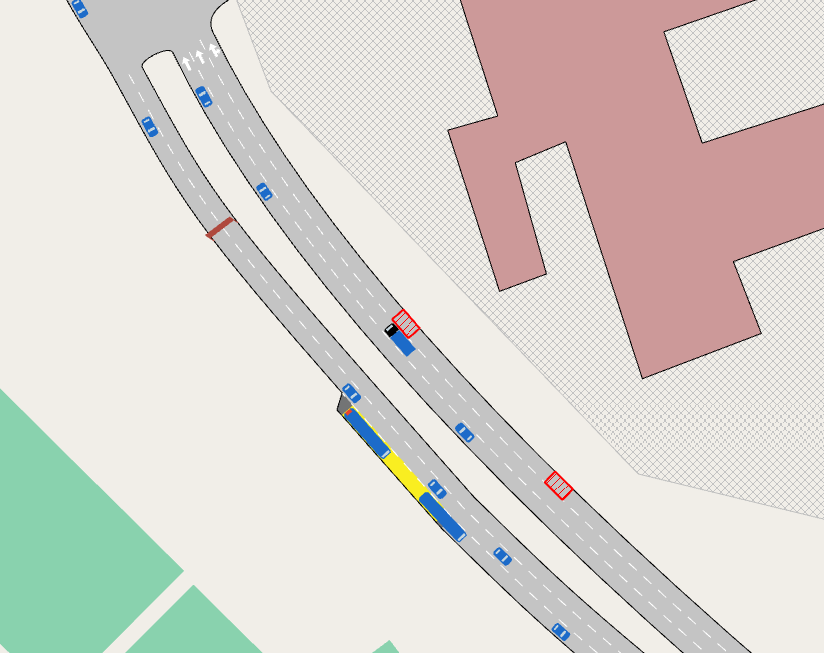
We will simulate the network using periodic incidents in the outer lane of Section 1930.
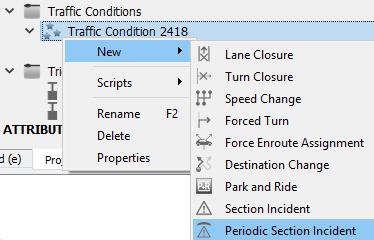
To create a periodic section incident:
-
Right-click Traffic Management > New > Traffic Incident.
-
Right-click on the new traffic incident and select New > Periodic Section Incident.
-
Open the periodic section incident.
-
In the 2D view, click on Section 1930 to add it to the Periodic Section Incident dialog.
-
Click on the outside lane to set the From Lane and To Lane as 3.
-
For Starts Every, enter 00:01:00.
-
Optional: Click and drag the incident box in the section (marked by black vertices) to change its size and/or position.
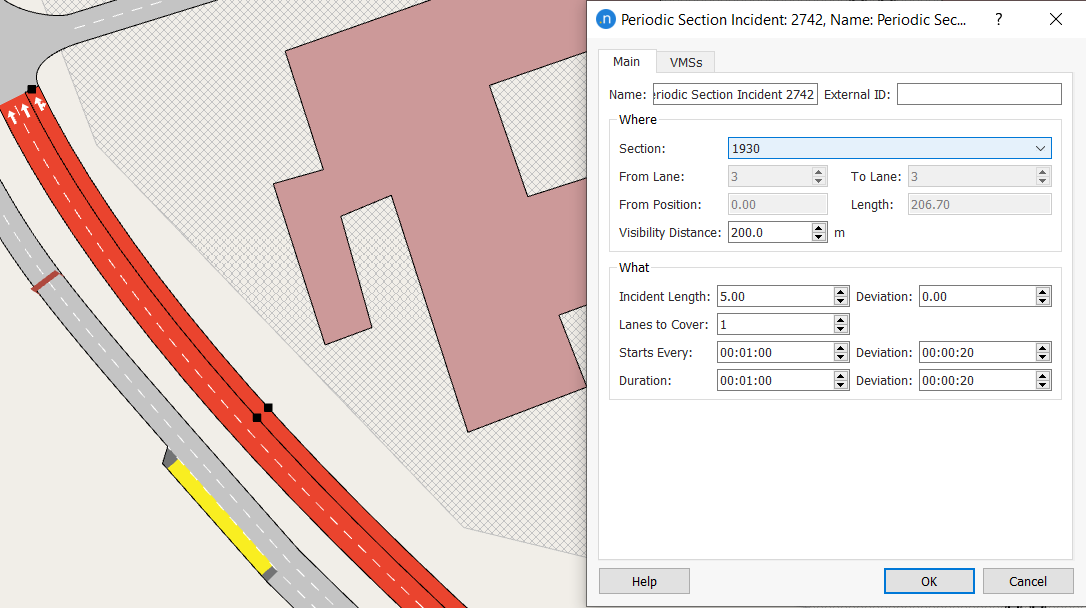
The incident we have created using the parameters above is one where a 5m-long vehicle parks in the outside lane – once per minute and for a duration of 1 minute – with a variance of 20 seconds.
-
Open Dynamic Scenario Base and add this traffic condition to the Strategies and Conditions tab.
-
Run the simulation and observe the following result, where the outer lane is blocked at random times, and the consequent effect on traffic flows.