Real Data Set Editing
Aimsun Next can read external detection data as a time series that can be used to compare with model outputs in validation and calibration, to provide the data required to adjust an OD matrix or to present the current traffic conditions on the 2D network map.
This section will show how to import the data. Its use is covered in other sections (Validation and calibration of a simulation, for example).
A real data set (RDS) is a collection of one or more external sources of information that contain detection data for detectors, detector stations, sections, turns, or transit stops. Usually this source will be a single file but it can also be a set of files or a database.
A 'reader' is assigned to each source. The reader can read the data and allocate it to one or several time series.
Creating and Editing a New Real Data Set
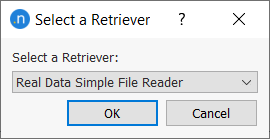
Create a new real data set using the Project menu or from the Data Analysis folder in the Project window. The new RDS object will appear in the Project window.
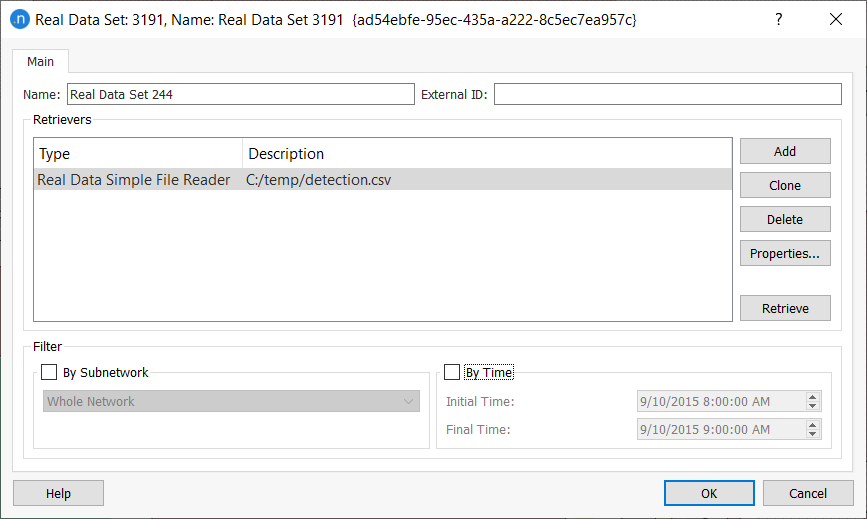
Double-click on it and add as many readers (retrievers) as necessary.
The types of reader that can be specified are:
-
Simple File Reader: This reader opens and reads text-based files, typically CSV files.
-
GPX File Reader: This reader takes inputs from positional data held in a GPS-based standard format.
When using the Real Data Simple File Reader, one reader for each file that needs to be imported is required.
Real Data Set Filters
A real data set can contain a huge amount of data, therefore it can be filtered by subnetwork or by time. When filtering by subnetwork, only data for objects inside the subnetwork will be considered, the rest of the data will be discarded. When filtering by time, only data that falls into the specified time interval will be considered.
Simple File Reader
The reader must be configured before importing the data to specify the file to be used (the File field), how to match data from the file with objects in the network (ID Settings group box), the time context (Date and Time Settings group box), and the columns to import (Columns group box).
Note: Text coding must be UTF-8 when reading from text-based files.
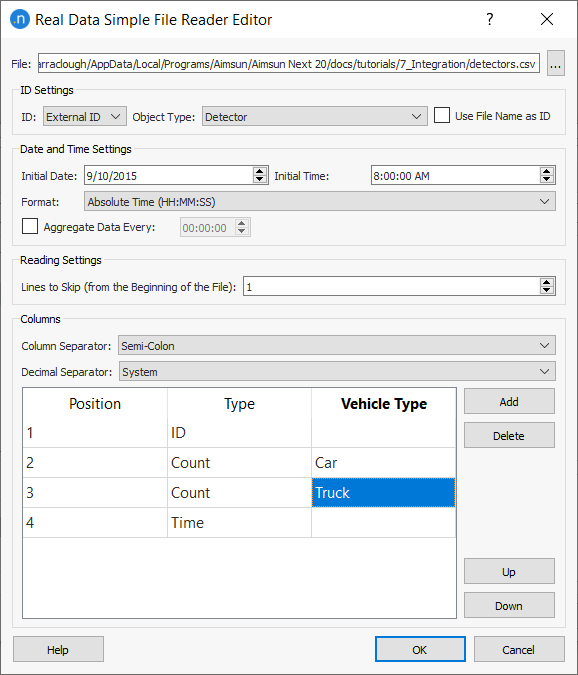
ID Settings
Objects in Aimsun Next can be identified either by their identifier (unique, assigned automatically to an object when it is created), by their name, or by their external identifier. Both the name and the external identifier can be specified for the object; editing the external identifier in Aimsun Next and naming it as the real object (the physical detector) is recommended.
As neither external identifiers nor names have a uniqueness restriction, the field Object Type can be used to avoid confusion among objects of different types with the same name.
Usually the detector or detector station ID is in one of the columns of the file to be retrieved but it can be coded in the name of the file. In this case, the Use File Name as ID option must be activated and the Columns table must not include an ID when defining contents.
Date and Time Settings
The detection data file (RDS) must contain all the times when the data were originally collected. These times can be absolute or relative and might contain the day, month, and year. The time of collected data in a real data set corresponds to the end time of their interval: for example, if a real data set begins at 08:00:00 and 100 vehicles are counted at 08:30:00, the interval for this data is 30 minutes (from 08:00:00 to 08:30:00).
Aimsun Next needs this time and date information to create the time series that will hold the collected (counted) values. The Real Data Simple File Reader Editor uses the Initial Date and Initial Time parameters to register the time when the data collection began and calculate the interval between measurements. In our example, Aimsun Next will check the start time and the data-collection times and deduce that the interval time is 30 minutes.
Even when there is only one measurement per object, Aimsun Next requires the Initial Date and Initial Time to calculate the duration of the interval.
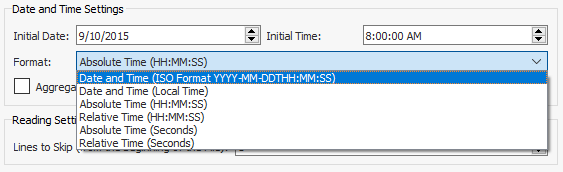
The Format field contains a drop-down list of permitted date and time formats. Select the option that matches the format in the RDS file.
If you prefer, you can choose to aggregate the data according to a different interval. For example, you might need to aggregate the data at one-hour intervals rather than the original 30 minutes. To do so, enter 01:00:00 in the Aggregate Data Every field. Any period entered here must be a multiple of the interval in the RDS.
Reading Settings
The data to be read in the detection data files does not need to start at the beginning of the file. A preference to skip several lines that might contain headers or descriptions, etc. can be specified in the Lines to Skip field.
Columns
The data in the file is held in the columns. The Column Separator in the file can be a space, a tab, a comma, or a semi-colon. The Decimal Separator can be the system automatic one, a dot, or a comma. The number of columns is adjusted by adding or removing rows in this dialog.
The content type for each input file column must be specified in the Type column. The options are: ID, Time, Travel Time, Vehicle, Count, Count in PCUs, Speed, Flow, Reliability, Not Used, Count (Min, Max, and Deviation), Speed (Min, Max, and Deviation), Flow (Min, Max, and Deviation), Travel Time (Min, Max, and Deviation), Transit Line, Boarding, Alighting, Load, Queue maximum and mean, section Density, Occupancy (Min, Max, and Deviation), Delay Time, and Stop Time. The "Congested" value is used in Dynamic OD Adjustment and is a Boolean marking if a section, turn, or detector can have when congested.
The Vehicle Type must be filled by the name and the Transit Line can be filled by the Id or name. The Vehicle Type column can be used where specific vehicle type data is assigned to specific columns in the same file.
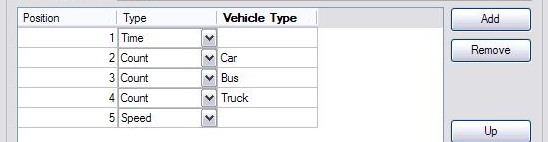
For example, if data was for a single detector and the input file format was:
Time/ Car Count/ Bus Count/ Truck Count/ Average Speed ----------- ----------- ----------- ------------ ------------- hh:mm:ss integer integer integer float
the columns dialog would be filled as follows:
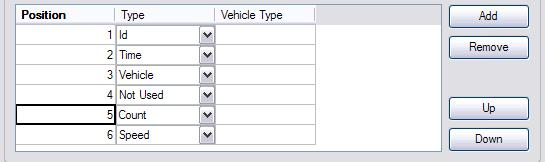
Or, for example, if data was for multiple detectors in columns as follows:
Detector/ Time/ Vehicle Type/ Audit Info/ Count/ Speed ----------- ----------- ----------- ----------- ----------- ----------- string hh:mm:ss string string integer speed
then columns would be specified as below:
Example: Reading Turns Data
Turn data can be read using the turn identifiers and also using the IDs of the section from which the turn originates and the section at which the turn ends. An example of text file containing count data for turns using the second option is shown below:
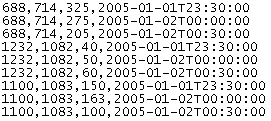
The first column contains the Section_From, the second column is the Section_To, the third contains the count data and the fourth is the time at which the count was collected.
It is compulsory that the text file lists the Section_From and the Section_To in this order (some columns might be placed between them, but the Section_To column cannot appear before the Section_From column).
The Real Data Simple File Reader Editor should be filled in as shown in the next image (the Object Type must be set to Turn):
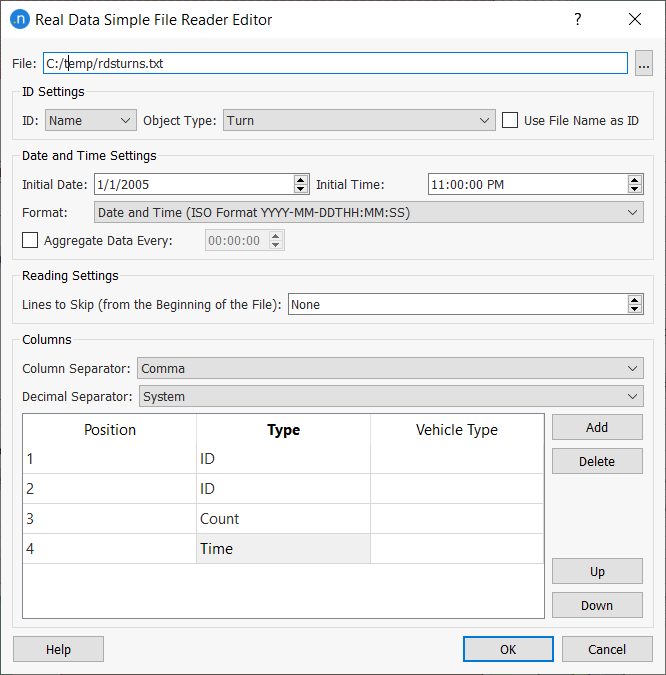
Note: ISO format choice is always taking the UTC as reference time, despite "Z" is not requested in the time format such as YYYY-MM-DDTHH:mm:ss.sssZ. In case, the format is not considering the UTC, the user always can select Local time as format or force the time interval with the choice of "Aggregate Data Every".
GPX File Reader 
GPX (GPS Exchange Format) is an XML-based common data format for positional-based data. Typically it stores tracks or waypoints and data associated with them. It uses the WGS84 coordinate system.
Retrieving Real Data
Real data is not stored in the Aimsun Next document. To retrieve real data from files once the reader has been set up, or after a network has been loaded in which real data sets have previously been specified, right-click on the real data set in the Project window to reveal its context menu, and select Retrieve. The Real Data Set editor also offers a Retrieve button to load the data from files.
Checking Real Data
Once the retrieve action is finished, the following Check Real Data Set dialog is displayed.
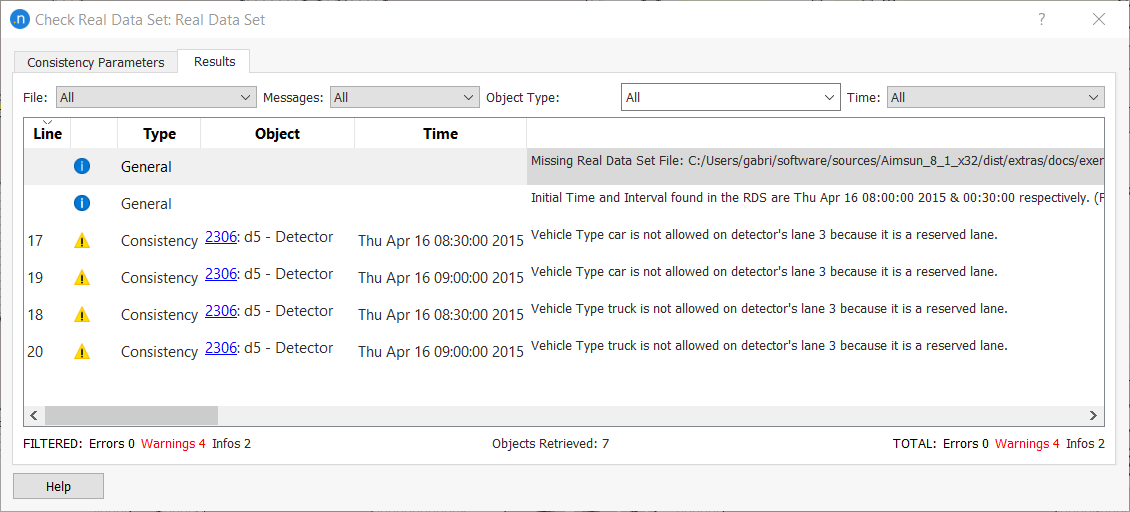
The Results tab summarizes data validation information, warnings & errors. Regarding data values: NaN and -1 values are invalid. They are shown as an empty value in the Time Series. Negative values are valid in some attributes due to the possibility of including data such as negative deviation. Also values for time, object, and vehicle type are checked in every scanned record.
The tab will show general reading messages for:
- Initial Time and Interval found.
- If the real data set file cannot be found.
- If the real data set file cannot be found in its original location but another file with the same name was found in the ANG folder and was retrieved instead.
- If no Time column was found - data cannot loaded as it cannot be assigned to a collection time interval.
- Dates earlier that 1970 are not allowed.
- Collection intervals are different for different objects.
And reading messages for the contents of the file:
- Data values that are missing.
- Data values that are invalid.
- Negative data values.
- NaN data values.
- Object not found.
- Turn not found.
- Trajectory not found.
- An ID for which more than an object was found. (IDs can be internal, External ID, or Name).
- No Vehicle Type matches with this name.
- No Transit Line matches with this name/Id.
- The object provided as a Vehicle Type/Transit Line corresponds to another object type.
- Invalid Date/Time.
Moreover, in addition to the messages included in this dialog, the Log window shows a success/fail message of the retrieving process.

Checking Real Data Consistency
In the Consistency Parameters tab of the same dialog, the user can modify the criteria for data consistency checks. This information is also accessible from the context menu of the Real Data Set by clicking the "Retrieve & Check" option. Once the dialog is open, clicking on the Check button will generate and show the list of inconsistencies in the Results tab.
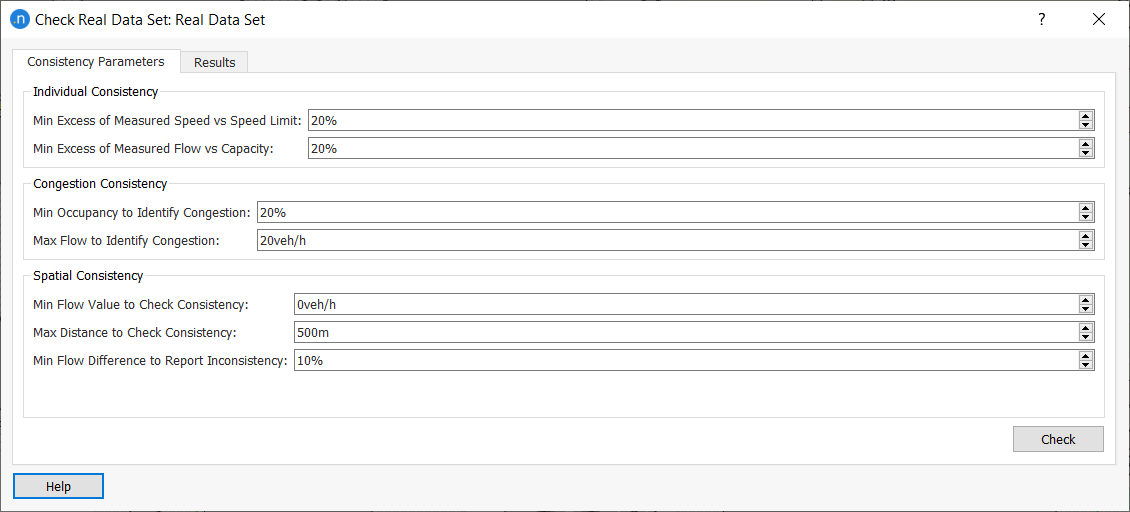
The values specified in the Consistency Parameters tab determine which lines read from the RDS files will produce consistency messages in the Results tab.
For example, when reading a value from a RDS file for a detector detecting at a particular interval a speed of 94 km/h on a section with speed limit of 60 km/h, as the excess between both is higher than 20% as specified in the parameters in the image above, then a message would appear in the Results table showing the line of the file in which this record was found, a warning sign, the type of check (Consistency type), the detector, the time of the record and the message explaining the issue detected.

There are several consistency criteria available.
Individual consistency:
- Min Excess of Measured Speed vs Speed Limit: when detected speed compared to the speed limit exceeds the specified percentage.
- Min Excess of Measured Flow vs Capacity: when detected flow compared to capacity exceeds the specified percentage.
Congestion consistency:
- Min Occupancy to Identify Congestion: when occupancy is over the specified percentage.
- Max Flow to Identify Congestion: when flow is under the specified flow.
A congestion consistency message will appear when these two criteria are fulfilled simultaneously.
Spatial consistency:
- Min Flow Value to Check Consistency: to determine which records to check.
- Max Distance to Check Consistency: to determine which objects to include, according to the distance to the record being checked.
- Min Flow Difference to Report Inconsistency: when the difference between two measure points that have no interference in between (no merge/diverge nor centroid connections) or when the incoming vs outcoming flow difference in the node is higher that the specified percentage.
Spatial consistency messages apply to count or flow records. The count or flow of a record in the RDS will be considered provided it is higher than the Min Flow Value to Check Consistency. It compares the value of the record with all records from the same interval within the Max Distance to Check Consistency. When the record corresponds to a partial value (not covering all the lanes of the section) data on the missing lanes will be looked for within 50m. When not found, this record will not be checked for spatial consistency.
Only in order to reach more spatial checks and as long as a node is not affected by centroid connections and includes data for all entrances and exits except one, the checker will calculate and assign the balance value for the no data section for the interval and the vehicle type that include the other inputs and outputs. This new data will be addressed as the other data entities and only be included in the check process.
The count or flow being checked is propagated until the next measuring point and directly compared if there are no geometry interferences (only section joins are encountered). Also, the possible difference of flow due to distance between the measure points is taken into account, by calculating an approximate of the storage capacity if all vehicles where stopped between these two points and assuming a density of a vehicle each 5m. So for this case, a warning report is generated when the count or flow difference is higher than the specified Min Flow Difference to Report Inconsistency. If the value difference minus the storage capacity between both points compared to the highest value is higher than the specified Min Flow Difference to Report Inconsistency then instead of the warning, an error will be issued.
Another count or flow consistency spatial check is done as well for nodes: when getting to a node where there are more options, if data is available on all entrances and exits, the incoming vs outcoming total value is then compared. If incoming vs outcoming exceeds the specified percentage in absolute value will be reported.