New Project
An Aimsun project is a set of transport model components (e.g. road sections and nodes, travel demand matrices, signal control plans...) which can be combined to form a transport model to simulate current road conditions and a set of options for future transport developments.
When starting a project with Aimsun Next, some thought should be given to the classification of the objects in the model and the use of standard descriptions. Aimsun Next uses a set of Road Types (i.e. Arterial, Freeway... Urban Road, Residential Street) and Lane types ( i.e Reserved for PT. Barred for HGV) to provide standard descriptions of the road sections in the model. Similarly, vehicles are classified by type (Car, Truck, Bus...) and by trip purpose(User Class). These classifications must be created before data is imported and before coding the model is started to ensure that the model is built on a good consistent foundation.
There is therefore, a workflow process required to create a model; to set up the model defaults, to import the background maps and if data is available, to import the road network and the demand data.
- Set up the project properties and units.
- Set up the classification types for roads and vehicles.
- Import the background images.
- Import the road network (optional, it can be manually edited) .
If the project is created in this order, then here should be no requirement to backtrack and re-edit: for example if road types were not created before data from a GIS system was imported, then there could be no automated match between GIS road types and the road types in the Aimsun traffic network.
Creating a New Project
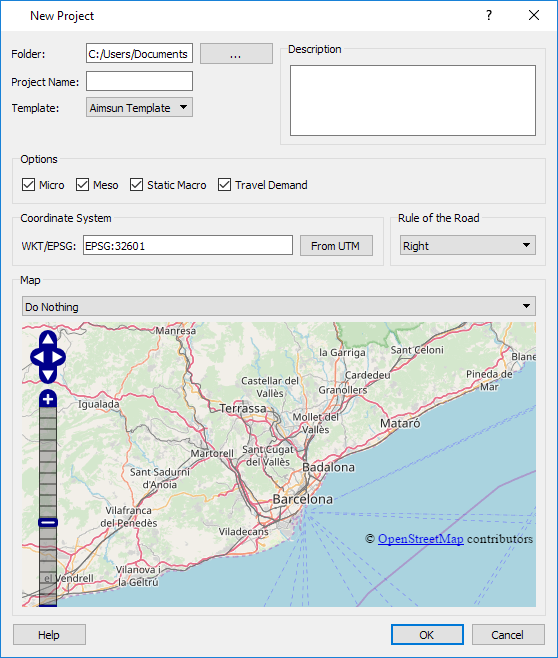
To create a new project, select New from the project menu and in the New Project Window:
- Select a file folder to hold the project.
- Select a project name.
- Enter a description - this text is written into a ReadMe.md file that is created in the same folder as the ANG document.
- Select the project scope ( Micro to Travel Demand) to display only the appropriate options in the User Interface rather than the complete set.
- Select the co-ordinate system and the rule of the road (driving side).
The key options in this dialog are to:
- Select a template from the list of templates. This creates the default properties and classifications.
- Select a background from the map. This imports a background, or can import a network. The source of the data in the New Project dialog is OpenStreetMap and there are options to import it from a file or from the Internet and to create a network, or create a background. In either case, the layering of the map information is preserved as it is imported. Refer to the OSM Import Section and the Layers Window
Background and Network Import
A traffic network can be created by manually editing it using a background map or aerial photograph as a guide to placing the road sections or junctions, or it can be imported as a road network from either an existing transport model, or from a GIS such as OpenStreetMap. The New Project dialog provides links to OSM Import, other importers can be used if required, as documented in the Importers and Exporters Section
If the model is to be edited manually, the background can be imported as the model is created as little depends on it.
If however, the model is to be created by importing a road network from a GIS, from OSM or from another Transport Model, the fundamental objects, i.e. the road and lane types should be in place before the import is done and the types described in the data file must be mapped to the types in the imported data. For example in an OSM import, if the road section types cannot be mapped to existing Aimsun types, the importer will assign the default type, which might need to be changed later – a task that could be avoided if the basic types are set up first.
Saving the Project
Once the project has been created, it can be saved in the project folder using the project name as the file name.