SCATS ITS Plug-In
The plug-in uses the SCATS ITS interface to gather data from SCATS servers. It is able to import data regarding geometry, signal timings and detector counts from SCATS into Aimsun Next. It helps to build a network representation similar to that used by SCATS.
SCATS ITS is intended mainly to provide data regarding the state of the server and geometry information on each site for visualization purposes. This geometry information is used by the plug-in to gather data on intersection layout, signal groups, detectors, etc.
Once signals on the traffic network are labeled as they are in SCATS, control plans that match those defined by SCATS can be created. Also, when detectors are labeled as they are in SCATS, Real Data Sets from SCATS logs can be imported.
Setup
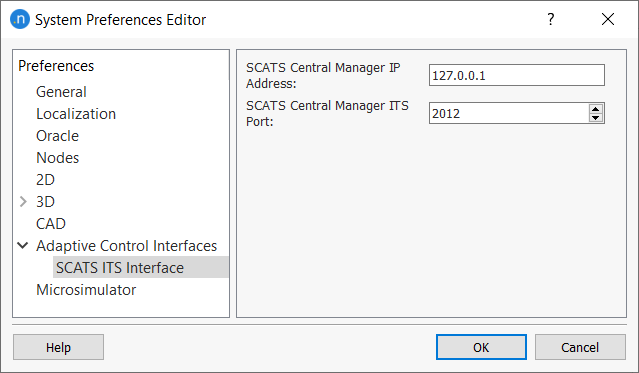
In order to communicate with the SCATS Central Manager through SCATS ITS, the plug-in needs the IP Address of the server and a valid license number and name to connect with the server. These parameters are specified in the Preferences dialog under the Adaptive Control Interfaces : SCATS ITS Interface section.
Identify objects with SCATS IDs
To import the SCATS data into an Aimsun traffic network, the relationship between objects in Aimsun Next and in SCATS needs to be established.
SCATS has internal identifiers for the objects that the server manages: SCATS Sites (intersections) have a unique ID on the SCATS Database, Similarly, detectors and Signal groups inside each SCATS Site also have an ID that identifies them within the Site they belong to. The relationship between Aimsun objects and SCATS identifiers is established using attributes, names, and external names, depending on the type of object.
This section shows how to make the links between SCATS and Aimsun objects. This process can be done manually or with the help of the plug-in by importing geometry from SCATS and performing a matching over the base network.
Identify Nodes
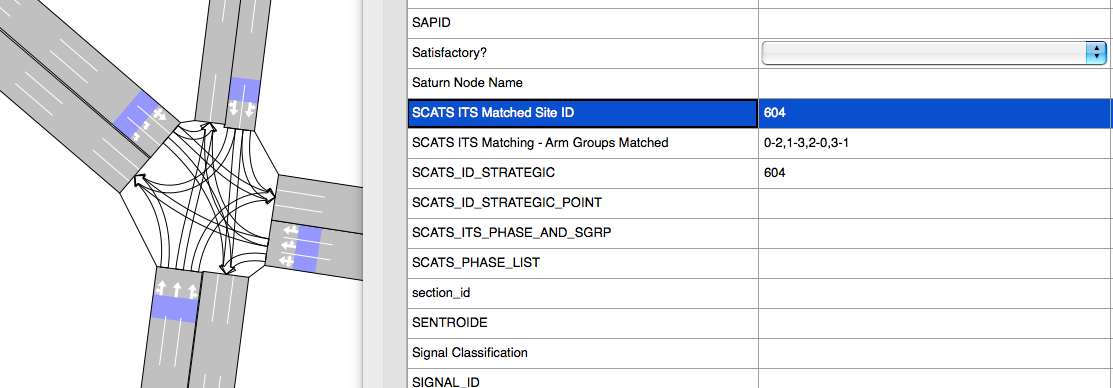
To identify the Nodes in the Aimsun traffic network as SCATS Sites, an attribute on the Node type is used. This is required both to import signal timings and detector volumes.
Identify Detectors
To import detection data from SCATS, a relationship between Aimsun detectors and SCATS detector IDs has to be built.
Detectors in the modeled network are identified as SCATS detectors by their “External ID”. It has to be composed of the Site ID and the ID of the detector in SCATS separated by an underscore:]
External ID: “SCATS_SITE_ID”_”DETECTOR_ID”
For example: Detector 13 on site 2208 should have the following external ID: “2208_13”.
Identify Signal Groups
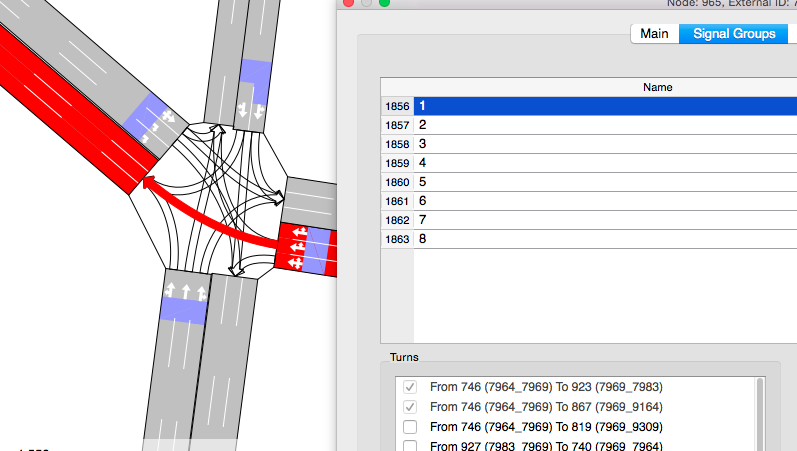
To be able to import data from SCATS regarding signal timings, the Signal Groups on each intersection have to be identified. In this case the “Name” of the signal groups is used. Therefore, on any node representing a SCATS Site, the Signal Groups in the traffic network have to have their SCATS identifier used as their “Name” in the corresponding node in the Aimsun traffic network.
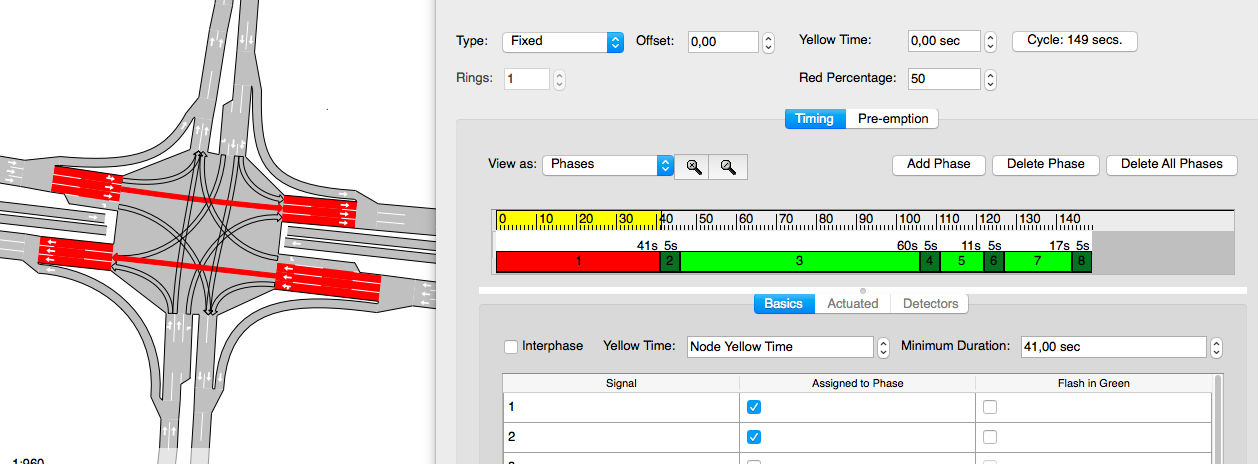
SCATS only gives the identifier of the phase activated for each time entry on the logs, without providing which Signal Groups are green. Therefore, a relationship between SCATS Phases and Signal Groups has to be built. This is done using an attribute in the modeled node. The value of this attribute is a string containing the IDs of the Signal Groups for each SCATS Phase.

In this example, the SCATS Phase “A” sets signal groups “1” and “2” to green. Phase “B” uses signals “1” and “5”, and so on.
Import Geometry
The SCATS ITS Plug-in can request SCATS information of the geometry of the SCATS sites via ITS and build a representation of them in Aimsun Next. The imported geometry is placed on a separated layer on top of the base network to make the task of checking the number of lanes, detector placement, signal group naming, etc. easier,
Depending on the information already present in the modeled network, the process can be performed in two different ways.
Using attributes
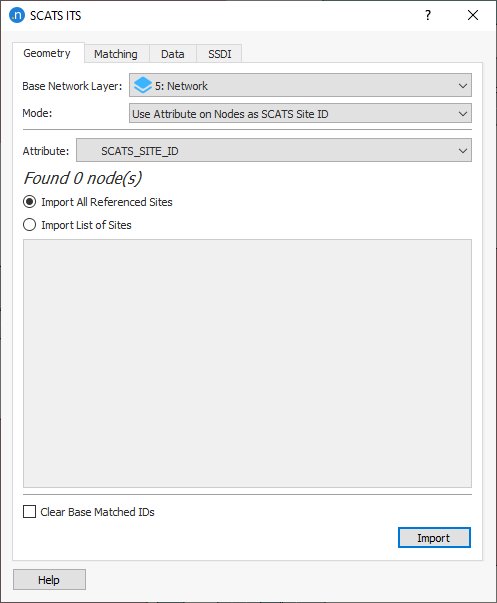
One possible situation is that some nodes are already identified in Aimsun Next as SCATS Sites. If the Site IDs are already coded as an attribute to the nodes, then this attribute can be used to import SCATS geometry on top of the identified nodes.
To do this, open the SCATS ITS Interface dialog from the Main Menu -> Tools -> SCATS ITS Interface. On the first tab Geometry, select the top layer where your network is located at. For the Mode option choose “Use attribute on nodes as SCATS Site ID”. Select the Node attribute where the Scats IDs are stored.
Using a node as reference
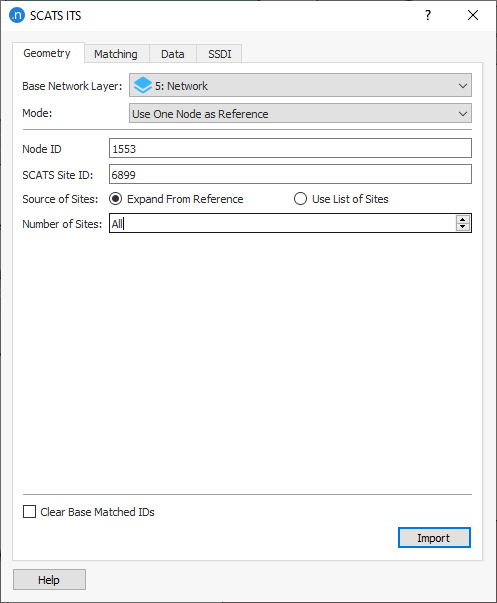
If the network does not have a SCATS Site identifier for the nodes, then on same Geometry tab on the SCATS ITS Importer dialog choose “Use one node as reference”. This importation mode allows one particular node to be set as reference for the import of the rest of the network. In this case, information about this particular site will be gathered, then information on neighboring sites will also be requested. This way, sites surrounding the reference one can be imported.
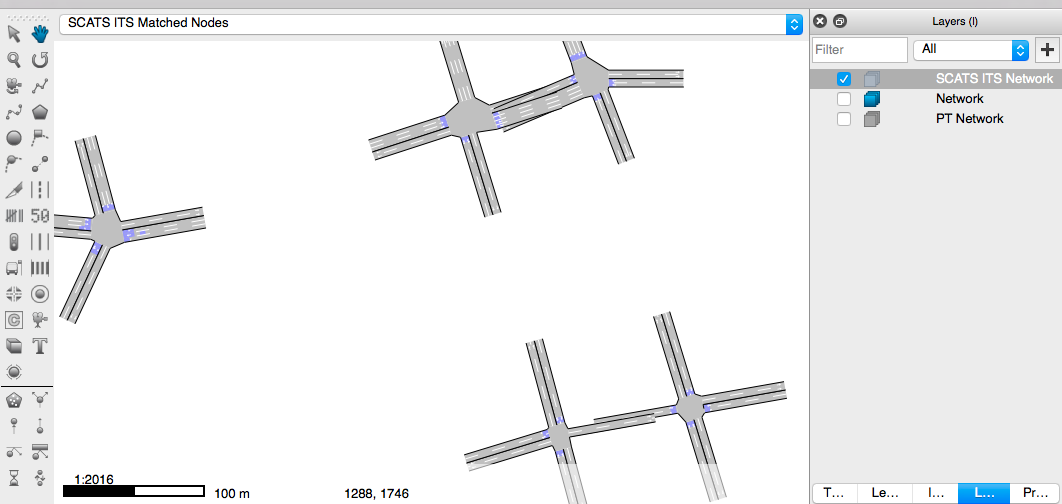
The imported geometry is always created in a special layer for the ITS Importer. This layer is identified by its external name “SCATS_NET_LAYER”.
Importing geometry also performs a matching of nodes in the underlying network with SCATS Site IDs by filling up the “SCATS_ITS_MATCHED_SITE” attribute on the nodes. You can check the matching performed by using the View Mode “SCATS ITS Matched Nodes” that the importer has created.
You may tick the option "Clear Base Matched IDs" to clear the existing value in the external column at nodes which has been selected in the Attribute field above. In the next step (matching), the process performs the matching between the SCATS Sites imported and the current network nodes.
Matching with base network
To help you in the process of finding possible mismatches between the imported SCATS geometry and your base network, as well as identifying objects in your network with SCATS identifiers, the plug-in can perform some automatic matching.
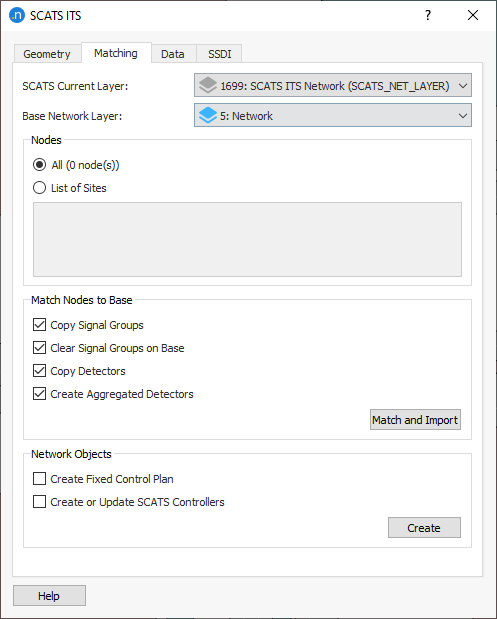
To perform the matching, first select the layer where the SCATS geometry is found and the base layer of the underlying network. Then choose between matching all the nodes identified as SCATS sites in the network or choose a subset by writing site identifiers in the text box.
Then, choose which actions the tool should perform while matching:
- Copy Signal Groups. Turns in the base network will be matched with turns in the SCATS site. After that, Signal Groups as defined by SCATS site will be created in the base network. The Signal Groups created will have the same names (usually a number) as their SCATS counterparts.
- Clear Signal Groups. If this option is chosen, the Signal Groups in the nodes of the base network will be deleted before the matching is performed.
- Copy Detectors. With this option checked the plug-in will try to create new detectors on the base network that match those in the SCATS sites. In this case, detectors are identified by its “External ID”.
As part of the matching process of the base network with SCATS information, you can also create a Control Plan based on the information found on SCATS. This Control Plan will have the phases for each site enabling the corresponding signal groups as defined by SCATS. Because no timing information is available at this point, dummy timings will be used.
Import Data from SCATS (Timings and Counts)
To import data from SCATS Servers, go to the “Import Data” tab on the ITS Importer dialog.
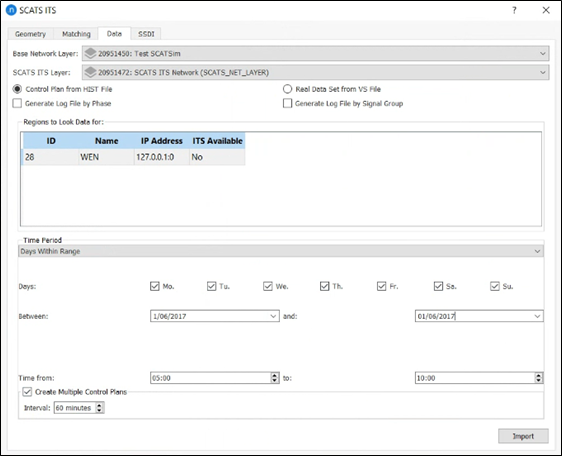
SCATS can be set up so that copies of the files stored in the Region Servers are copied periodically to the Central Manager. The plug-in can take advantage of this and query the Central Manager for historic timing files and detector count files.
SCATS stores this data in daily files for each Region. You should select which regions you would like to request the files for and the time range. The time range can be defined by selecting a starting and end dates plus a starting and end times. Specific week days can be selected to create queries such as for example: “All Mondays of a July, from 6am to 11am”.
Detector Counts (.vs files)
Once the relation between Aimsun detectors and SCATS detector identifiers is made, detection data can be imported from the SCATS logs.
In the Data tab, check the “RDS from Counts” checkbox and click the “Import” button.
The files for each day and region are requested from the server and parsed. A Real Data Set is created with mean, minimum and maximum counts and flows. This references a set of “CSV” files created by the plug-in that contain all the data gathered from the servers.
Historical Green Times (.hist files)
Once the relationship between Aimsun signal groups and SCATS identifiers as well as the signal groups activated for each phase are made, the plug-in is ready to import data from the SCATS server.
In the Data tab, check the “Control Plan from Timings” checkbox and click the “Import” button.
In this case a Control Plan is created. It references with signal timings in all the Nodes matched with SCATS sites on the network. The phases created on each control plan contain the average green time calculated for the time period provided.
Example
Let’s suppose you have a network with nodes identified by SCATS ID using an attribute named “SCATS_SITE_ID”. In this case you can import the geometry from SCATS directly on top of the nodes identified.
If you don’t need to import all the identified nodes in your network, but a subset of them, you can use one of the three following methods:
- Group them in a layer.
- Create a subnetwork and activate the filter in the view.
- Set the list of sites directly in the SCATS ITS Interface dialog.
Click on “SCATS ITS Interface” on the Tools menu. On the “Geometry” tab, select the layer where your nodes are located at. If no layer is selected all the nodes will be considered. If a layer is selected, only nodes in that layer and sublayers will be considered.
In our case, because we have the nodes already identified, we choose “Use attribute…” as “Mode”. The, we select the attribute on the nodes that contain the SCATS identifiers, in our case “SCATS_SITE_ID”. Once the dialog is filled, click the “Import” button.
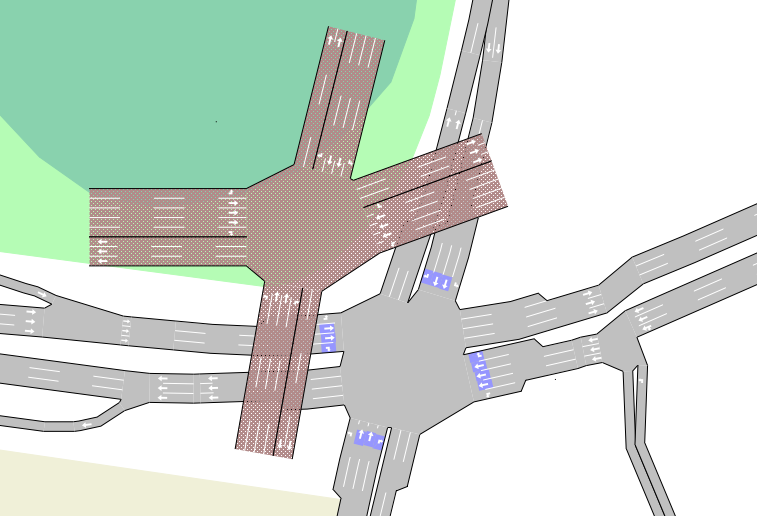
Once the SCATS ITS Interface has gathered and parsed the data, the SCATS geometry will appear in a new layer named “SCATS ITS Network”.
At this point, you can check the imported geometry and compare it with the base network.
Next step is to perform the matching process. This will try to match sites on the “SCATS ITS Network” layer with the base network and copy information such as signal groups and detectors to it.
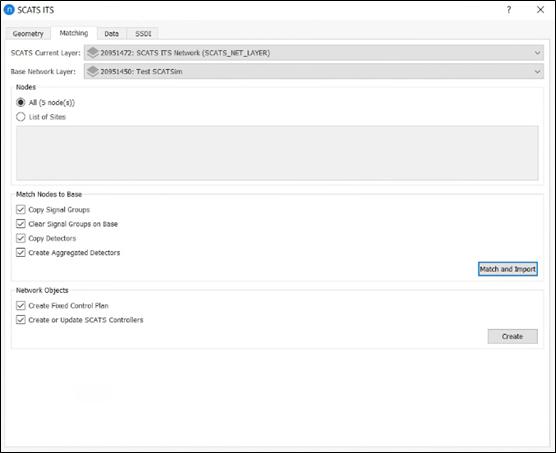
To proceed with the matching, open the “Matching” tab on the “SCATS ITS Interface” dialog. Select the layer with the geometry of the sites that was created in the previous step as well as the layer that contains the Nodes on the base network.
You can also select whether you want detectors and signal groups to be copied to the base network. Click on “Match and Import”.
Once the matching process has finished, the plug-in will have created and filled signal groups in the nodes on the base network and copied the detectors, depending on the options you had chosen.
Due to the mismatch between the geometry in the SCATS layer and the base network it is very likely that parts of the matching process could not be performed properly. To check for problems and mismatches, the plug-in writes messages on the Log window and creates attributes with statistics on the nodes. Some View Modes to show this statistics are also created. You can use this view modes to visually locate the nodes that present a higher ratio of failure in the matching process.
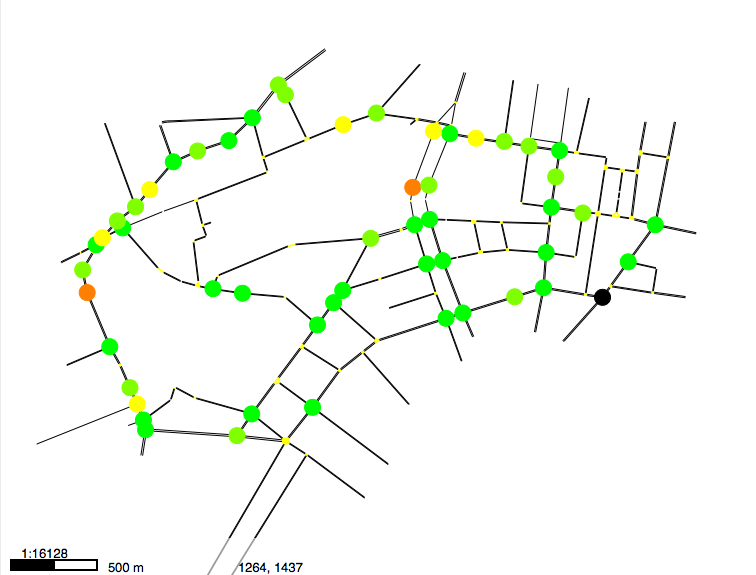
The View Modes created are the following:
- SCATS ITS Matching - Arms. Shows the ratio of arms that could be matched on each node.
- SCATS ITS Matching - Detectors. Shows the ratio of detectors that could be copied to the base sections.
- SCATS ITS Matching - Turns. Shows the ratio of turns that could be matched in the base node.
Once you have checked that the signal groups on the base network are properly defined and contain the right turnings, next step is to create a Control Plan as defined by SCATS on the base network. To do this, fill the “Matching” tab with the layers and sites to consider as in the previous step, select the “Create Control Plan” checkbox and click the “Create” button.
A Control Plan named “SCATS ITS Fixed” is created. This Control Plan is linked to the nodes on the base network and holds the data on phases as described by SCATS.

Annex: Granting access to the Central Manager through ITS
One the SCATS Central Manager license has been set up and is running, we can set it up so it allows external applications to query the server through ITS.
- Double click in the Central Manager/ScatsAccess.exe to open the SCATS Access application.
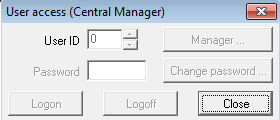
- After a couple seconds the “Manager” square on the top right corner turns green. If it does not, make sure that the Central Manager is running and the IP address is correct.
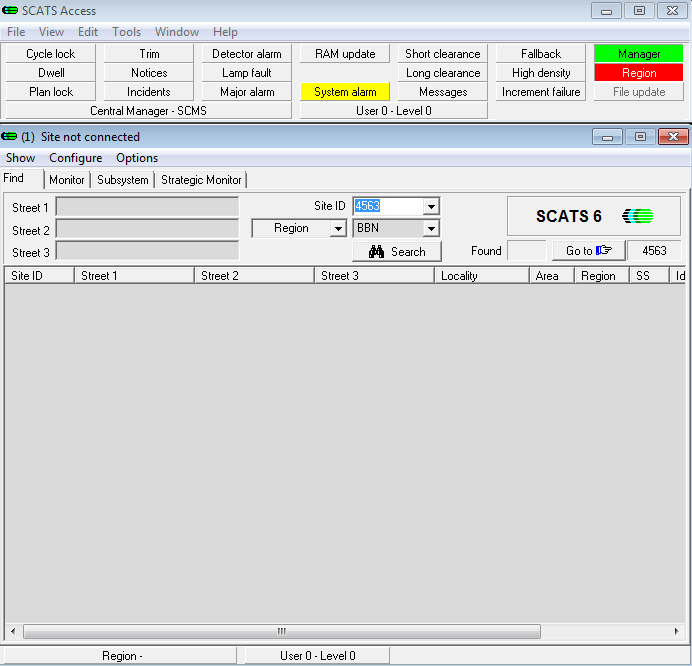
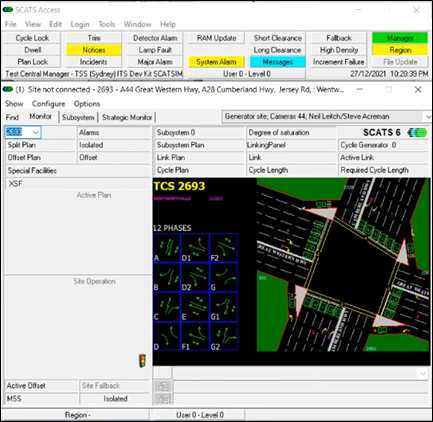
- In the Site ID set the desired SCATS Site ID (i.e: 2693) to visualize. The Region field will be filled automatically (i.e.: WEN).
- Select Search
- At this point, you can validate that the detectors have been imported correctly from the SCATS Database by checking their IDs with the External ID of the imported detectors in Aimsun Next. You can also validate that the signal groups are associated to the correct phases in the Aimsun Next network.
.Hist & .VS files
These files need to be located under the Central Manager’s directory tree in a structure like the following. (In this case BBN and CA1 are Region names). Restart the server after adding or removing files.
|
Central Manager
|
|--- Regions
|          |
|          |---- BBN
           |        |
           |        |--- SCATSData
                    |               |
                    |               |--- History
                    |               |        |
                    |       |       |--- BBN_20141001.hist
                    |       |       |--- BBN_20141002.hist
                    |       |       |---  [.. more hist files ..]
                    |       |
                    |       |--- Vs
                    |               |
                    |               |--- BBN_20141001.VS
                                    |                       |--- BBN_20141002.VS
                                                            |                       |--- [.. more vs files ..]
           |
           |---- CA1
           |       |
           |       |--- SCATSData
                   |                |
                   |                |--- History
                   |                |        |
                   |        |       |--- CA1_20141001.hist
                   |        |       |--- CA1_20141002.hist
                   |        |       |---  [.. more hist files ..]
                   |        |
                   |        |--- Vs
                   |                |
                   |                |--- CA1_20141001.VS
                                    |                        |--- CA1_20141002.VS
                                                             |                      |--- [.. more vs files ..]