Detector Location
Whenever detector data is to be used as an input to any process, mainly for a Static OD Adjustment, it is important to know to what extent the detection data available is providing significant information on the network traffic. Based on the percentage of intercepted demand covered by the working detection sites, the Detector Location tool can be used to evaluate the relevance of the current detection sites locations, or to work out an improvement of the current configuration by proposing new detectors to be added which would complement the current configuration, or even to produce a completely new configuration from scratch if there are no detection sites located on the network yet.
New detector locations are picked out by maximizing the amount of trips still not intercepted by any other detector in the network.
Note about licenses: This functionality requires an Aimsun Next Pro TDM, Aimsun Next Advanced or Aimsun Next Expert Edition.
Inputs
The Detector Location feature is accessed from menu Project: New, Infrastructure: Detector Location. A new Detector Location Object will be created in the Detector Locations folder located inside the Infrastructure folder in the Project window.

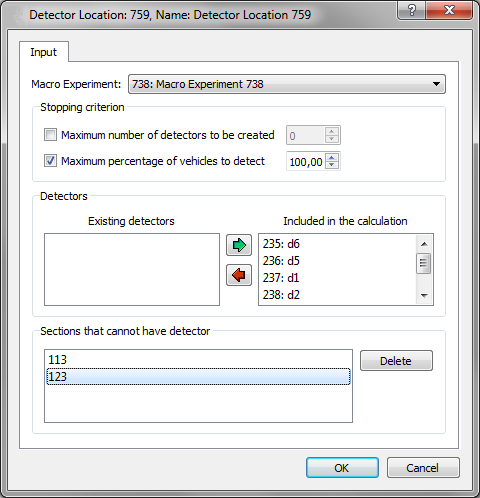
Double-click on a detector location object to bring up the object editor which contains:
- The Static Assignment Experiment to be used. In order to be able to calculate a detector location, the selected Static Assignment Experiment must already have results for sections, turns and paths, prior to the Detection Location execution.
- The Stopping Criterion. The maximum number of new detection sites to be added or the percentage of intercepted demand that must be achieved is set. If both criteria are selected, then the process will stop when either of them is met. If the maximum number of detectors is the only criterion used and it is set to 0, the result obtained will be the information about the percentage of trips intercepted by the already existing (included in the calculation) detectors.
- From the list of detectors defined in the network, specify which of them are considered in the calculations. That is, for example, if some detectors are defined in the model but are not working on the real network, they should not be included. The list of existing detectors initially contains all the detectors in the network. Select on the list the ones that must be included and press the green arrow to add them to the list on the right.
- The list of sections that must not be considered as candidates for a new detector. Specify if there is any section in the network that cannot contain a detector. Sections are added to this list by clicking on them at the 2D view of the network. To remove them from the list, select them on the list and press the Delete button.
When all the parameters are entered, the process is executed by right clicking on the Detector Location in the Project window and choosing Calculate Detector Location.
The calculations are made taking into account the section volumes obtained from a Static Traffic Assignment of the demand on the network and the paths followed. That means a Static Assignment Experiment with the path calculation activated must already have been executed before starting the Detector Location calculation. If the Static Assignment Experiment hasn't been previously executed, or its results have not been retrieved, when trying to execute the Detector Location a warning message will pop up. Also, if the experiment has been executed but paths calculations were not activated, a warning message will be shown, as paths results are needed in order to execute the Detector Location calculations.
Outputs
At the end of the calculation, the dialog in the figure below appears:
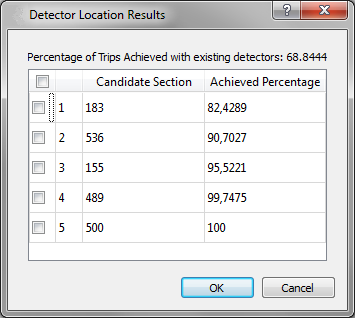
The information shown in the table is the list of sections selected for the placing of a new detector and their corresponding cumulative achieved percentage of trips intercepted by the set of already considered detectors and the new locations calculated up to that section (from top to bottom). Ticking a Candidate Section implies the automatic creation of a detector on that section after pressing the OK button. The sections listed in a purple background are sections that already have a detector on them; sections listed in a white background are sections that do not have any detector defined.
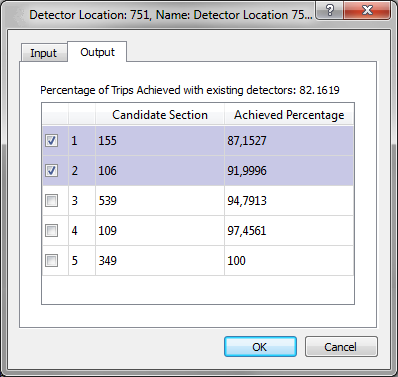
The results of the Detector Location can be consulted at any time, by opening the Detector Location editor. The Outputs to Generate folder (see figure below) lists the Candidate Sections, the cumulative achieved percentage of intercepted trips, the information of whether a detector was created on that section after the detector location algorithm execution (the ones ticked) or not, and the sections that currently have a detector on them (the ones with a purple background in the list).
Algorithm
The procedure to calculate the list of candidate detector locations is:
- Based on the assignment results of the Static Assignment Experiment and on the list of detectors to be included in the calculation, all trips (or equivalently, all paths) intercepted by these detectors are added up and not taken into account any more. The percentage of deleted trips in comparison with the total amount of trips of the demand is calculated.
- From the selectable sections, the one with a higher number of the remaining trips (yet to be intercepted) is chosen and added to the candidates list. Trips through this section are added to the accumulated percentage of intercepted trips calculation and are not taken into account any more.
Step 2 is repeated until one of the stopping criteria is matched.
Note that Transit vehicles and Additional Volumes are not included at all in any Detector Location calculation.