Map Outputs Preferences
Color Ramps
A color ramp is a predefined group of colors used by Aimsun Next to color a group of objects when drawing in a 2D view depending on an object's attribute. They are also used to color the selected object.
Several default color ramps are available. These are:
- MARK_COLORS: defined in the mark.xml file and used, for example, to color the selected objects.
- TIME_SERIES_WIDGET: defined in the lines.xml file and used when drawing the time series graphics.
- ASSIGNED_VOLUMES: defined in the assignedVolumes.xml file and used in the Macro component when showing the static assignment results.
The color ramps are defined in XML files that are located in the Program Files/Aimsun/Aimsun Next X.X/shared/color_ramps folder. There is an XML file for each color ramp.
The way to change the colors in a color ramp is to edit directly the XML file. The format of the color ramps XML files is:
<color_ramp name="RAMP_NAME" type="RAMP_TYPE" coded="RAMP_CODED">
<color>COLOR_DATA</color>
<color>COLOR_DATA</color>
...
</color_ramp>
where:
RAMP_NAME: it is the name of the ramp.
RAMP_TYPE: it is the color space to be used when interpolating, either RGB or HSV.
RAMP_CO/DED: how colors are specified, either HEX or DECIMAL
COLOR_DATA: the color information. The format varies according to RAMP_CO/DED:
HEX: #RRGGBB, where:
- RR is the hexadecimal red component from 00 to ff
- GG is the hexadecimal green component from 00 to ff
- BB is the hexadecimal blue component from 00 to ff
DECIMAL: RRR GGG BBB (space separated), where:
- RRR is the decimal red component from 0 to 255
- GGG is the decimal green component from 0 to 255
- BBB is the decimal blue component from 0 to 255
Note that colors are specified in RGB. The RAMP_TYPE is used only in the interpolation.
Example 1: a gray ramp using HEX
<color_ramp name="GRAY" type="RGB" coded="HEX">
<color>#000000</color>
<color>#ffffff</color>
</color_ramp>
Example 2: a gray ramp using DECIMAL
<color_ramp name="GRAY" type="RGB" coded="DECIMAL">
<color>0 0 0</color>
<color>255 255 255</color>
</color_ramp>
Microsimulation Outputs
The output preferences for microsimulation models relate to vehicles, view setup(Bookmarks) and more extensively to 3D views.
Vehicles
Aimsun Next Microsimulator preferences are accessible from the Preferences command in the Edit menu, which opens the Model Preferences Editor and can be found under the Microsimulator option. See the Preferences section for details on the Preferences editor and all the other options.
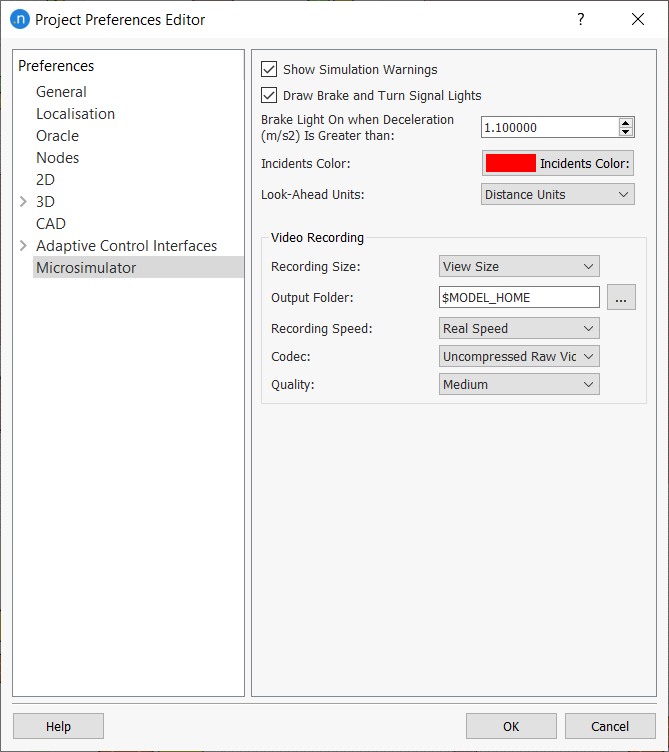
The Aimsun Next Microsimulator preferences are related to the microsimulator models, drawing and video recording. They are:
-
Show Simulation Warnings: When checked, all the messages produced by the simulator will be shown in the Log Window during a simulation.
-
Draw Brake and Turn Signal Lights: When checked, the brake and turning indicator lights of vehicles will be drawn in the 2D view. Unchecking this option will result in slightly faster drawing.
-
Brake Light on When Deceleration (m/s2) is Greater Than: Vehicles will be drawn braking in 2D views when their deceleration is greater than the specified value
-
Incidents Color: Color used to draw incidents in 2D and 3D views. When clicking on the color rectangle a color picker dialog will appear.
-
Look-Ahead Units: The look-ahead model parameters can be specified either in time in seconds or in distance units, meters or feet.
-
Video Recording preferences:
- Recording Size: Select a size (PAL, NSTC, 720p, 1080p) from the drop-down list.
- Output Folder: Click
 and locate the folder where you would like to save the video. Videos will be saved here as video_XXX.avi, where XXX is the ID of the replication or result being recorded. If more than one video for the same replication is recorded, then the file names will be appended with -1, -2, -3 and so on.
 - Recording Speed: Select a speed (Quarter, Half, Real, Double, Quadruple, Octuple) from the drop-down list.
- Codec: Select a codec (Uncompressed, MPEG-4, H.624, WebM) from the drop-down list.
- Quality: Select a level of compression (Very Low, Low, Medium, High, Very High).