Traffic Demands
A Traffic Demand object is a collection of OD Matrices or Traffic States, but not a mixture of both, which can be placed as a single object in different scenarios. A Traffic Demand object is convenience object intended to simplify the process of managing demand states and facilitate allocating them consistently across scenarios. It also allows some editing of the timing of the demand.
In Aimsun Next, both the Traffic States and the OD matrices are created for a single vehicle type (plus trip purpose in the case of OD matrices, that is, for a single user class) and for a single time interval. Several OD matrices or Traffic States will be grouped into a Traffic Demand which thus contains traffic data for several vehicles (or several user classes) and time intervals and are used as input for one or more Scenarios.
This is a similar method to that used to apply different signal control scenarios with a Master Control Plan A set of test scenarios can quickly be developed mixing different demand and control options by selecting the appropriate Traffic Demand and Master Control Plan.
A Traffic Demand can be created by accessing the New…/ Demand Data / Traffic Demand command either in the Project Menu, the Demand Data folder context menu in the ProjectWindow or in the Traffic Demand folder context menu. Once done, a new traffic demand will be added to the Traffic Demands folder in the Project Window.
Editing Order
The order for editing Traffic Demand data is:
- Create and edit the Vehicle Types to be used.
- Create and edit the OD matrices or the Traffic States that will be used for each vehicle type and time interval.
- Create a new Traffic Demand and assign to it the appropriate OD matrices or the Traffic States.
Also, before Macro, Meso, Hybrid or Micro simulations are used:
- Assign the Traffic Demand to a Scenario.
- If required, assign values to variables in the Scenario or in the Experiments.
Traffic Demand Editor
Open the Traffic Demand editor by double clicking on the traffic demand in the Project Window.

Main tab
First, select whether the Traffic Demand will be composed of OD matrices or Traffic States.
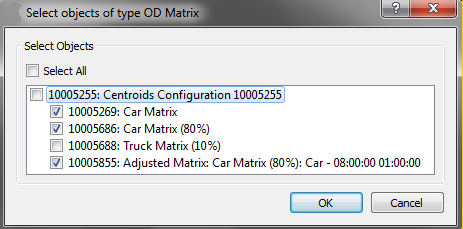
The time interval where this Traffic Demand will be applicable can be defined modifying the Initial Time and Duration. To add a demand item, that is, either an OD matrix or a Traffic State, press the Add Demand Item button. A list of all the OD matrices grouped by Centroid Configurations or all the Traffic states will be shown from which the demand item is selected. Selection can be single items, all items, or if a Centroid Configuration is selected, all of its OD matrices are automatically selected.
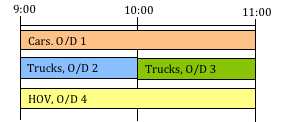
Once selected, the item will be added to the timing diagram. Click on the item in the diagram to select it when it can be scaled and moved to fit in the desired interval.
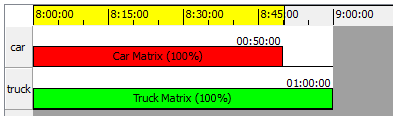
Press the Add Demand Item and repeat all the steps as many times as demand items must be added. As the Traffic Demand items are defined for a single vehicle type, there will be a line in the timing diagram for every vehicle type selected in the added items.
To remove an item, just select it in the timing diagram and press the Remove Demand Item button.
There is also an option to modify the initial time and duration of an item without moving or scaling it in the timing diagram but by entering times in the Demand Item properties folder once it is selected.

NOTE: when using OD Matrices, the duration defined for each demand item in the Traffic Demand will be the duration used to enter all the trips defined in the OD matrix. Therefore, if an OD matrix of 6,000 trips from A to B with duration of 2 hours was defined, and the demand item is defined for one hour, then the dynamic simulators will try to put 6,000 vehicles in one hour. Change the Factor to multiply any OD matrix or Traffic State by a factor to increase or decrease the flow or number of trips without modifying the item itself to adjust this.
There is also a global factor that affects all the items in a Traffic Demand.
These factors can be a percentage or a variable. If a percentage is used, Set 100 % to use all the trips, 50 % to use half the trips, 120 % to generate 20 % more trips than the number found in the OD matrix or traffic state, etc. If it is a variable, the percentage value to be used (100 %, 120 %, 80 %,...) will be set at the scenario or the experiment level as documented in the variables tab of static or dynamic scenarios and experiments.
When the Traffic Demand is based on OD Matrices, a Traffic Arrivals object can be also specified to be used in a dynamic simulation. This adds vehicles to the simulation from a list generated either by a prior dynamic simulation or externally generated from other data sources. Traffic Arrivals cannot be included in a Traffic Demand which uses Traffic States.
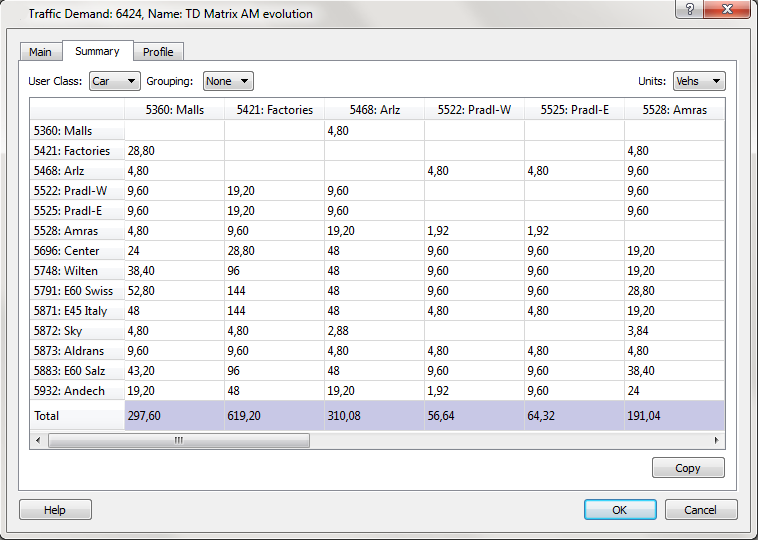
Summary Tab
The Traffic Demand editor includes a Summary tab with the total number of trips per OD pair for each user class. Note that the summary does not take into account factors defined as variables (as the final value depends on the chosen scenario).
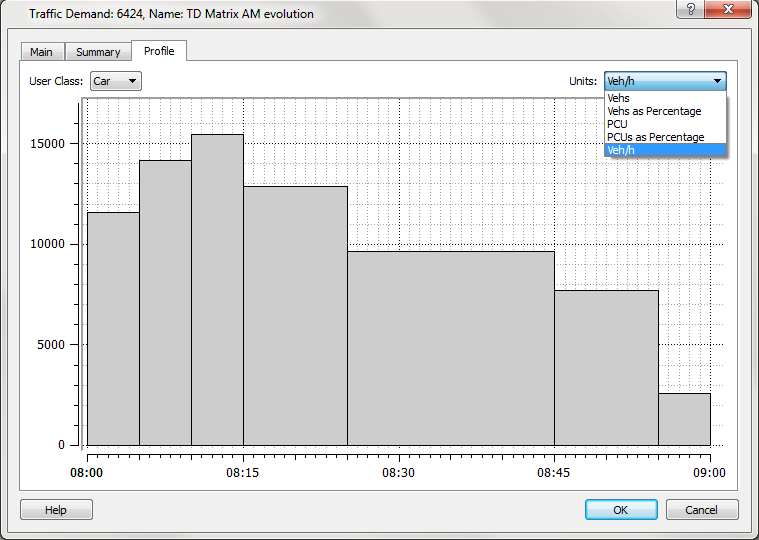
Profile tab
The Profile tab shows the demand profile, that is, a diagram showing the total number of trips of each of the matrices in the demand, for each user class.
Traffic Demand Comparison 
Two Traffic Demand objects can be compared in the same way as two OD Matrices can be compared by selecting two demands and right clicking the context menu. The differences between the two Traffic Demands are presented as a table or as a graph and can be grouped by centroid grouping or filtered by centroid group.