Master Control Plans
A Master Control Plan is a collection of Control Plans which are assigned to a scenario and used to control the signals in that scenario. Assembling a set of Control Plans into a single Master Control Plan eases the task of assembling different scenarios with different control options and keeping those control options consistent.
Each node must have a number of signal groups; these are the same across all control plans for that node. The node can then be linked to one or more Control Plans which can, if required, have different sets of timings for that node. Control Plans can be applied sequentially over time or applied in different areas of the network.
The Control Plans are then assembled into a Master Control Plan which is linked to a scenario in the project. Different master plans with different sets of control plans are in effect the control options that can be applied to the transport scenarios being tested in the project.
This is a similar method to that used to apply different demand scenarios with Traffic Demands. A set of test scenarios can quickly be developed mixing different demand and control options by selecting the appropriate Master Control Plan and Traffic Demand.
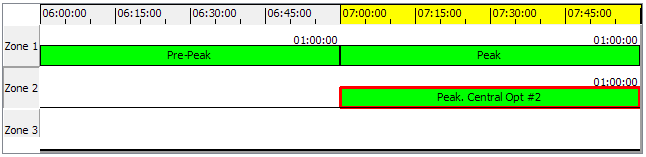
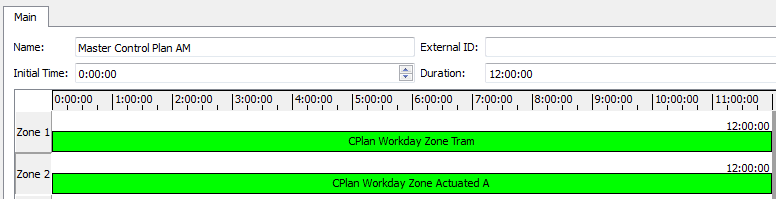
For example a large network might have:
- A control plan for the pre-peak period covering the whole network
- A control plan for the peak period covering the whole network
- A number of test plans for a central zone in the network
The Master Control plan for one of these scenarios is shown below where "zone 2" is the central zone.
Creating a new Master Control Plan
To create a new Master Control Plan, either:
- Select Project > New > Control > Master Control Plan.
Or
- In the Project window, right-click Control > New > Master Control Plan.
A new Master Control Plan will be added to the Master Control Plans folder in the Project window.
Master Control Plan editor
Double-click on the Master Control Plan in the Project Window or open its context menu and select the Properties option to open the editor.
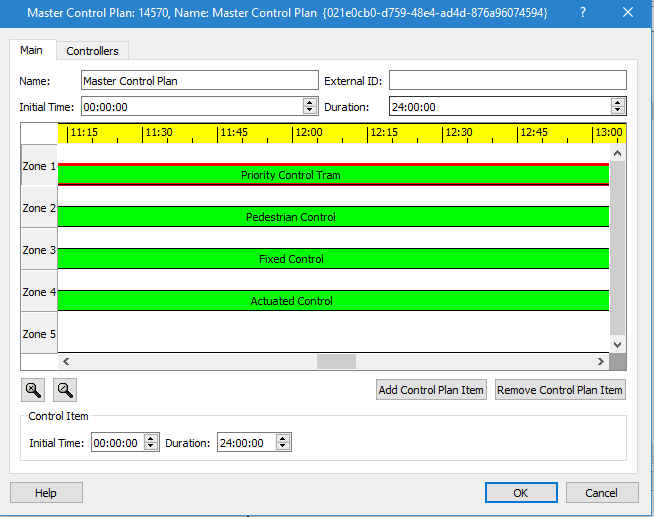
The initial time and the duration when this Master Control Plan will be applied can be defined here. To add Control Plans, press the Add Control Plan Item button. This will present a list of all the Control Plans and the set to be included in this Master Control Plan can be selected.
If more than one Control Plan is selected, they will be added to the timing diagram using their Initial time. The duration of each Control Plan will be the time between its initial time and the next Control Plan's initial time, except for the last one which duration will be set to one hour. If only one plan is selected, it will be treated as if it was the last Control Plan. Click on any plan to select it, then move it to the required time period if needed. The initial time and duration can also be edited in the Control Item area of the dialog.
When adding more Control Plans when their initial time is not available, they will be added with their initial time as the end of the last Control Plan added.
To remove an item, select it in the timing diagram and press the Remove Control Plan Item button.
Control Item OCIT Parameters
When a Control Plan Item is associated with a node that is listed as part of a Controller object, extra OCIT parameters are revealed when you click on the item. They appear in the Control Item group box under OCIT. The screenshot below shows the default selections. When ticked, they include or activate the labeled item.

- Central Control: Activate/deactivate the central controller (Sitraffic or VS-PLUS, etc.)
- Individual Traffic: Include/ignore private vehicles
- Transit Prioritization: Include/ignore transit telegram
- Partial Intersection 1, 2, 3, 4: Activate/deactivate partial intersections.
Master Control Plan Zones
When dealing with large networks, Control Plans can be created for different areas, each one with a different collection of intersections. These areas are allocated to Master Control Plan zones. Select the zone by clicking on its label to add the Control Plan to it; each time the first Control Plan is selected for a zone, a new empty zone will appear below it in the Master Control Plan editor.
Control information is processed from top to bottom, from the first to the last zone. If two control plans contain information for the same node different that Unspecified, the last one will prevail.
Controllers
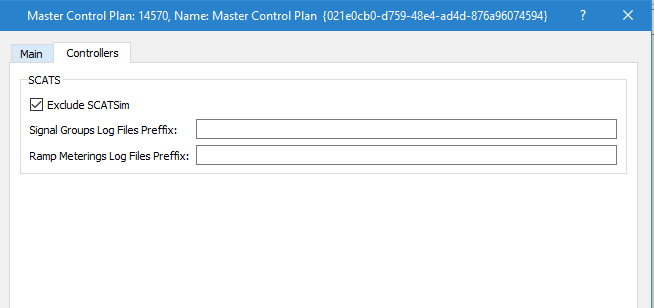
A controller can be linked to a SCATSim external controller which uses a "hardware in the loop" simulation to include the effect of running SCATS within the simulation. This requires that a SCATSim system is available as the simulation is run and that is it linked to the simulation. This is not always possible, hence the SCATS Log files can be used to control the signals instead. These must have been saved in a previous simulation using a SCATSim with a prefix determined in the Scenario Editor.
Selecting the Exclude SCATSim option switches the SCATS control from SCATSim to the log files.